


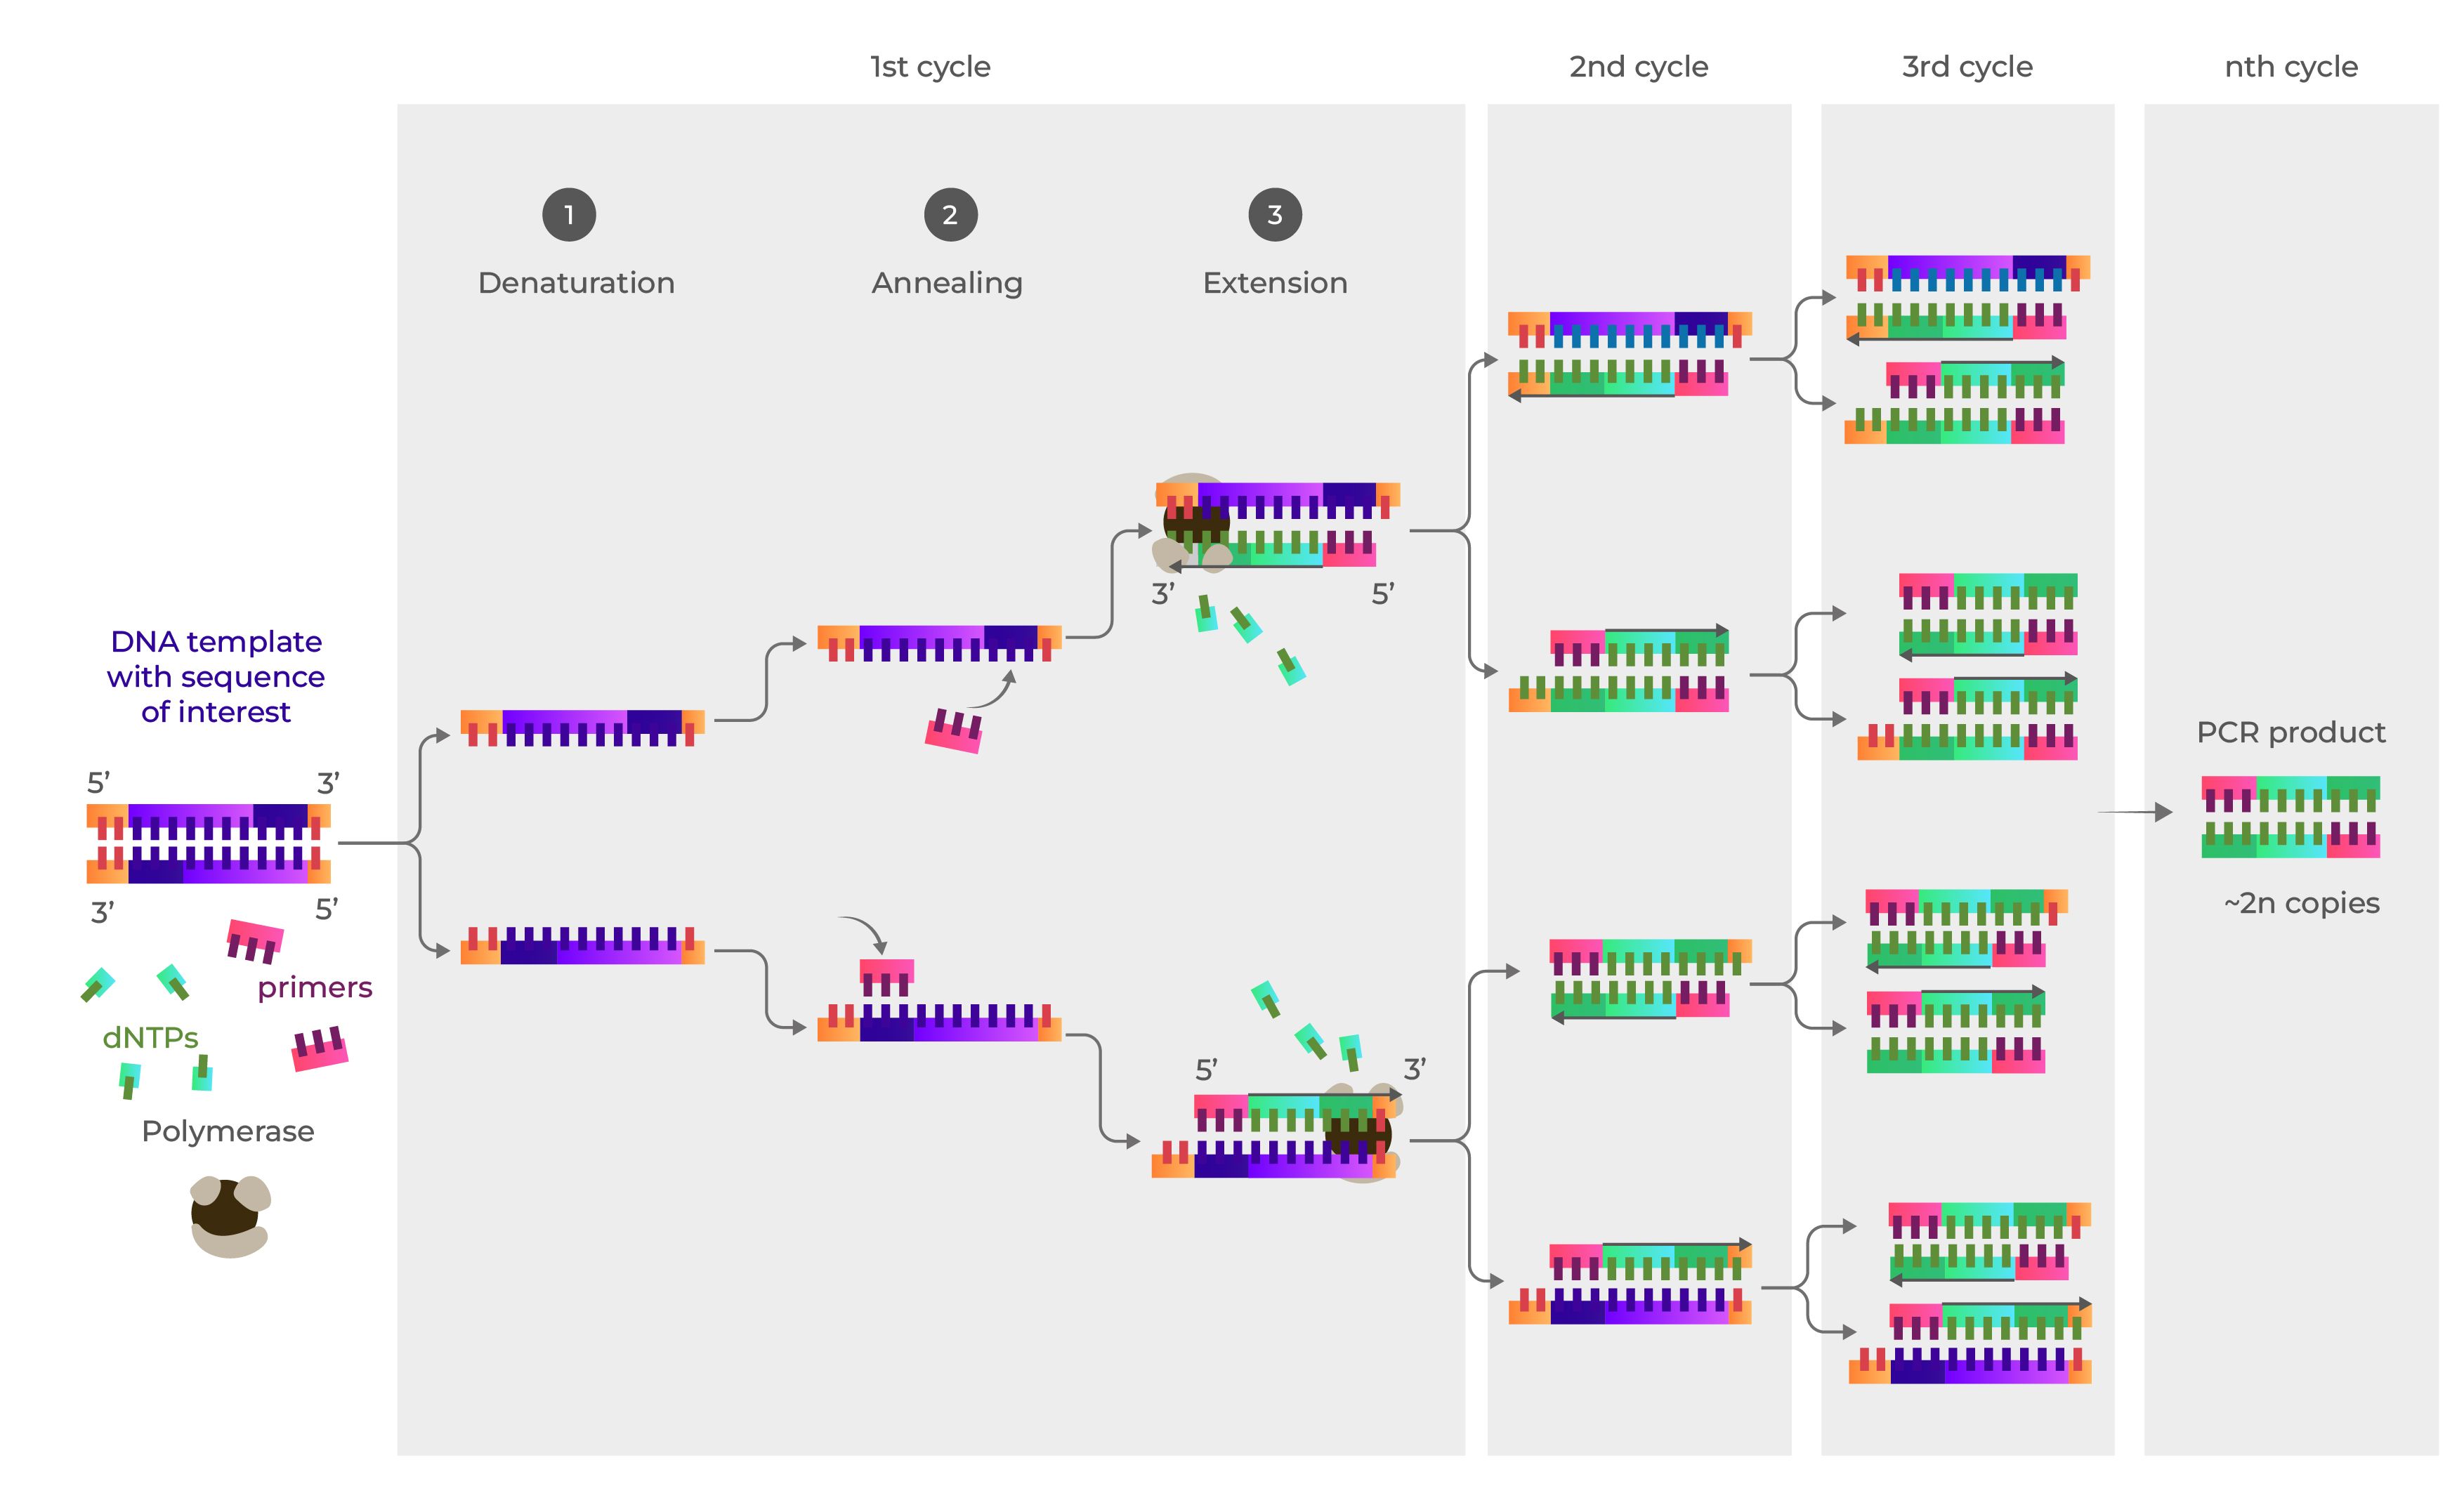
Overview of Polymerase Chain Reaction (PCR): The following description provides a comprehensive summary of the Polymerase Chain Reaction (PCR). The first illustration outlines the crucial components involved in PCR: a DNA template, specific primers, deoxynucleoside triphosphates (dNTPs), and a DNA polymerase enzyme.
The subsequent visual elaborates on the PCR cycle, segregated into three distinct stages. In the denaturation phase, the double-stranded DNA (dsDNA) is separated into two single-stranded DNA (ssDNA) molecules. The annealing phase involves the attachment of primers to the DNA template, driven by the principle of complementary base pairing. Lastly, during the extension phase, dNTPs are added to the 3’ end of the primers, complementing the template and resulting in the conversion of ssDNA back into dsDNA.
As the illustrations progress, it becomes evident that with each cycle, the quantity of DNA doubles, starting from one copy to two, then two to four, and so on. Thus, the number of DNA copies grows exponentially, with the final quantity calculated as 2^n, where 'n' represents the number of cycles conducted.
Mendelgen Tutorial: With mendelgen, simulating PCR is simple and straightforward.
Follow the steps outlined below.
Follow the steps outlined below.
- Open mendelgen, https://mendelgen.com/, and sign in.
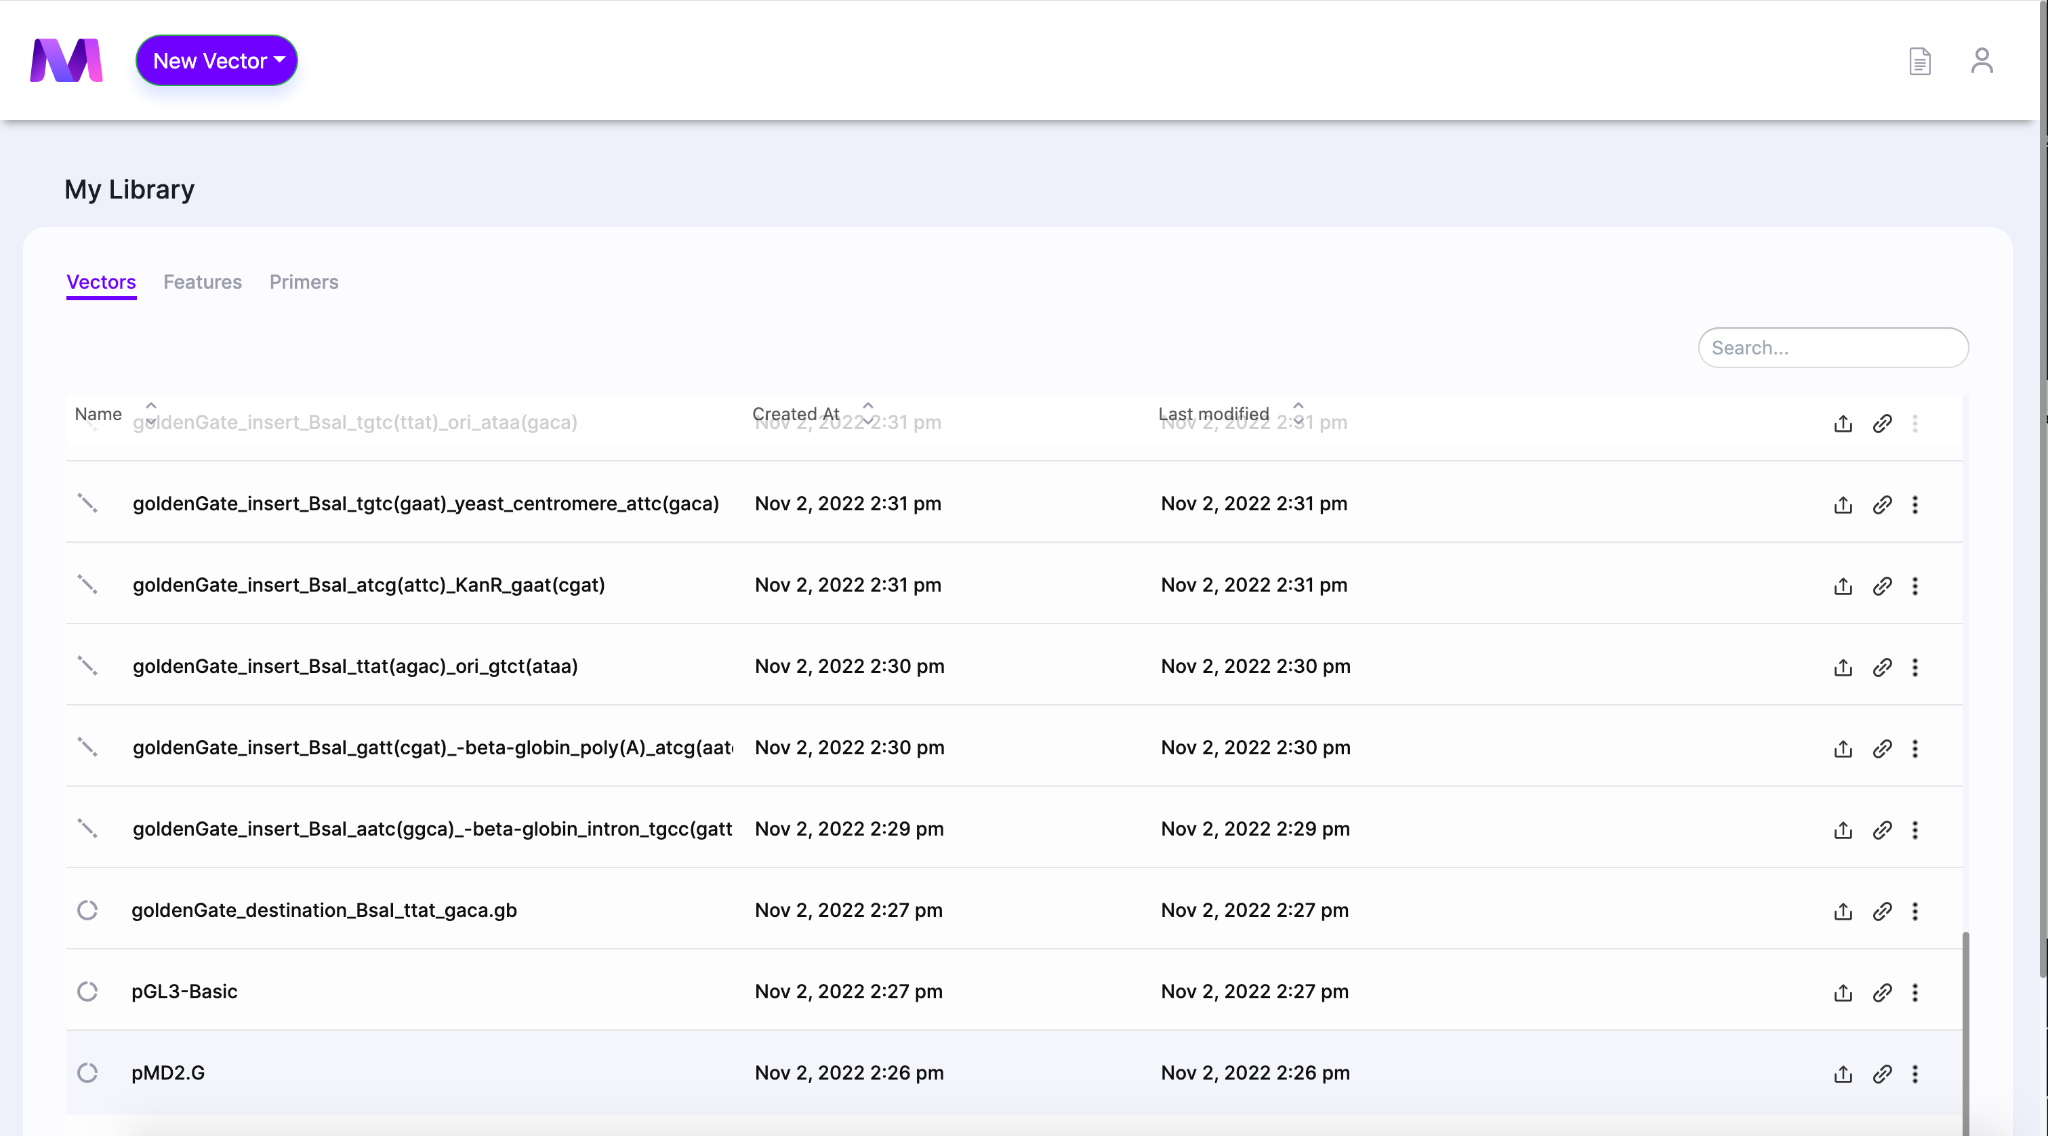
- Select a vector from your library to be the DNA template. The template contains the region of interest you want to amplify using PCR.
- The Mendelgen dashboard is shown below
- When the page opens the DNA template will be shown in the viewer on the left side of the screen.
- The Mendelgen dashboard is shown below
- Click ‘Tools’ on the top right of the page in the purple bar and select ‘PCR’ in the drop down.
- A tab will open to the right of the viewer titled ‘Create a PCR Product’.
- Shown below, ‘Tools’ is clicked with the PCR option highlighted and the PCR tab open.
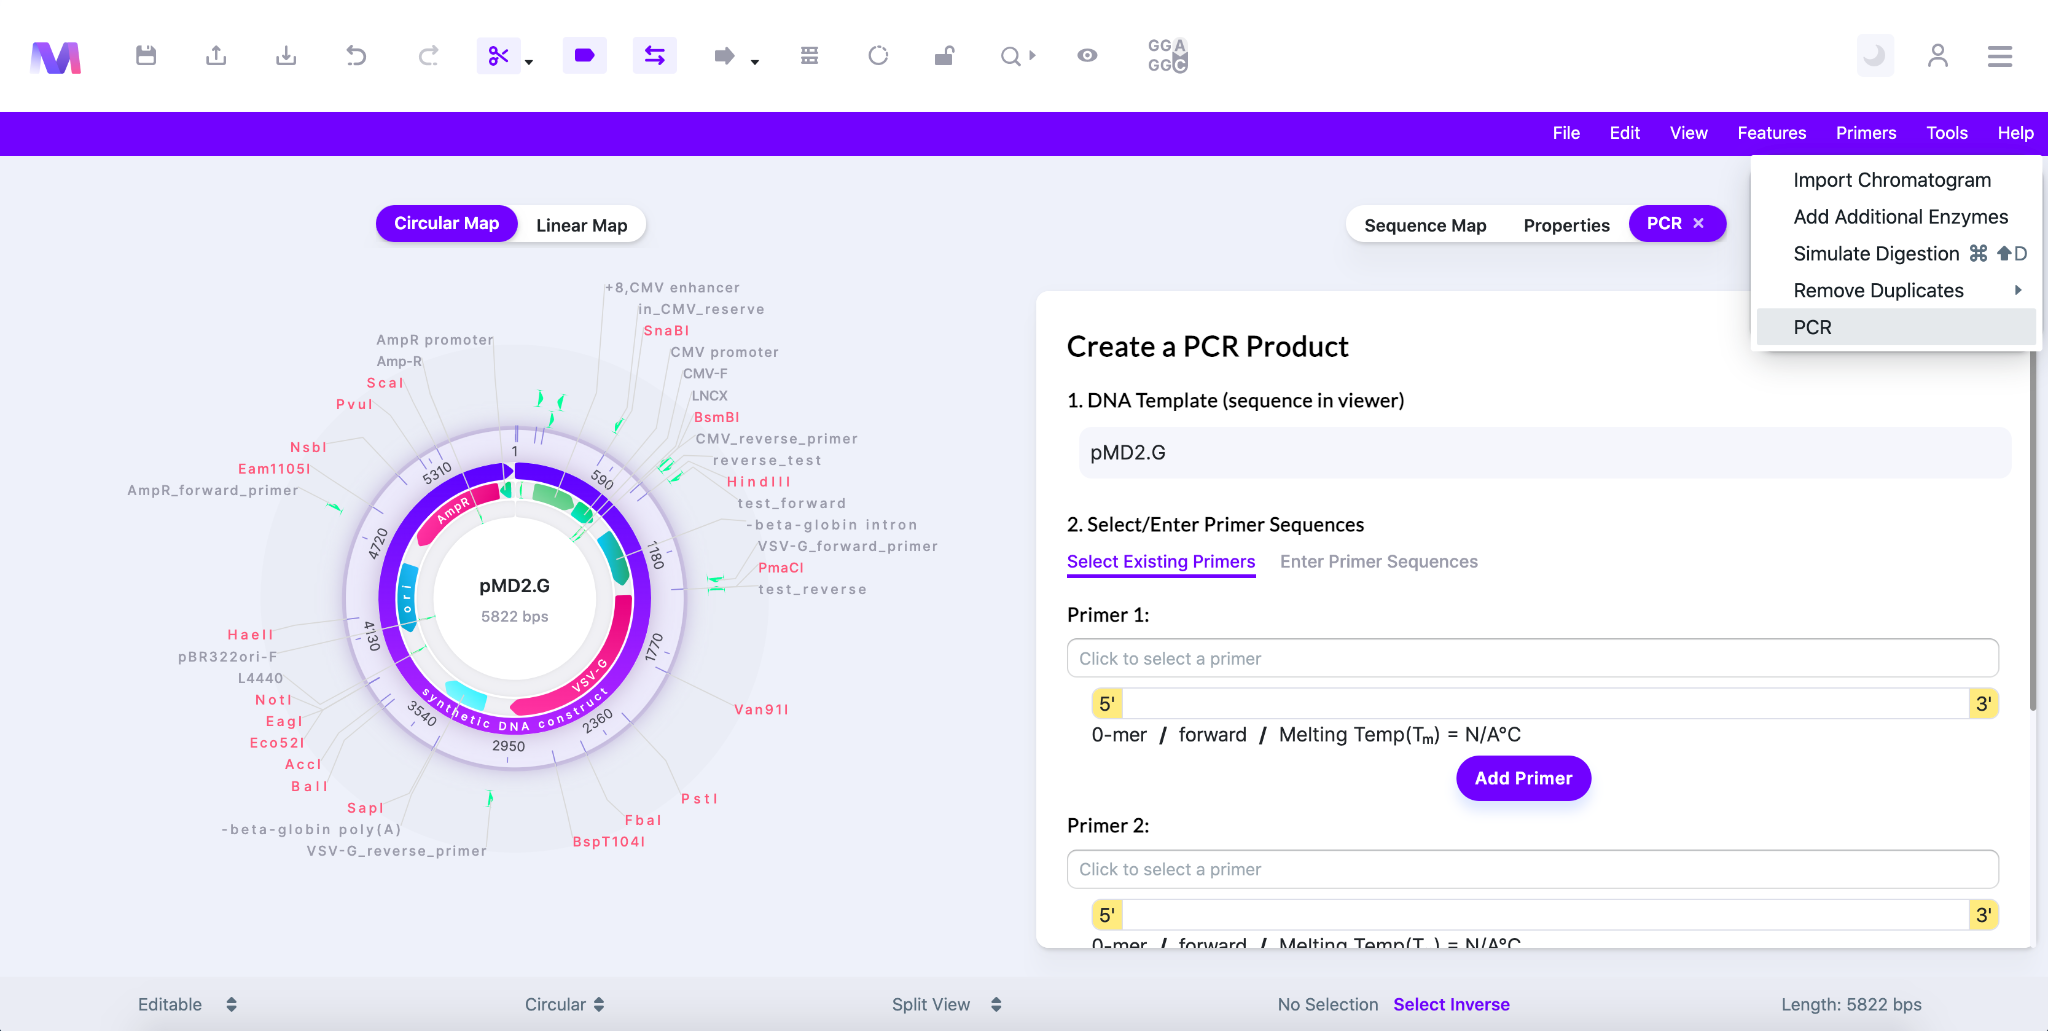
- The first step has already been completed and just shows that the DNA template is the sequence displayed in the viewer.
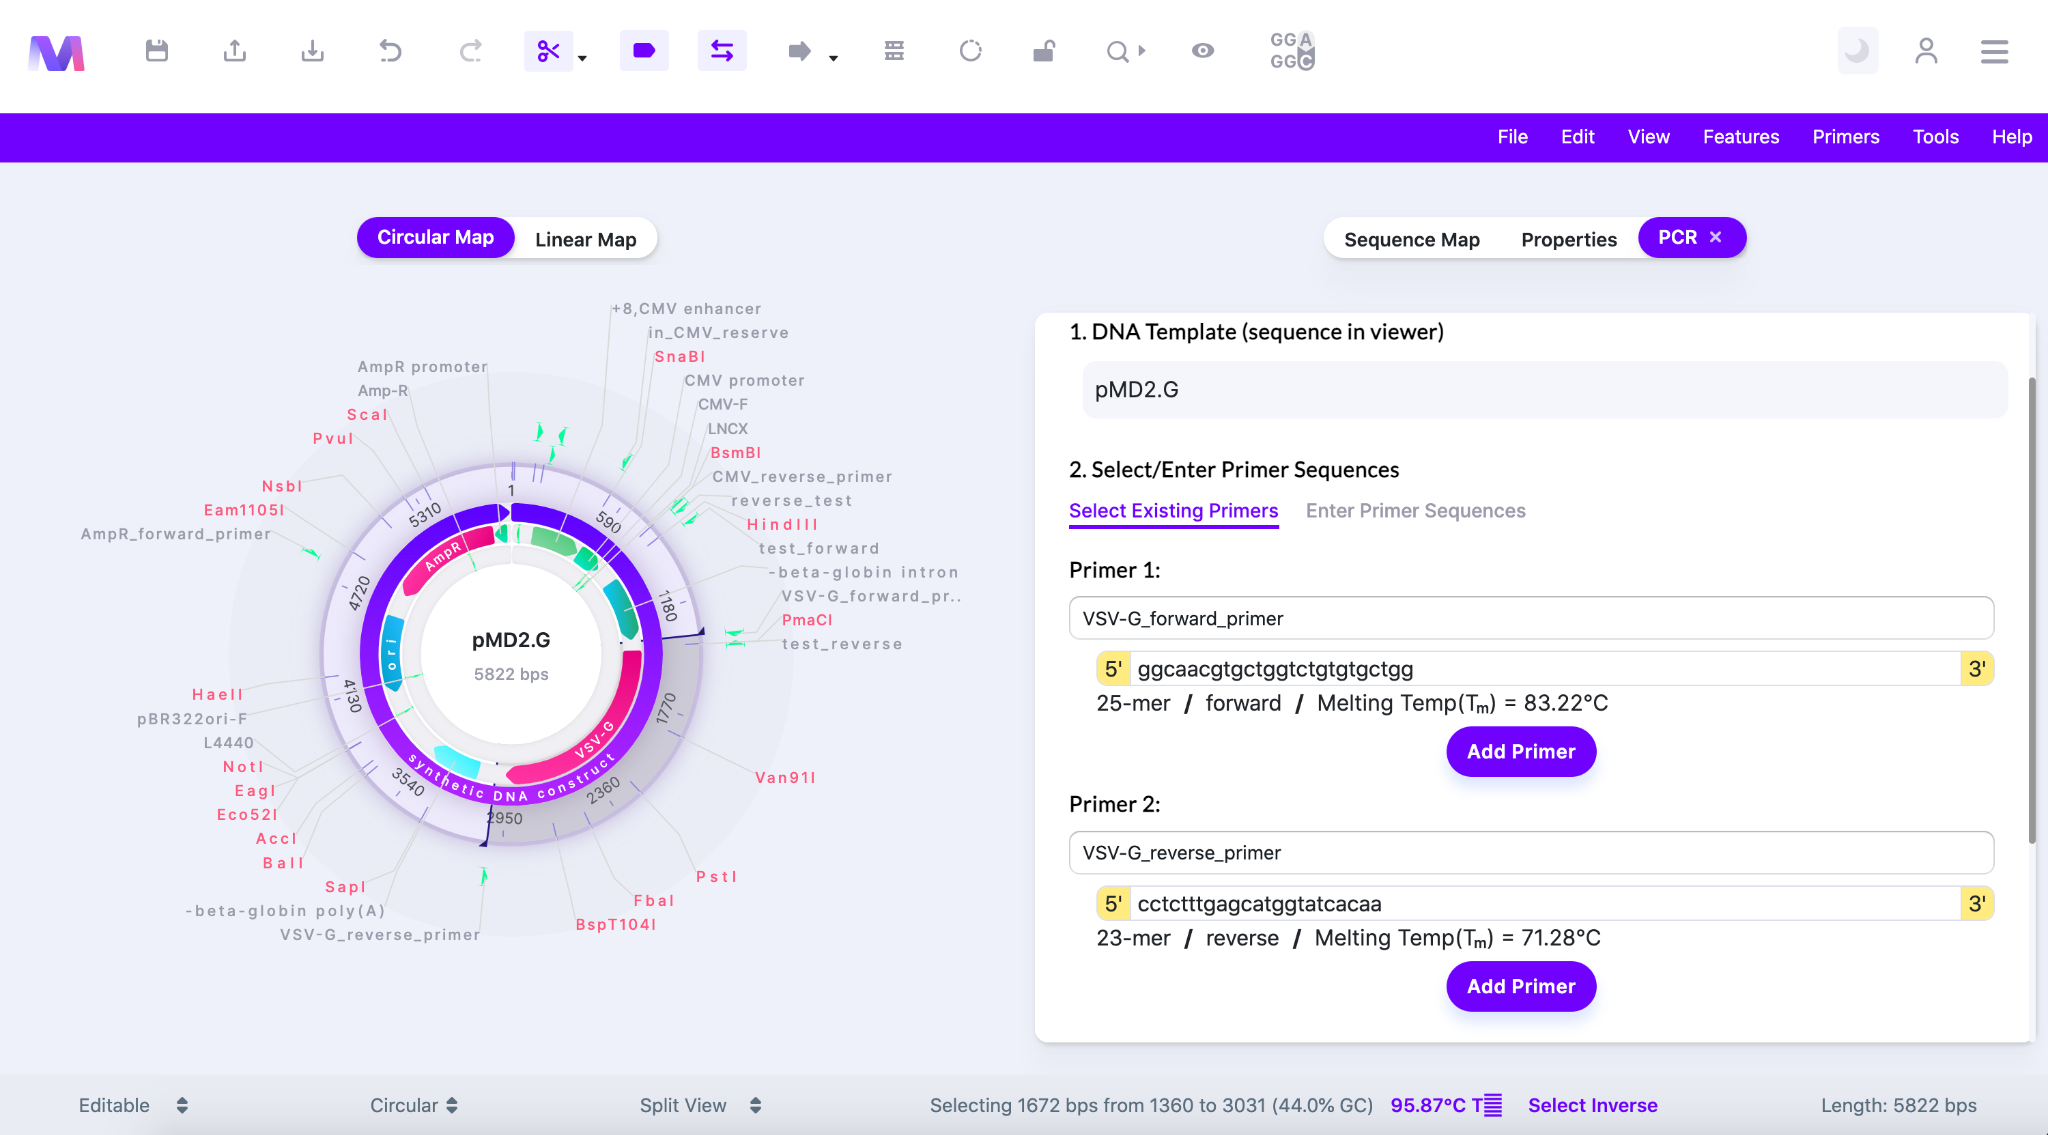
- In the second step, titled ‘2. Select/Enter the Primer Sequences’, you select/enter the primers to be used.
- Both Primer 1 and Primer 2 are required.
- One primer must be in the forward orientation and the other in the reverse orientation.
- You can choose ‘Select Existing Primers’ or ‘Enter Primer Sequences’ to specify the primer.
- ‘Select Existing Primers’ lets you select a primer from your library.
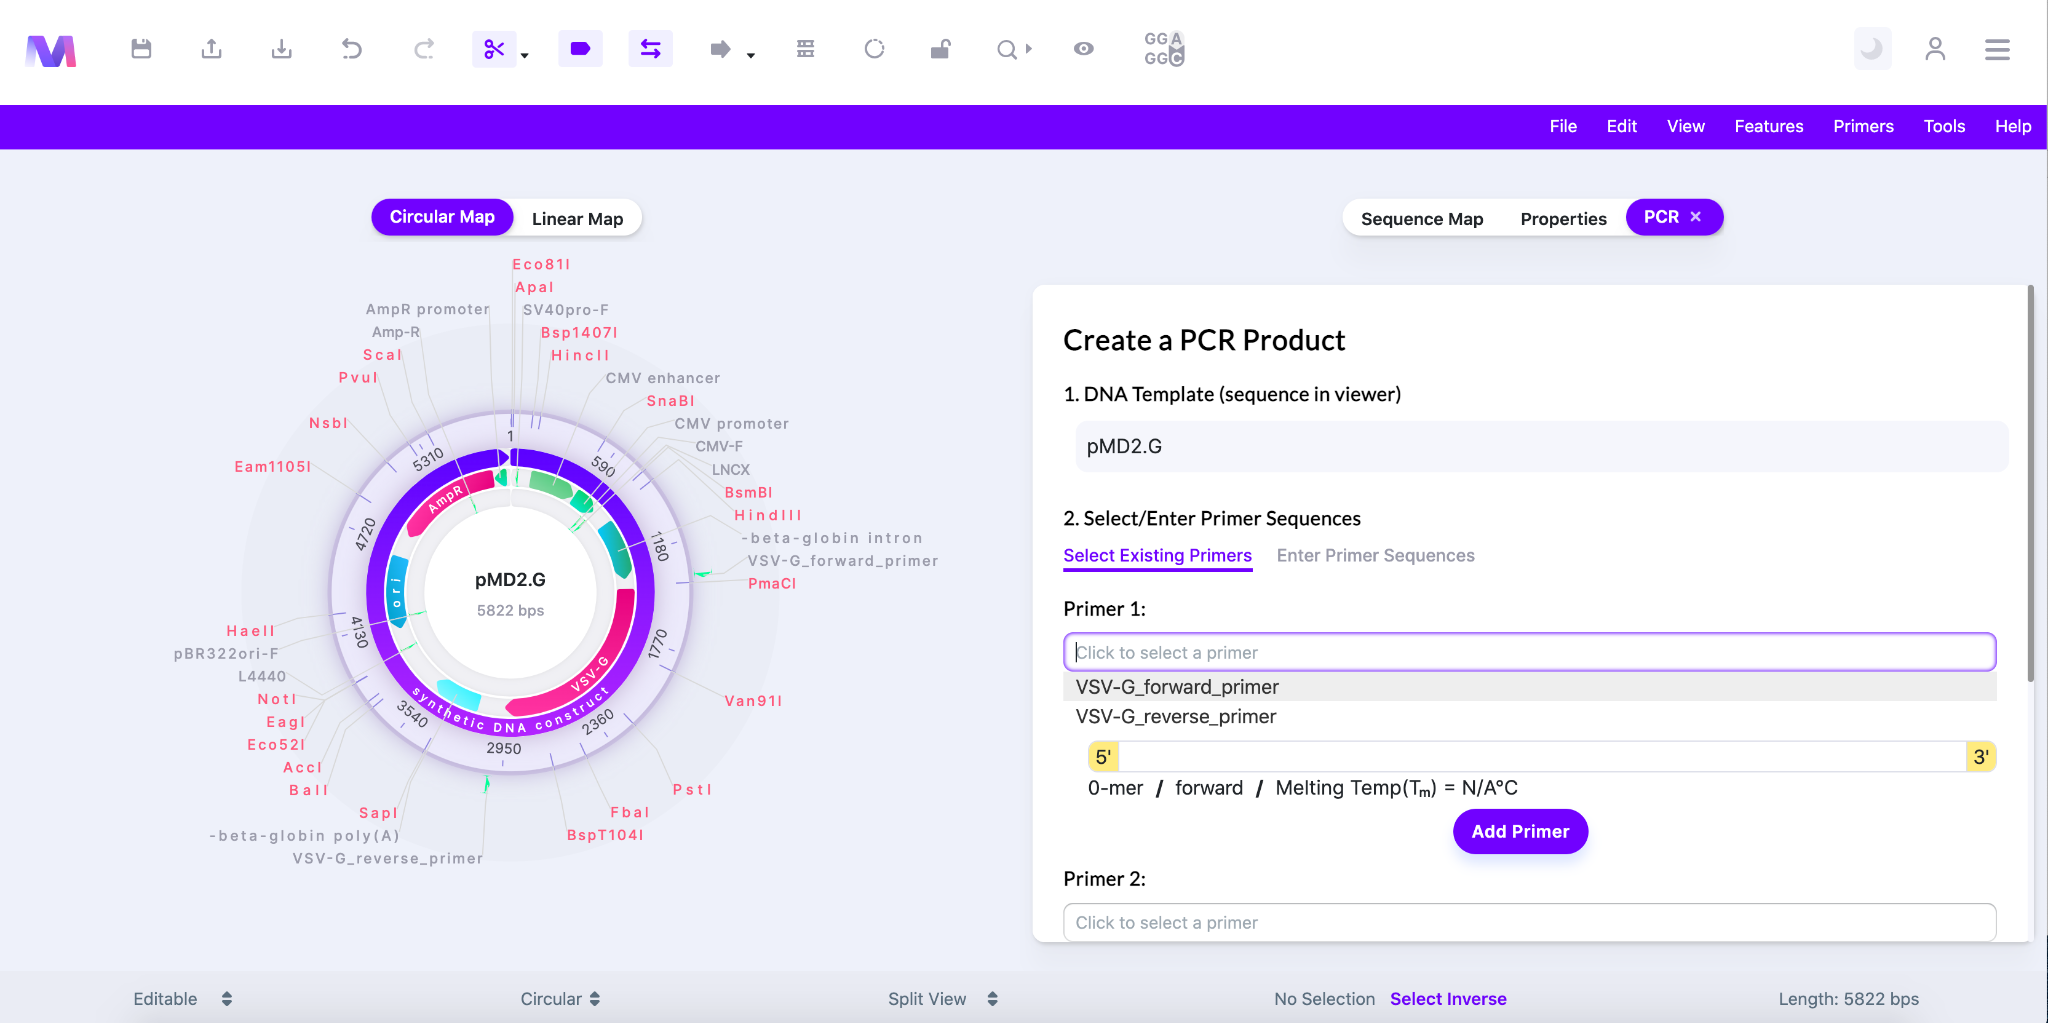
- Under ‘Primer 1’ or ‘Primer 2’ click the area that says ‘Click to select a primer’ to show the primers in your library.
- Choose a primer from the dropdown and the following features of the primer will be filled in.
- 5’-3’ sequence
- Bp length
- Forward/Reverse orientation
- Melting temperature
- Shown below the dropdown in ‘Select Existing Primer’ under Primer 1 is open so an existing primer can be selected from your library.
- Alternatively, you can click a primer in the viewer and that primer will automatically be chosen in Primer 1. Then if you hold shift and click a second primer that primer will automatically be chosen in Primer 2.
- Click the ‘Add Primer’ button and the primer will be added to the relative primer number under ‘3. Confirm Primers’.
- ‘Enter Primer Sequences’ lets you enter new primers.
- In the image below ‘Enter Primer Sequences’ is chosen under ‘2. Select/Enter Primer Sequences’.
- Enter the primer name
- Enter the primer sequence
- The primer sequence must have a match in the sequence displayed in the viewer.
- If there is no match you will not be able to add the primer. The error ‘No Matches for This Sequence’ will be shown in orange just below the area to enter the sequence.
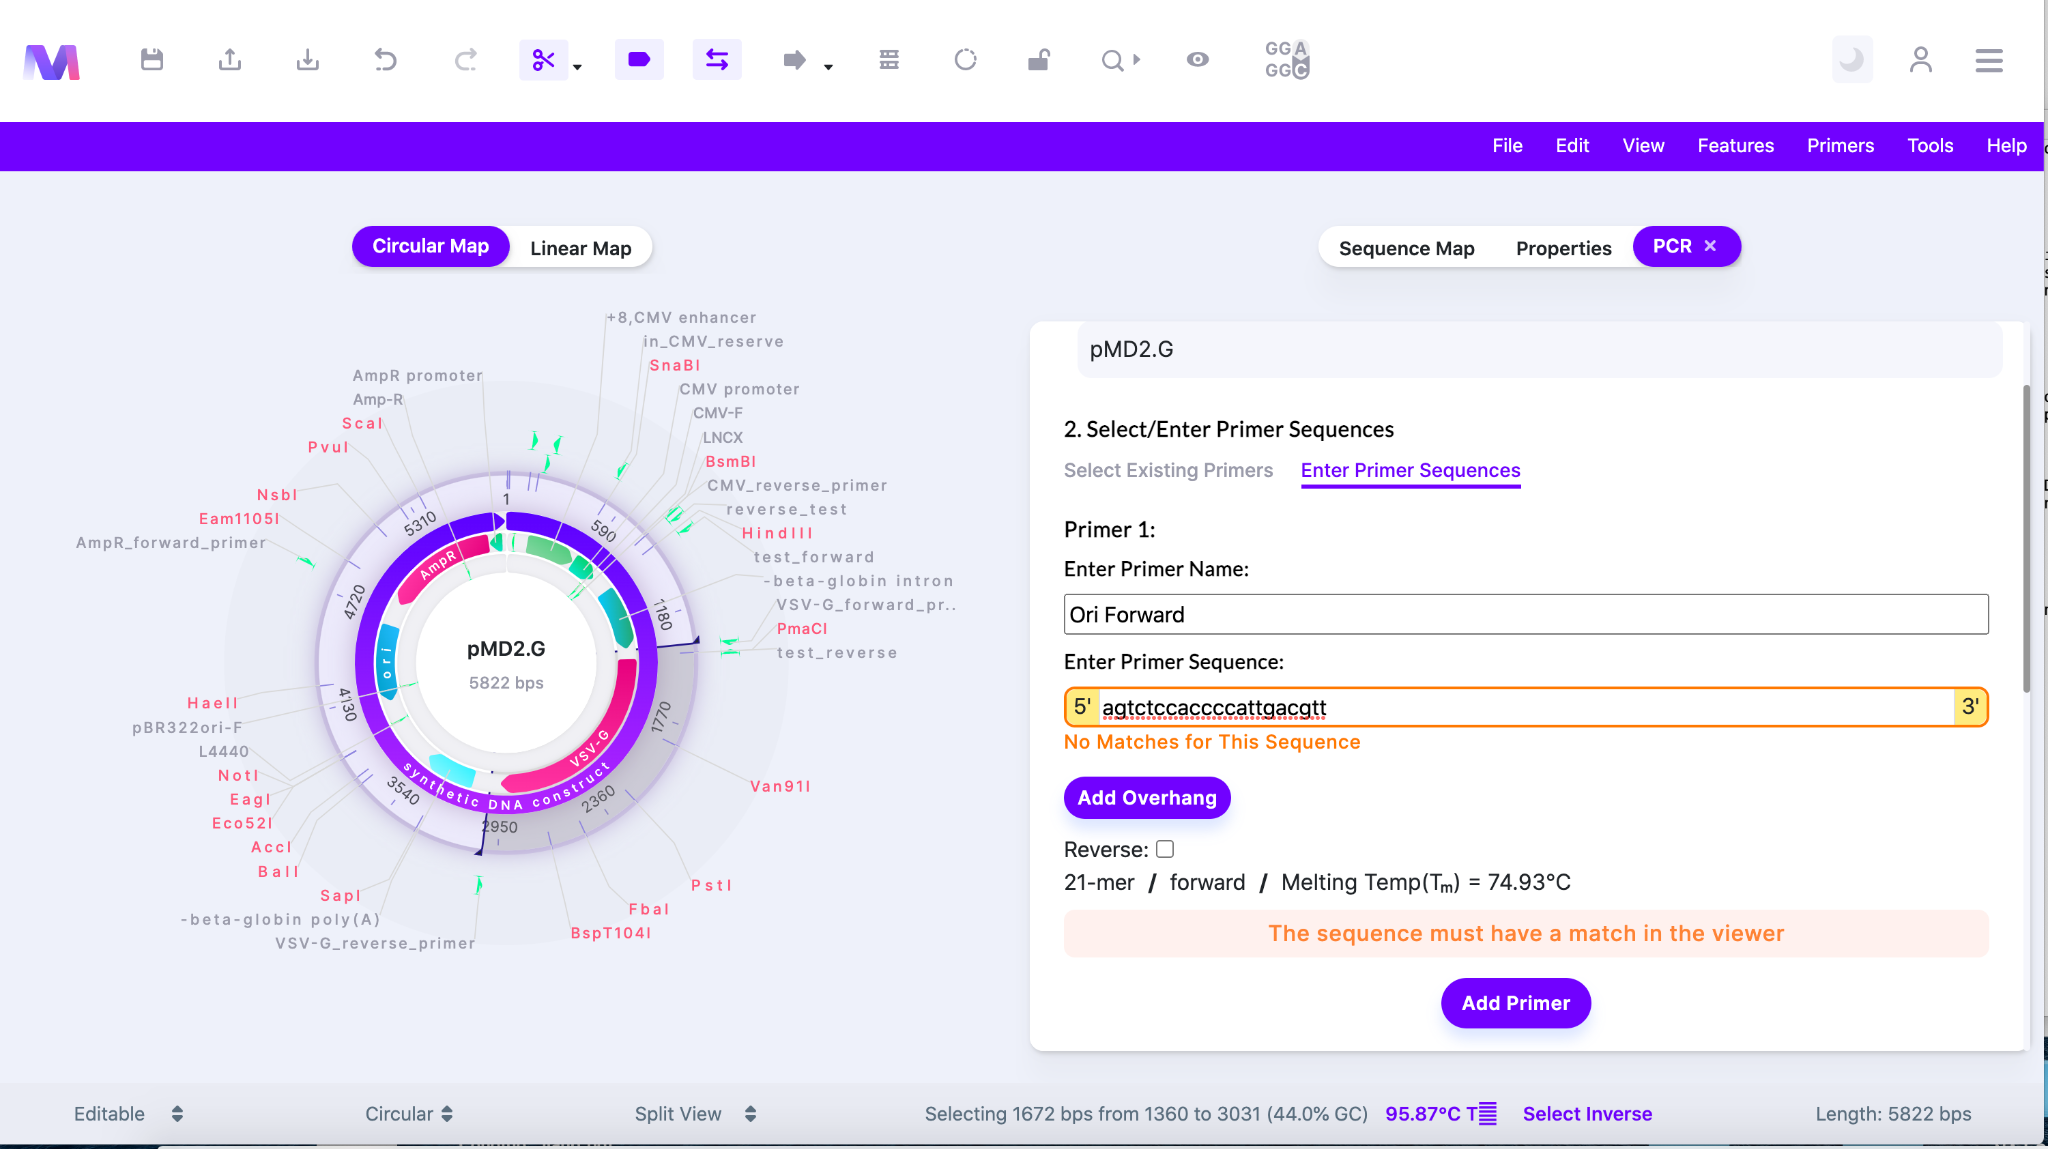
- If you would like to add an overhang to the 5’ end of the primer sequence click ‘Add Overhang’.
- A box allowing you to enter nucleotides will be shown.
- Only the nucleotides ‘a’, ‘c’, ‘t’, and ‘g’ are allowed.
- Check the Reverse box if you would like the sequence entered to match the reverse complement of the forward orientation of the sequence in the viewer.
- If there is no match you will not be able to add the primer. The error ‘No Matches for This Sequence’ will be shown in orange just below the area to enter the sequence.
- The following features about the primer you have entered will be shown.
- Bp length
- Forward/Reverse orientation
- Melting Temperature
- Click the ‘Add Primer’ button and the primer will be added to the relative primer number under ‘3. Confirm Primers’
- You will not be able to click ‘Add Primer’ if any errors exist.
- An error highlighted above the ‘Add Primer’ button preventing adding the primer.
- Errors.
- The primer must have a name.
- The primer must have a sequence.
- The sequence must have a match in the viewer.
- The primer overhang must contain only the nucleotides a, c, t, g.
- The overhang cannot have any ambiguous nucleotides.
- ‘Select Existing Primers’ lets you select a primer from your library.
- Both Primer 1 and Primer 2 are required.
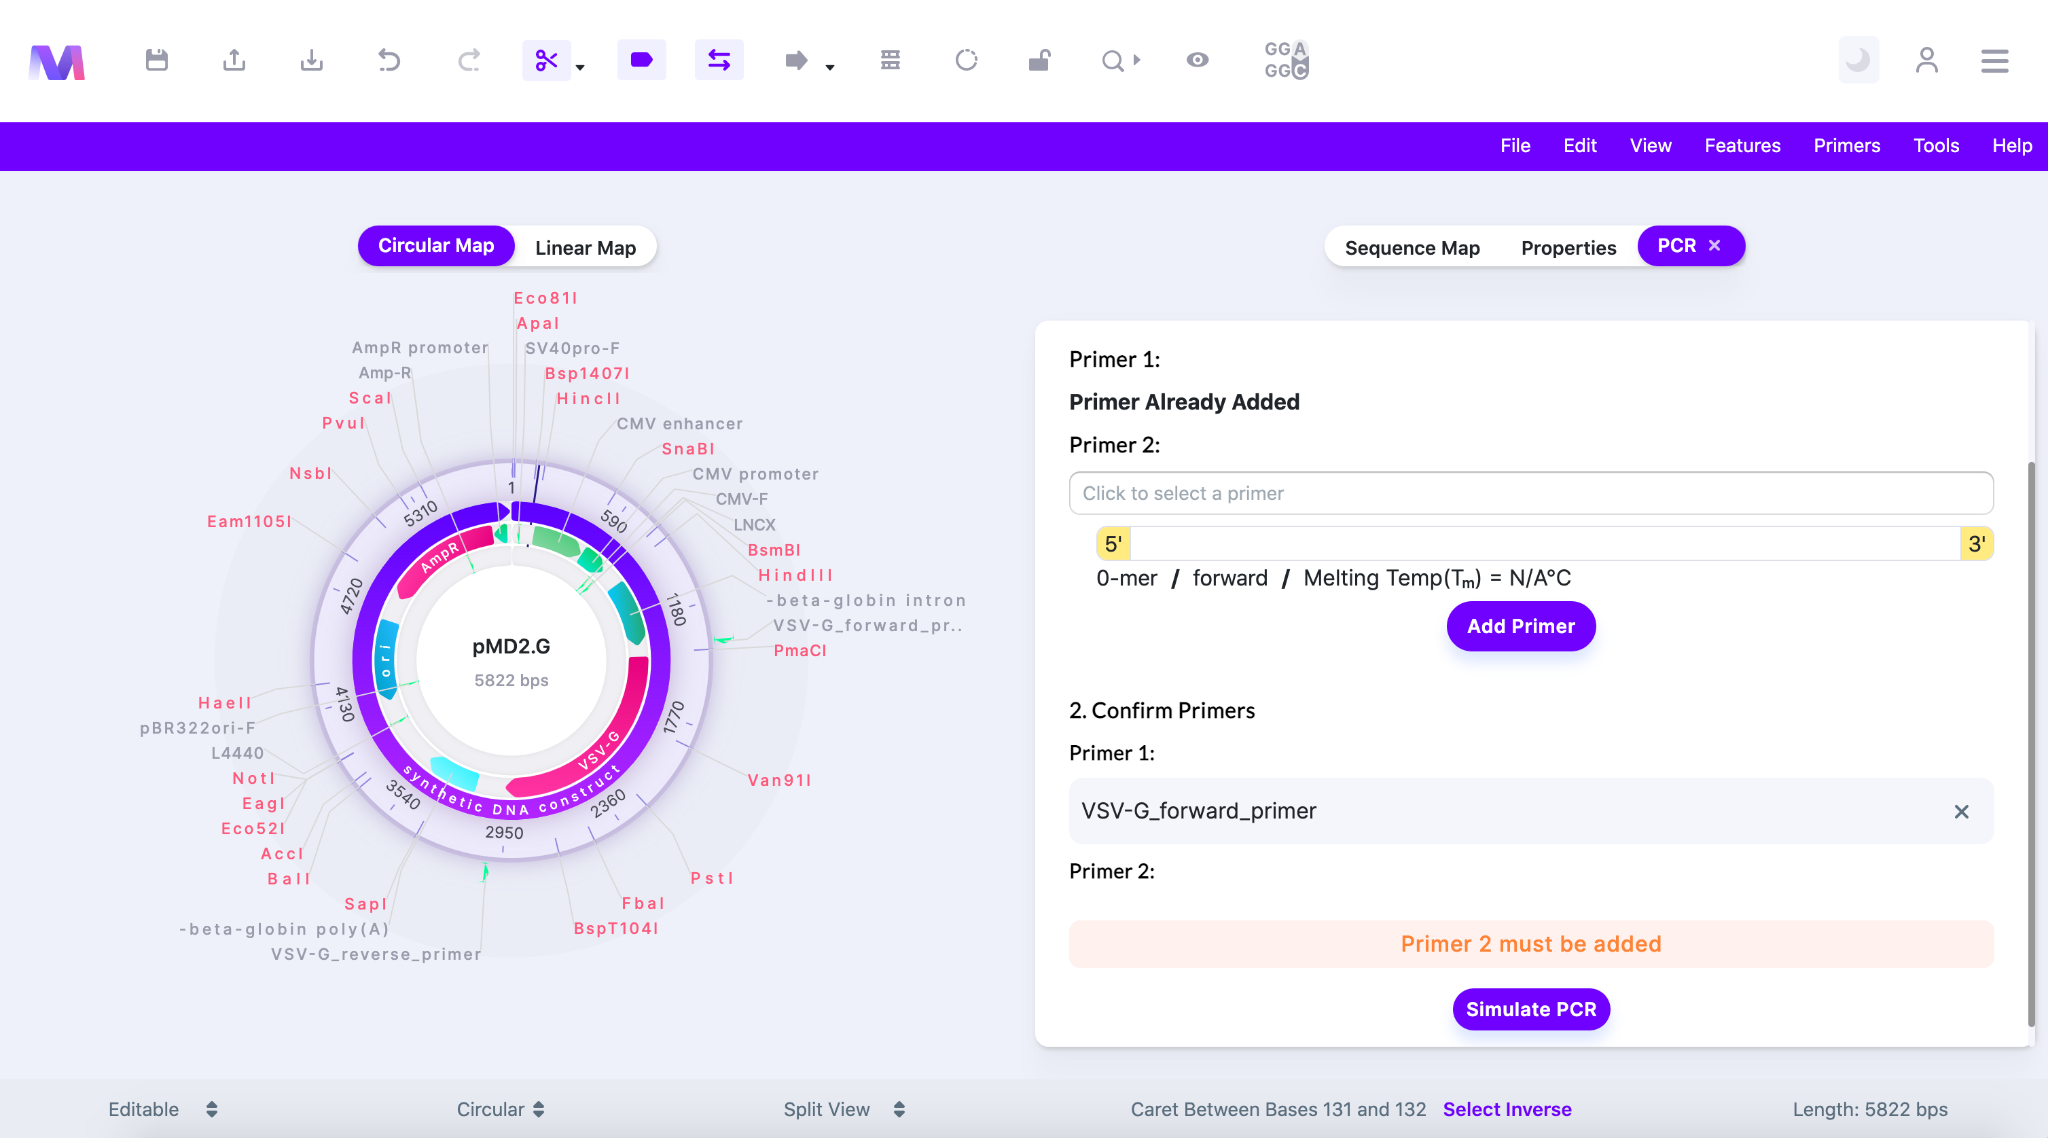
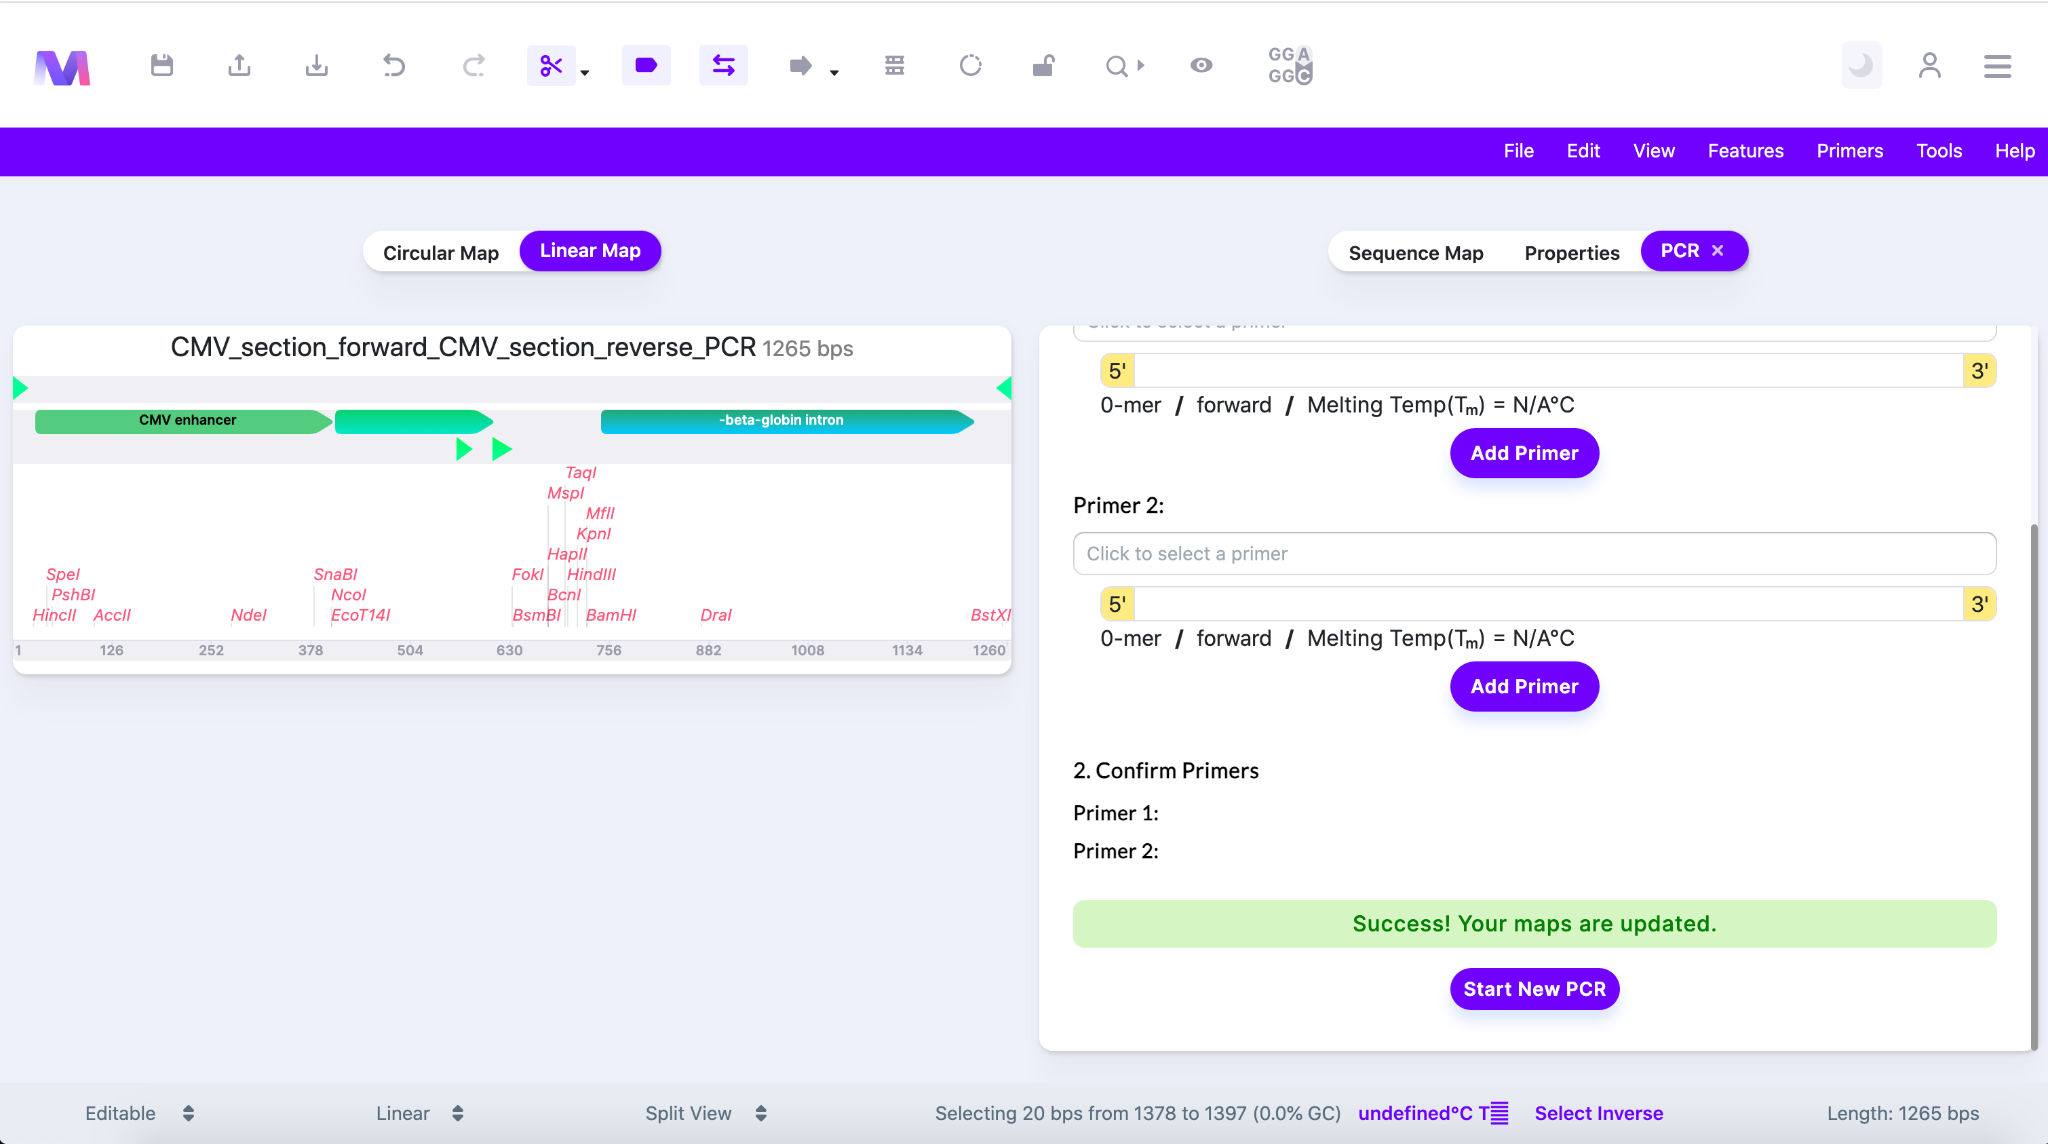
- In the third step you simply review the primers you have added.
- If you want to remove the primer simply click the 'X' to the right of the primer name.
- When a primer is removed the relative primer section, Primer 1 or Primer 2, will be reopened in the previous step ‘2. Select/Enter Primer Sequences’.
- The image below shows primers listed under ‘3. Confirm Primers’.
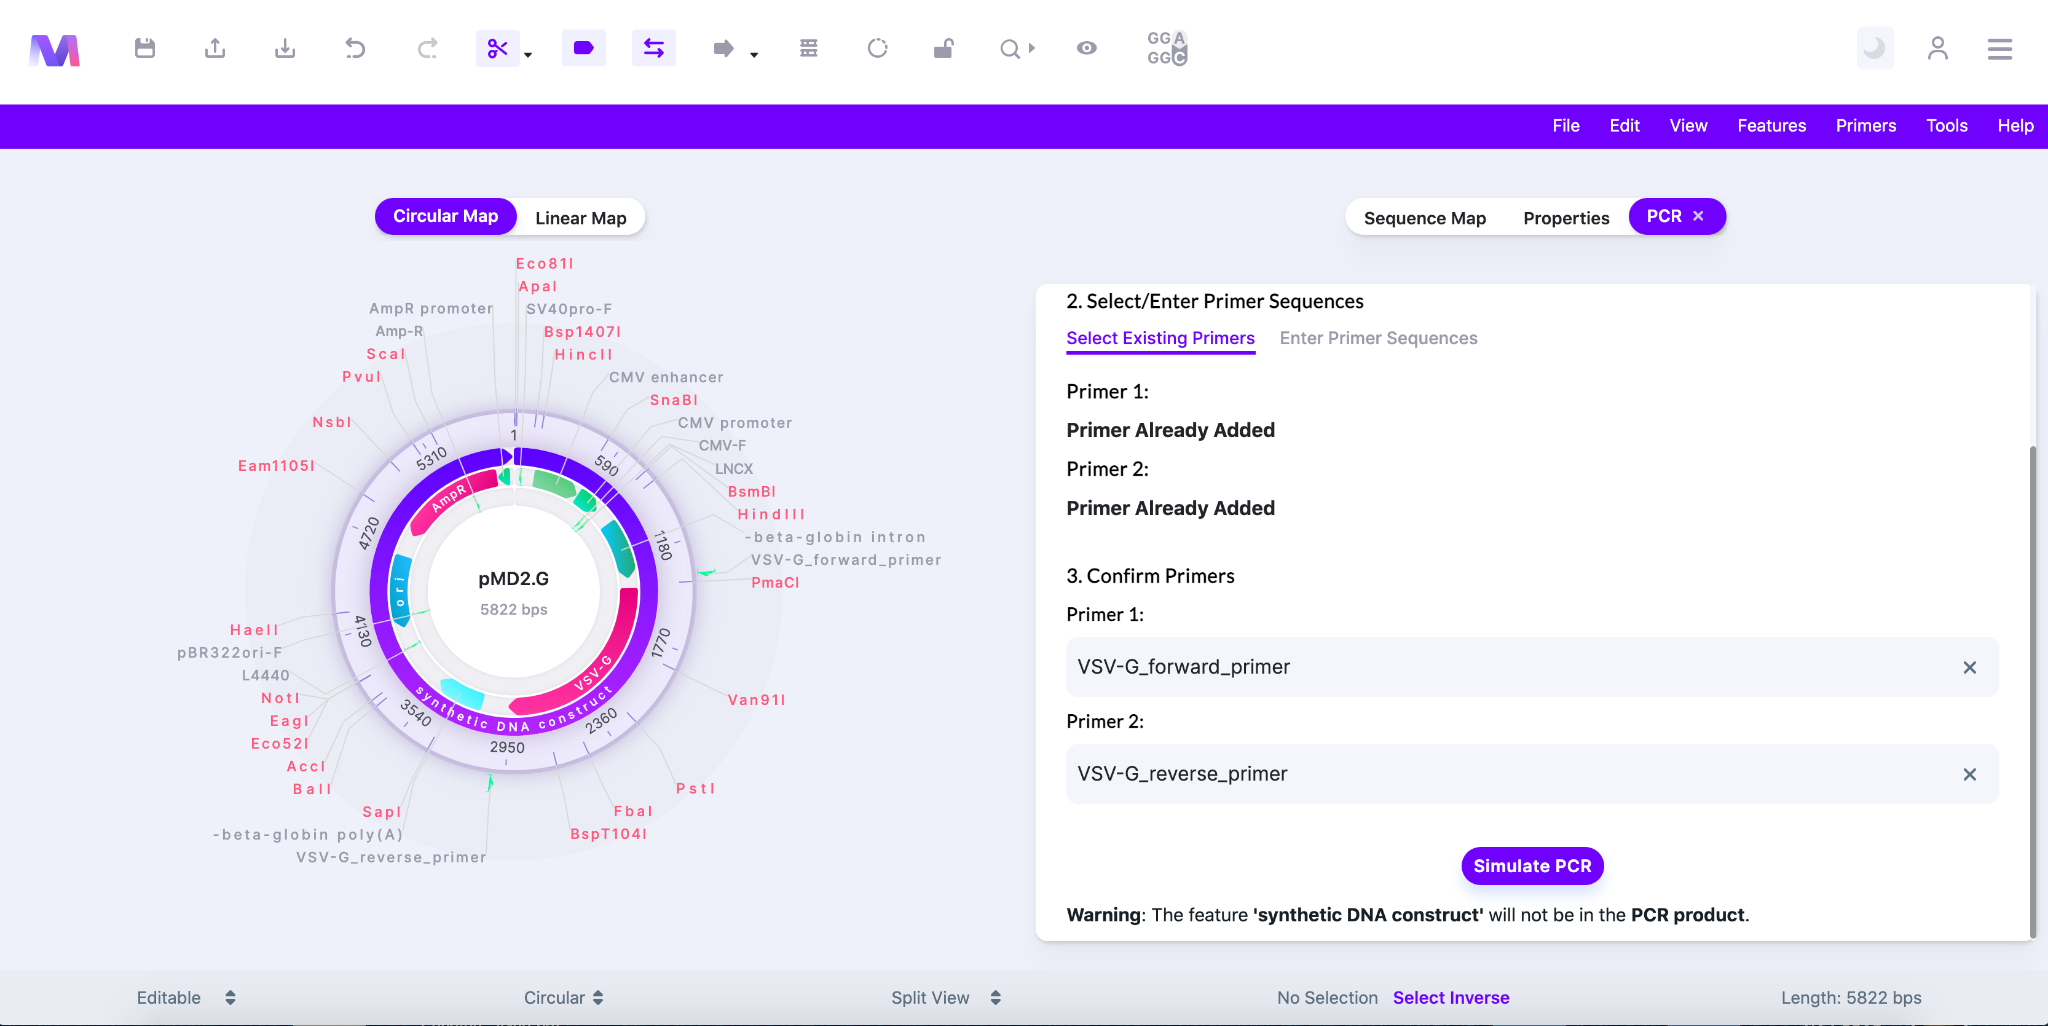
- If you want to remove the primer simply click the 'X' to the right of the primer name.
- Click the ‘Simulate PCR’ button to perform a PCR simulation.
- You will not be able to click ‘Simulate PCR’ if any errors exist.
- An error highlighted above the ‘Simulate PCR’ button preventing the button from being clicked.
- Errors and their description.
- Primer 1 must be added.
- Primer 2 must be added.
- The same primer cannot be used twice.
- Primer 1 and Primer 2 cannot be the same primer.
- Both primers are forward primers, one must be reverse.
- If both primers are in a forward orientation then PCR cannot take place. One must be forward and one must be reverse.

- If both primers are in a forward orientation then PCR cannot take place. One must be forward and one must be reverse.
- Both primers are reverse primers, one must be forward.
- If both primers are in a reverse orientation then PCR cannot take place. One must be forward and one must be reverse.
- The primers cannot overlap
- The forward primer cannot be after the reverse primer if the sequence in the viewer is linear.
- If the template is linear and the forward primer exists after the reverse primer in the 5’-3’ forward orientation then the elongation of the forward primer will never contain a complementary sequence for the reverse primer. Therefore, the desired PCR product will not be synthesized.
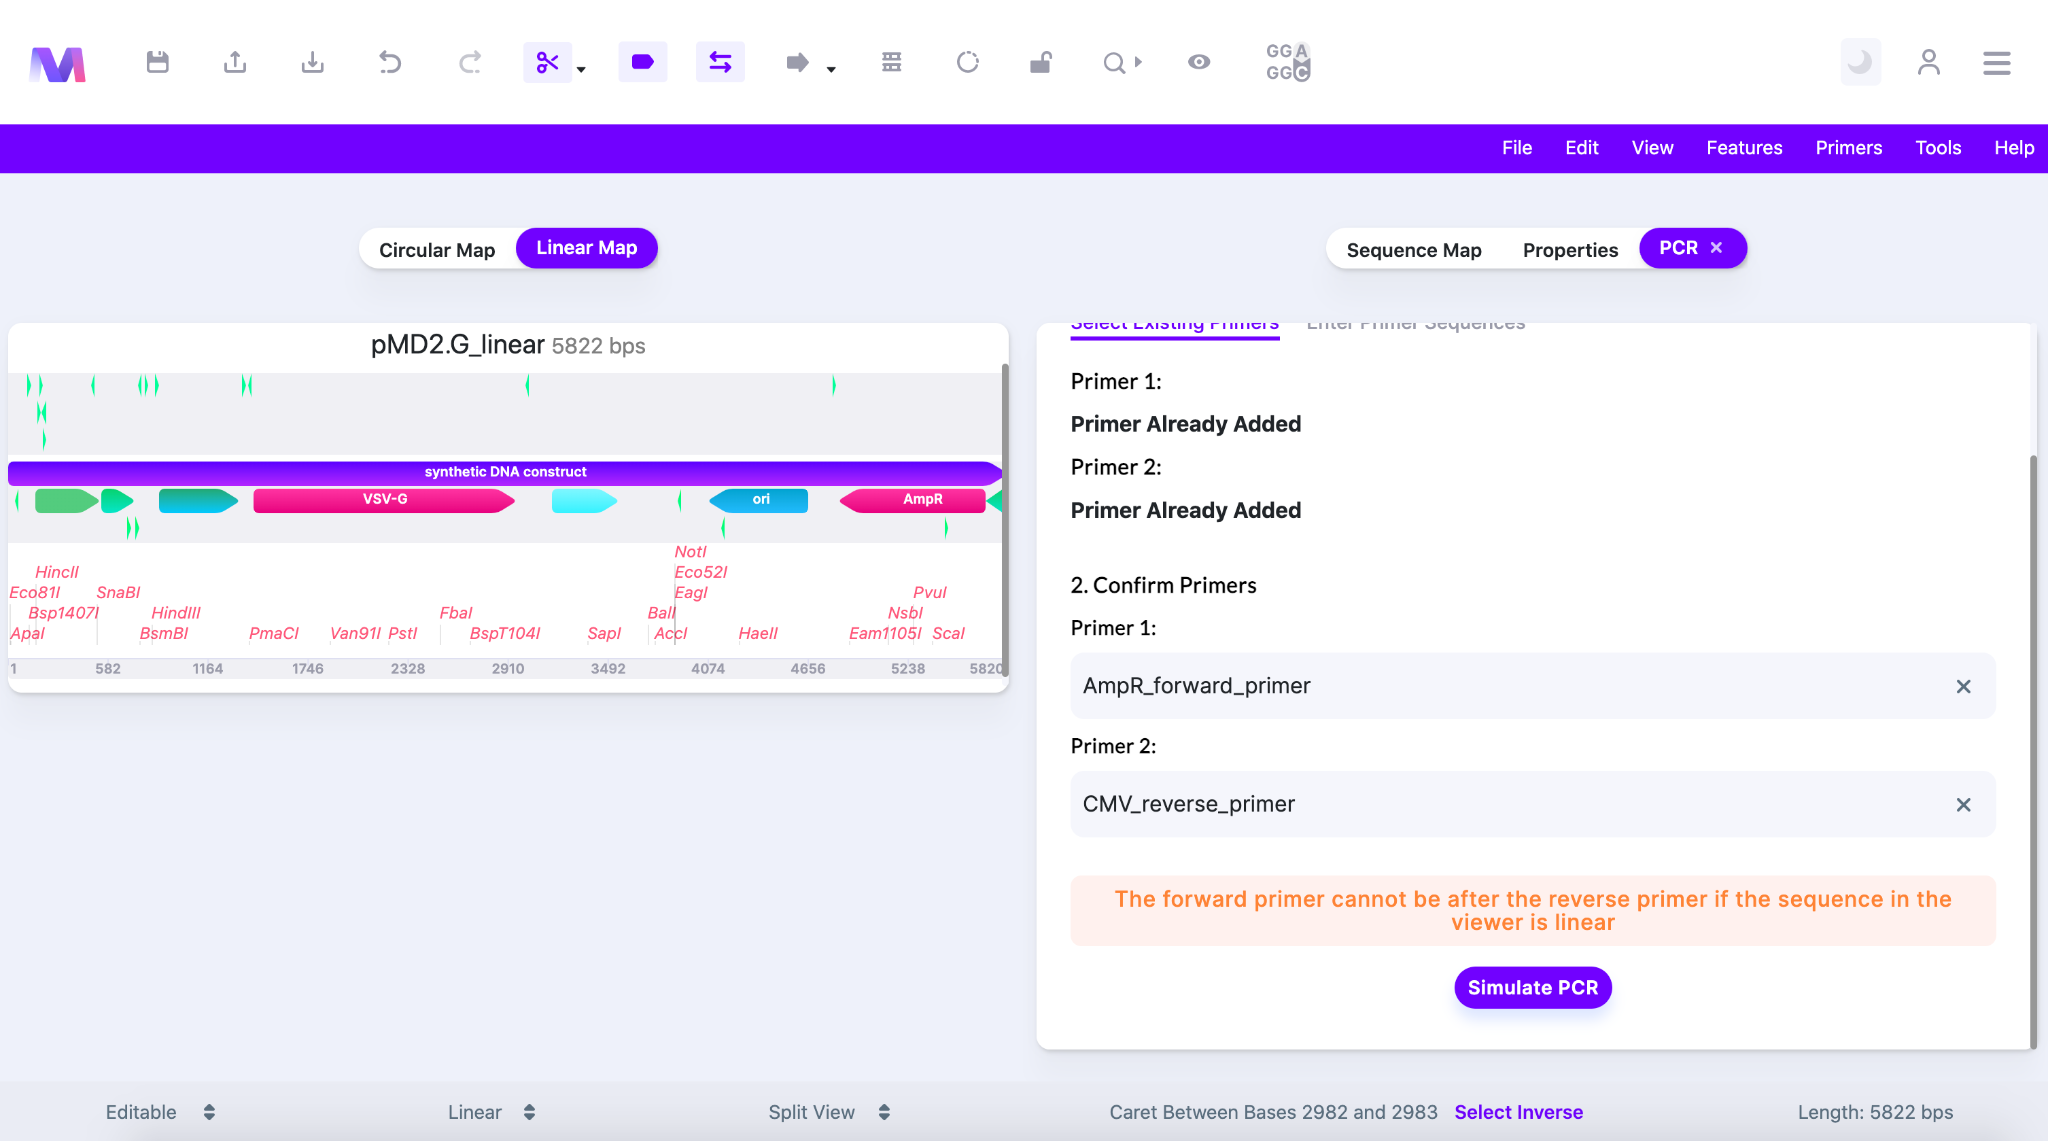
- If the template is linear and the forward primer exists after the reverse primer in the 5’-3’ forward orientation then the elongation of the forward primer will never contain a complementary sequence for the reverse primer. Therefore, the desired PCR product will not be synthesized.
- The final resulting PCR product will be displayed in the viewer
- Mendelgen has simulated;
- Denaturation of the dsDNA template into two strands.
- Annealing of the primers to the 3’ ends of the template.
- DNA polymerase building a new DNA strand of the region of interest complementary to the template using the primers and dNTPs.
- Finished PCR simulation
- Mendelgen has simulated;