Gateway Cloning Overview
In-vitro Gateway cloning models the recombination reactions that happen when a lambda phage infects a bacterium in-vivo. A lambda phage contains a region of DNA called an attP site. When the phage infects a bacterium, this attP site comes into contact with a region called the attB site in the bacterial genome. Recombination occurs between the attP site and the attB site integrating the phage genome into the bacterial genome. Once integrated, the phage's genome gets surrounded by two att sites, the attL site on the left and the attR site on the right. The attL and attR sites can then go through recombination under certain circumstances to excise the phage's genome from the bacteria. The separated phage genome gets left with an attP site, and the bacterium gets left with an attB site—gateway cloning models these recombination reactions to incorporate a gene of interest into a cloning vector.
Gateway cloning models the recombination between a lambda phage and bacterium in-vitro through two reactions:
- The BP reaction
- And the LR reaction.
The BP reaction requires a gene/sequence of interest surrounded by attB sites and a donor vector containing attP sites. The attB sites can be added around the gene/sequence of interest through PCR using primers targeting the sequence of interest with attB site sequences as extensions. Many various donor vectors have already been prepared and can be purchased. In the BP reaction, the attB sites surrounding the sequence of interest go through recombination with the attP sites on the donor vector. The resulting sequence, called the entry clone, contains the gene/sequence of interest surrounded by attL sites. The entry clone can get constructed using many different methods. However, we will only discuss the one above in this post.
Next, the LR reaction requires an entry clone and a destination vector containing attR sites. As with the donor vector, many various destination vectors have already been prepared and can be purchased. By selecting multiple destination vectors, copies of one entry clone can get used to perform numerous experiments. In the LR reaction, the attL and attR sites in the entry clone and destination vector go through recombination, producing a vector called the expression clone, which contains the gene/sequence of interest surrounded by attB sites. The expression clone is your final cloning vector and can be transfected or transformed into cells of your choice.
The Gateway cloning outlined above is a simple overview and only involves one entry clone. However, following the same procedure with slight variations, up to four entry clones containing different genes/sequences of interest can be inserted into a single destination vector. Each type of att sequence, attP, B, L, and R, has many variations and recombines specifically with only one match. This specificity allows you to create many entry clones that will recombine specifically in the LR reaction to produce an ordered and directional expression clone.
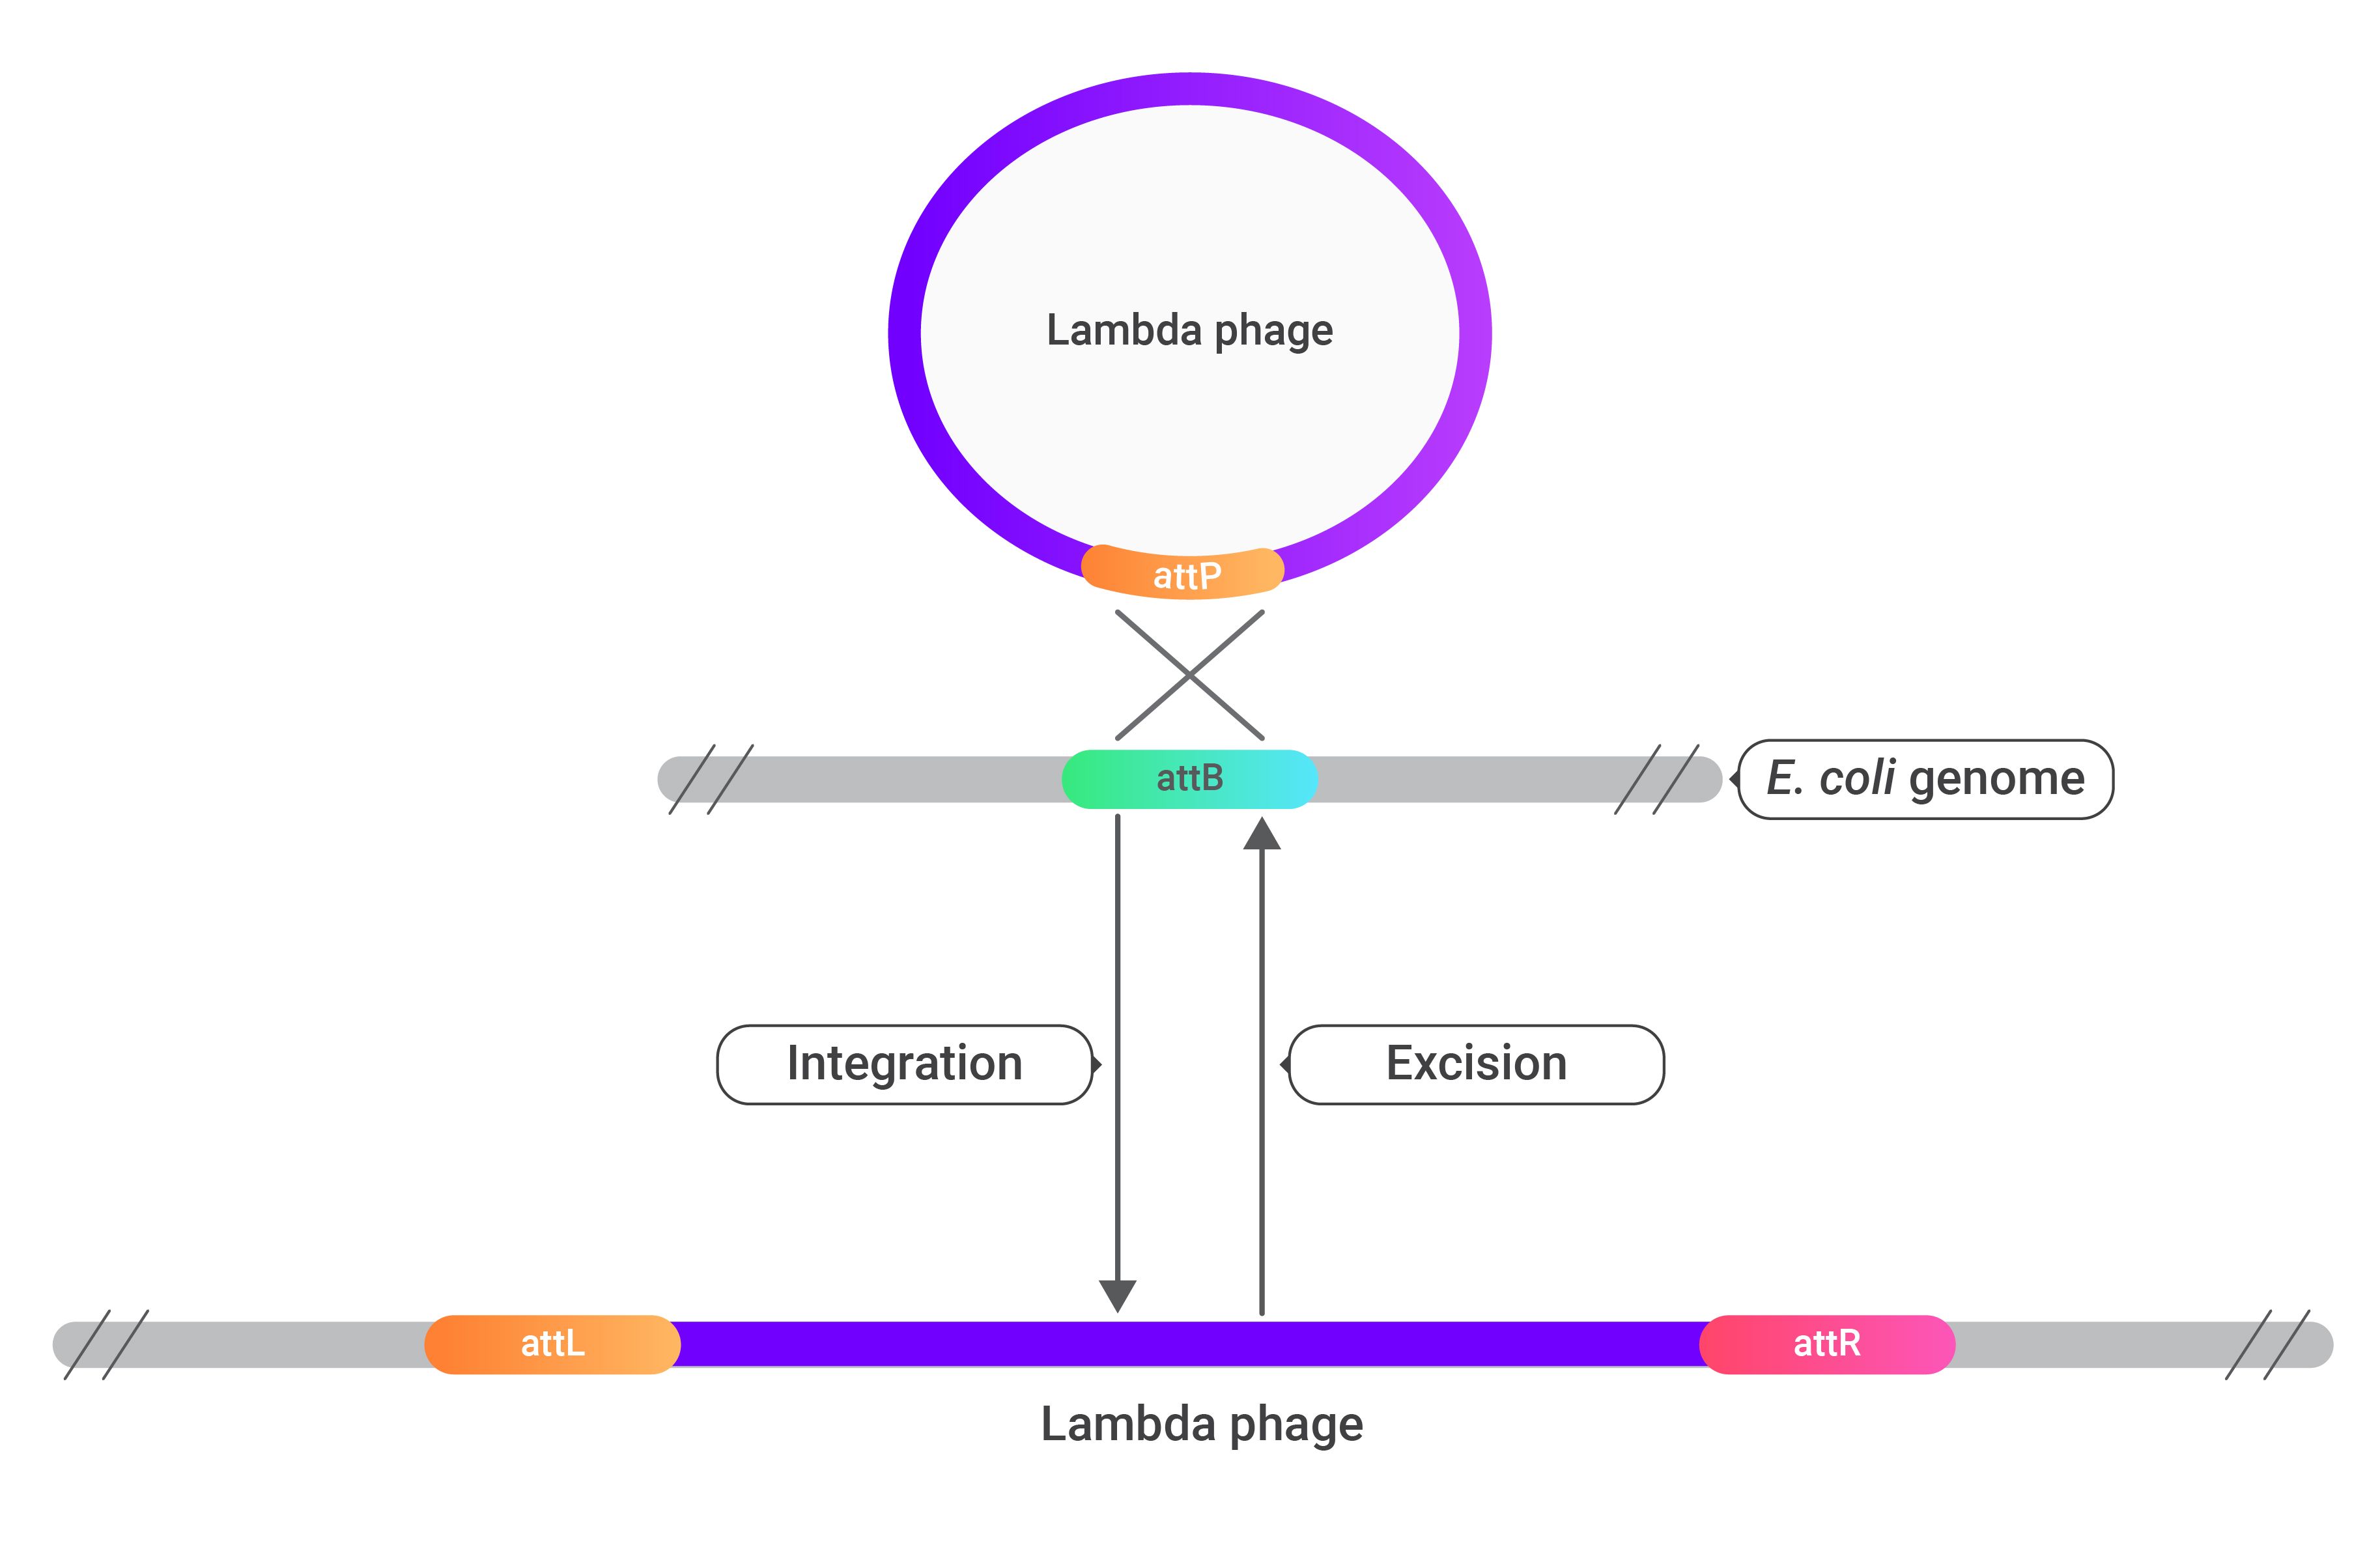
The image above shows how the genome of a lambda phage can be integrated and excised from the genome of a bacterium through recombination at att sites.
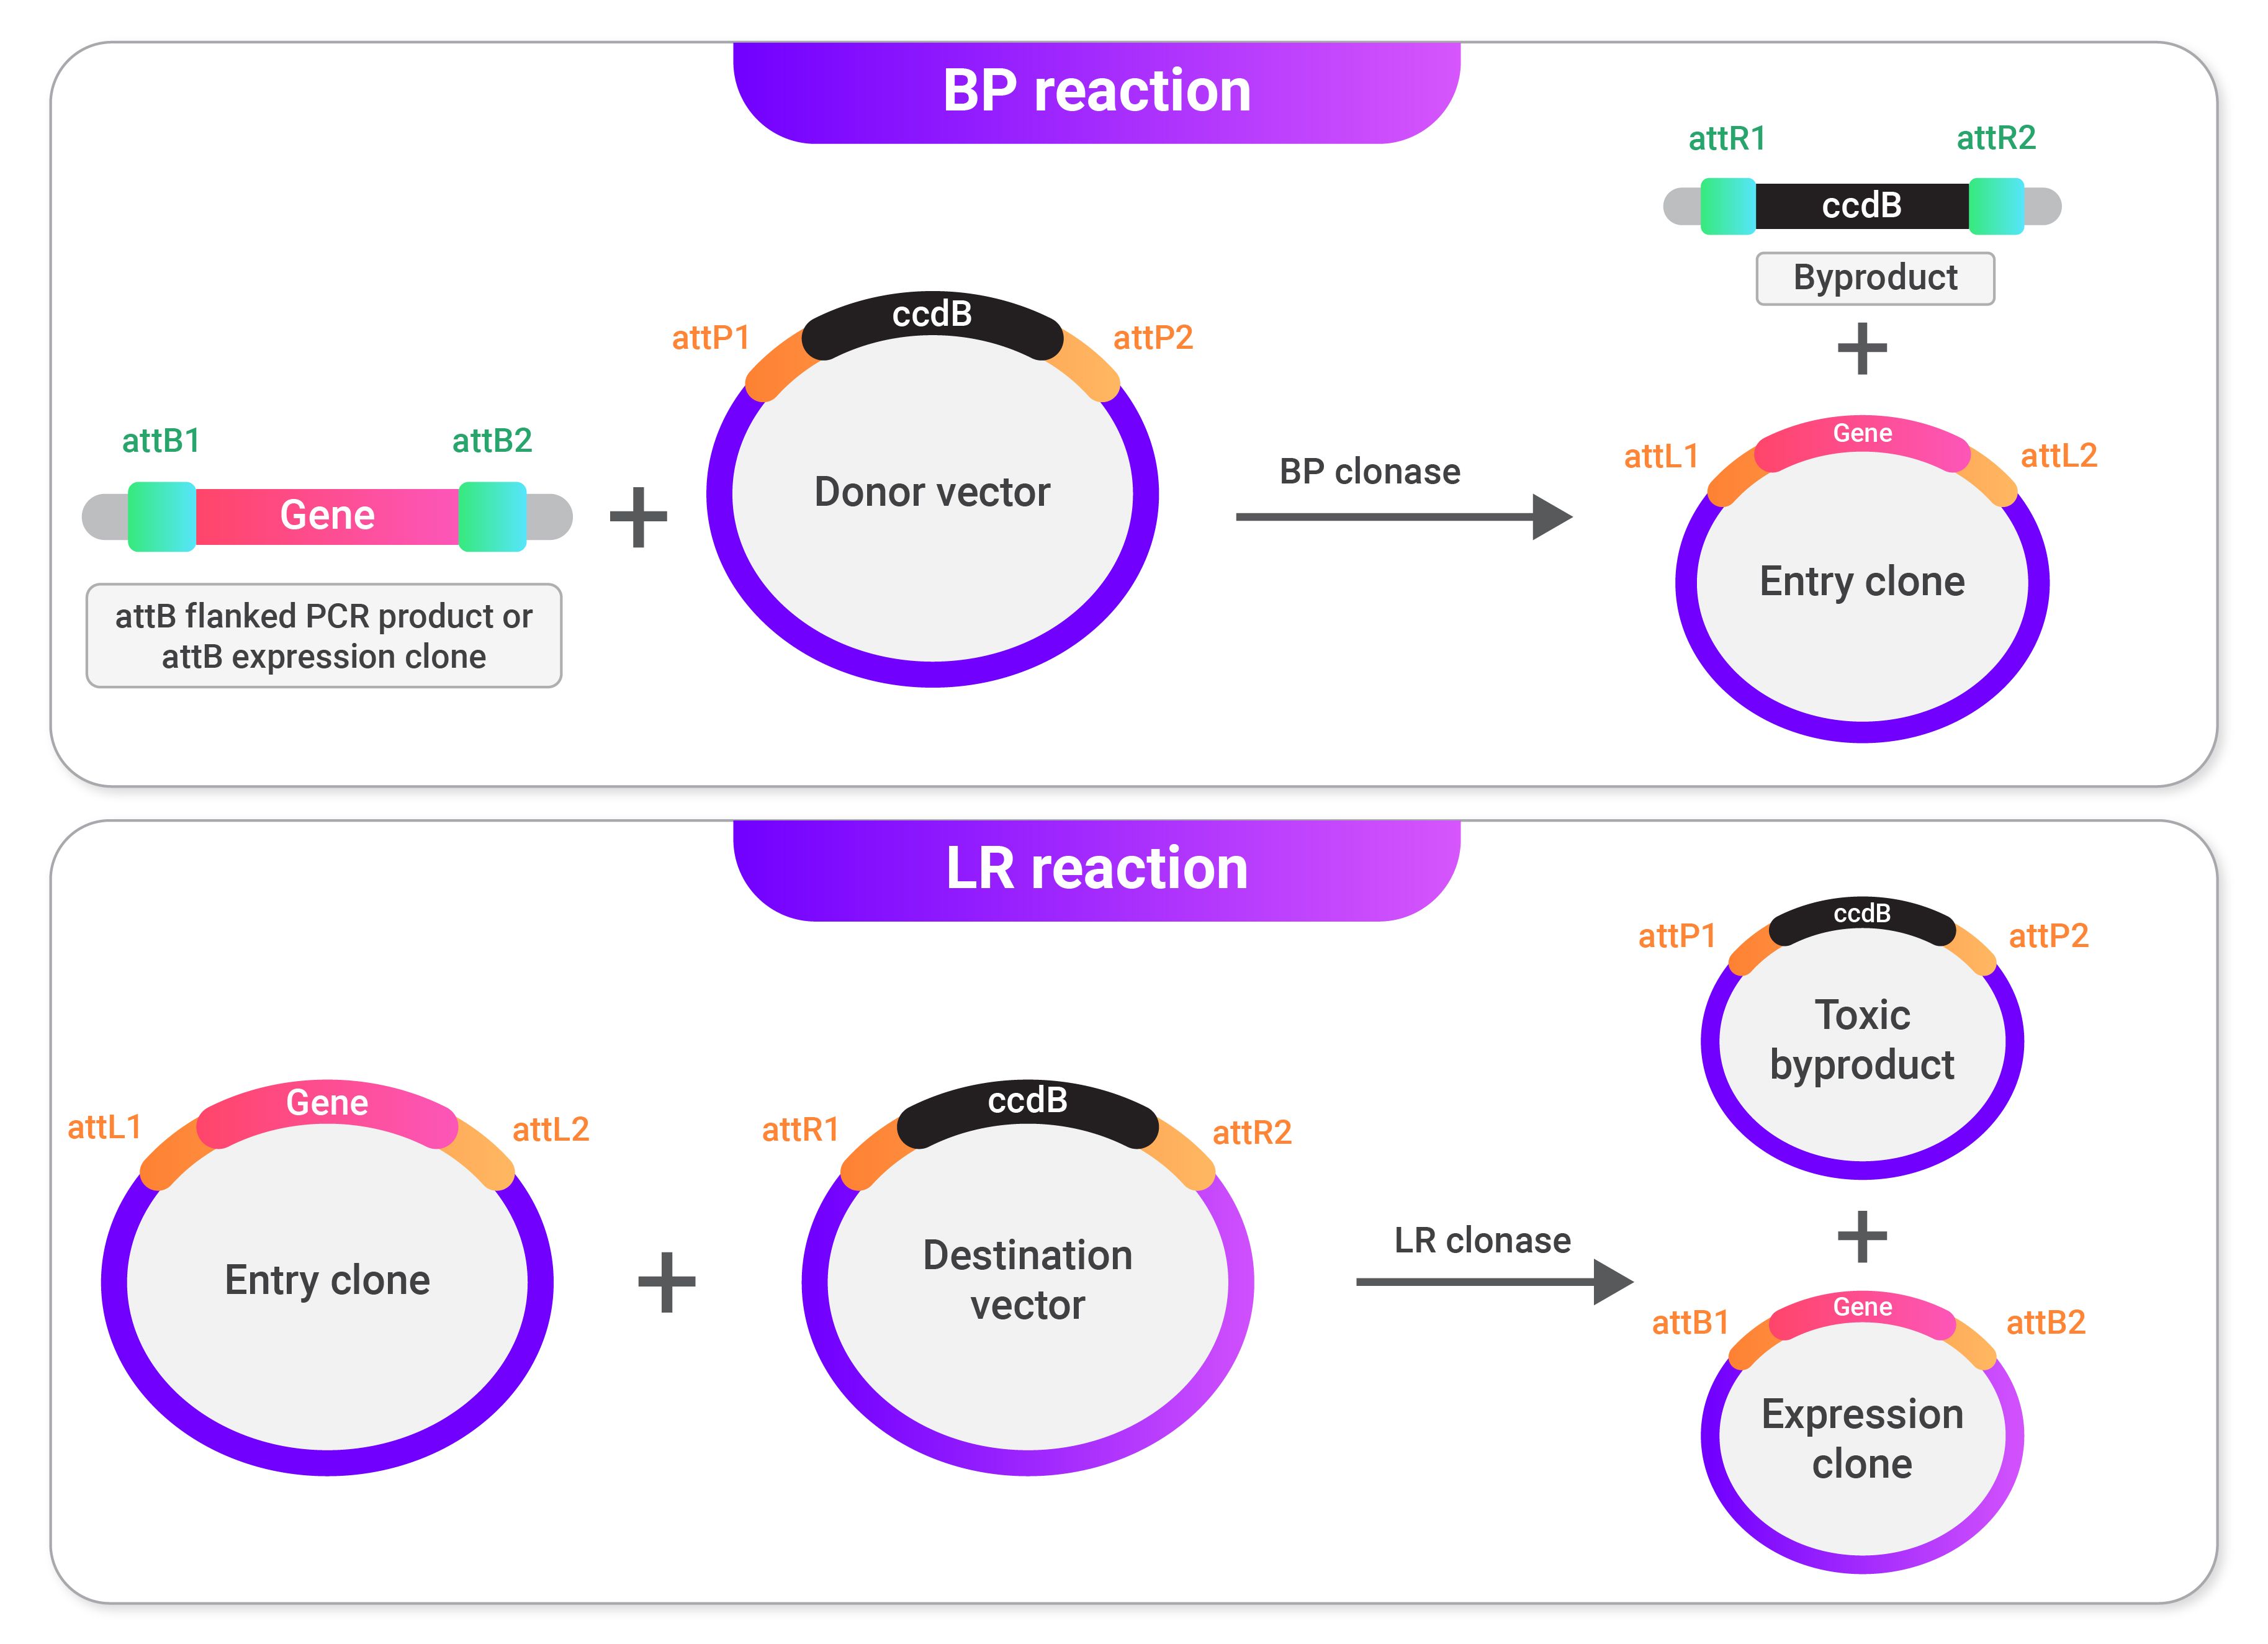 The image above shows a general overview of Gateway cloning. In the BP reaction, attB sites surrounding a gene of interest go through recombination with the attP sites in a donor vector to produce an entry clone with attL sites. In the LR reaction, the entry clone's attL sites go through recombination with the attR sites in a destination vector to produce the final expression clone.
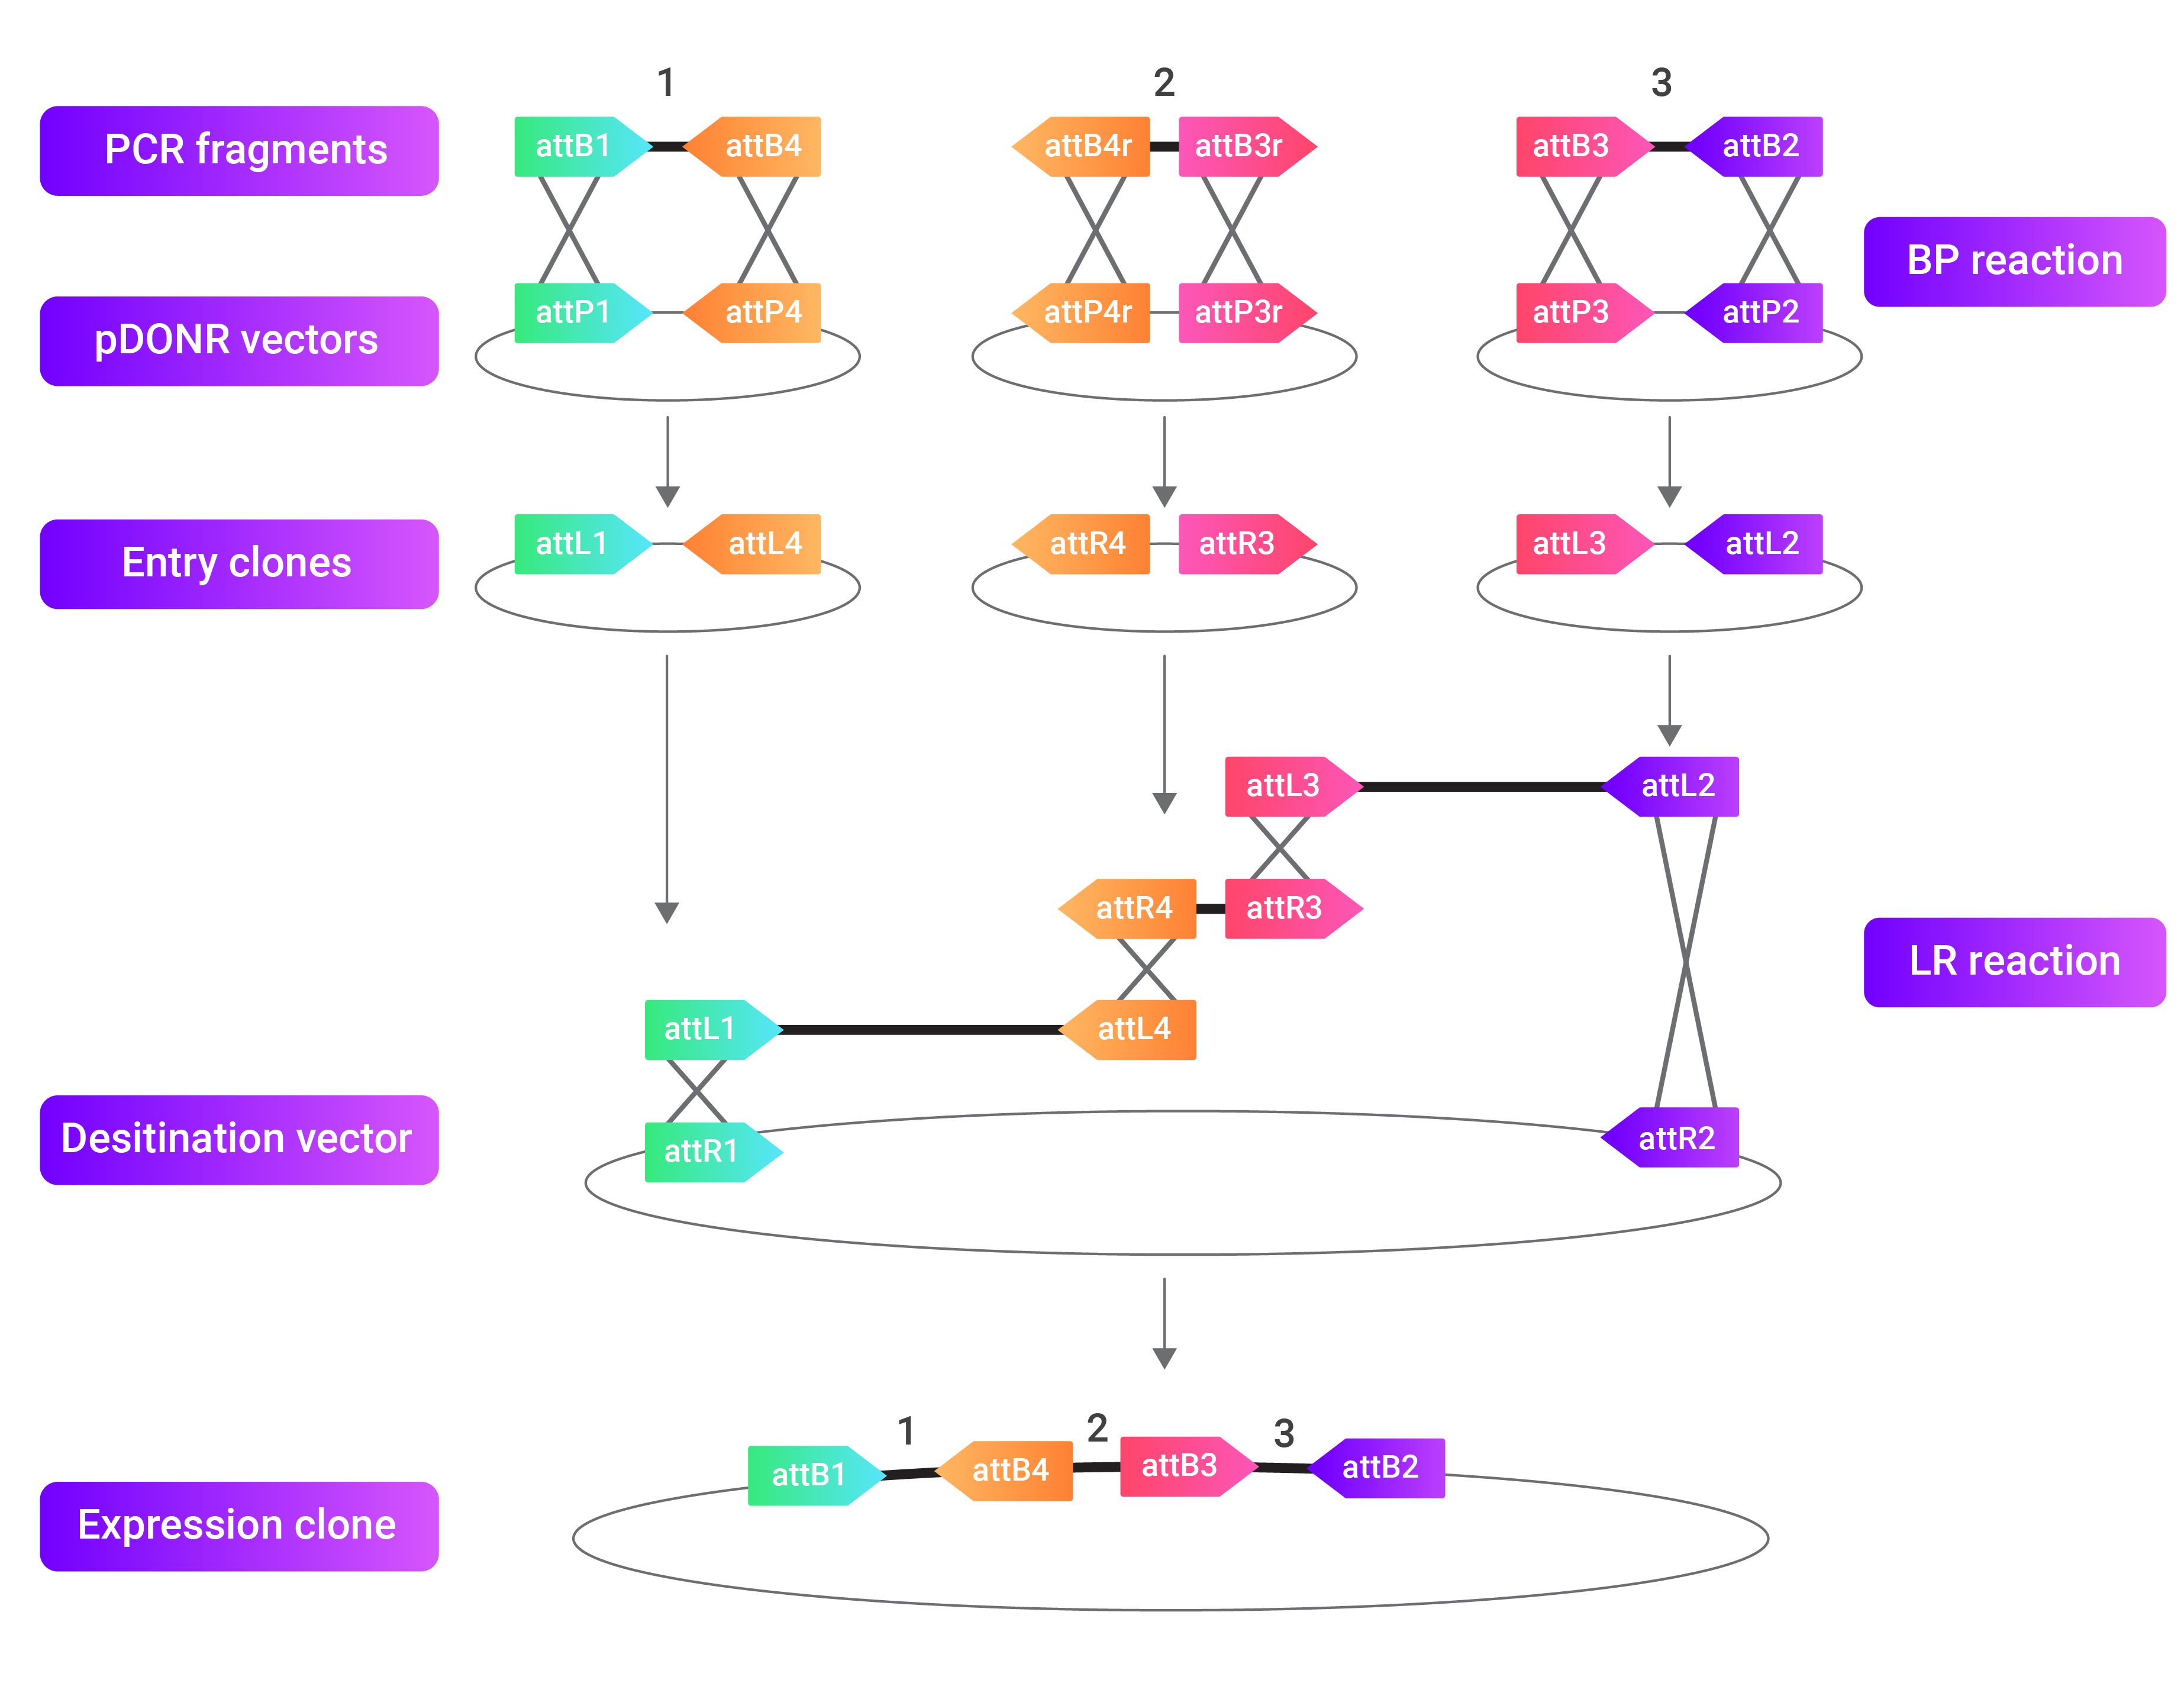
The image above outlines how Gateway cloning can gets used to incorporate many different genes/sequences of interest into one expression clone. This procedure is possible because each att site, attP, B, L, and R, have many variations and only recombine with other specific att sites.
How to simulate Gateway Cloning
In this method, you first choose a gene/region of interest from the sequence shown in the viewer that will get cloned into the final vector. From here, you will select the Donor Vector and Destination Vector to build the resulting cloning vector. For a walkthrough of how to do this, follow the below steps.
1. Open mendelgen, https://mendelgen.com/, and sign in.
2. Select and click a vector from your library that contains the gene/region of interest you want to clone into the final cloning vector.
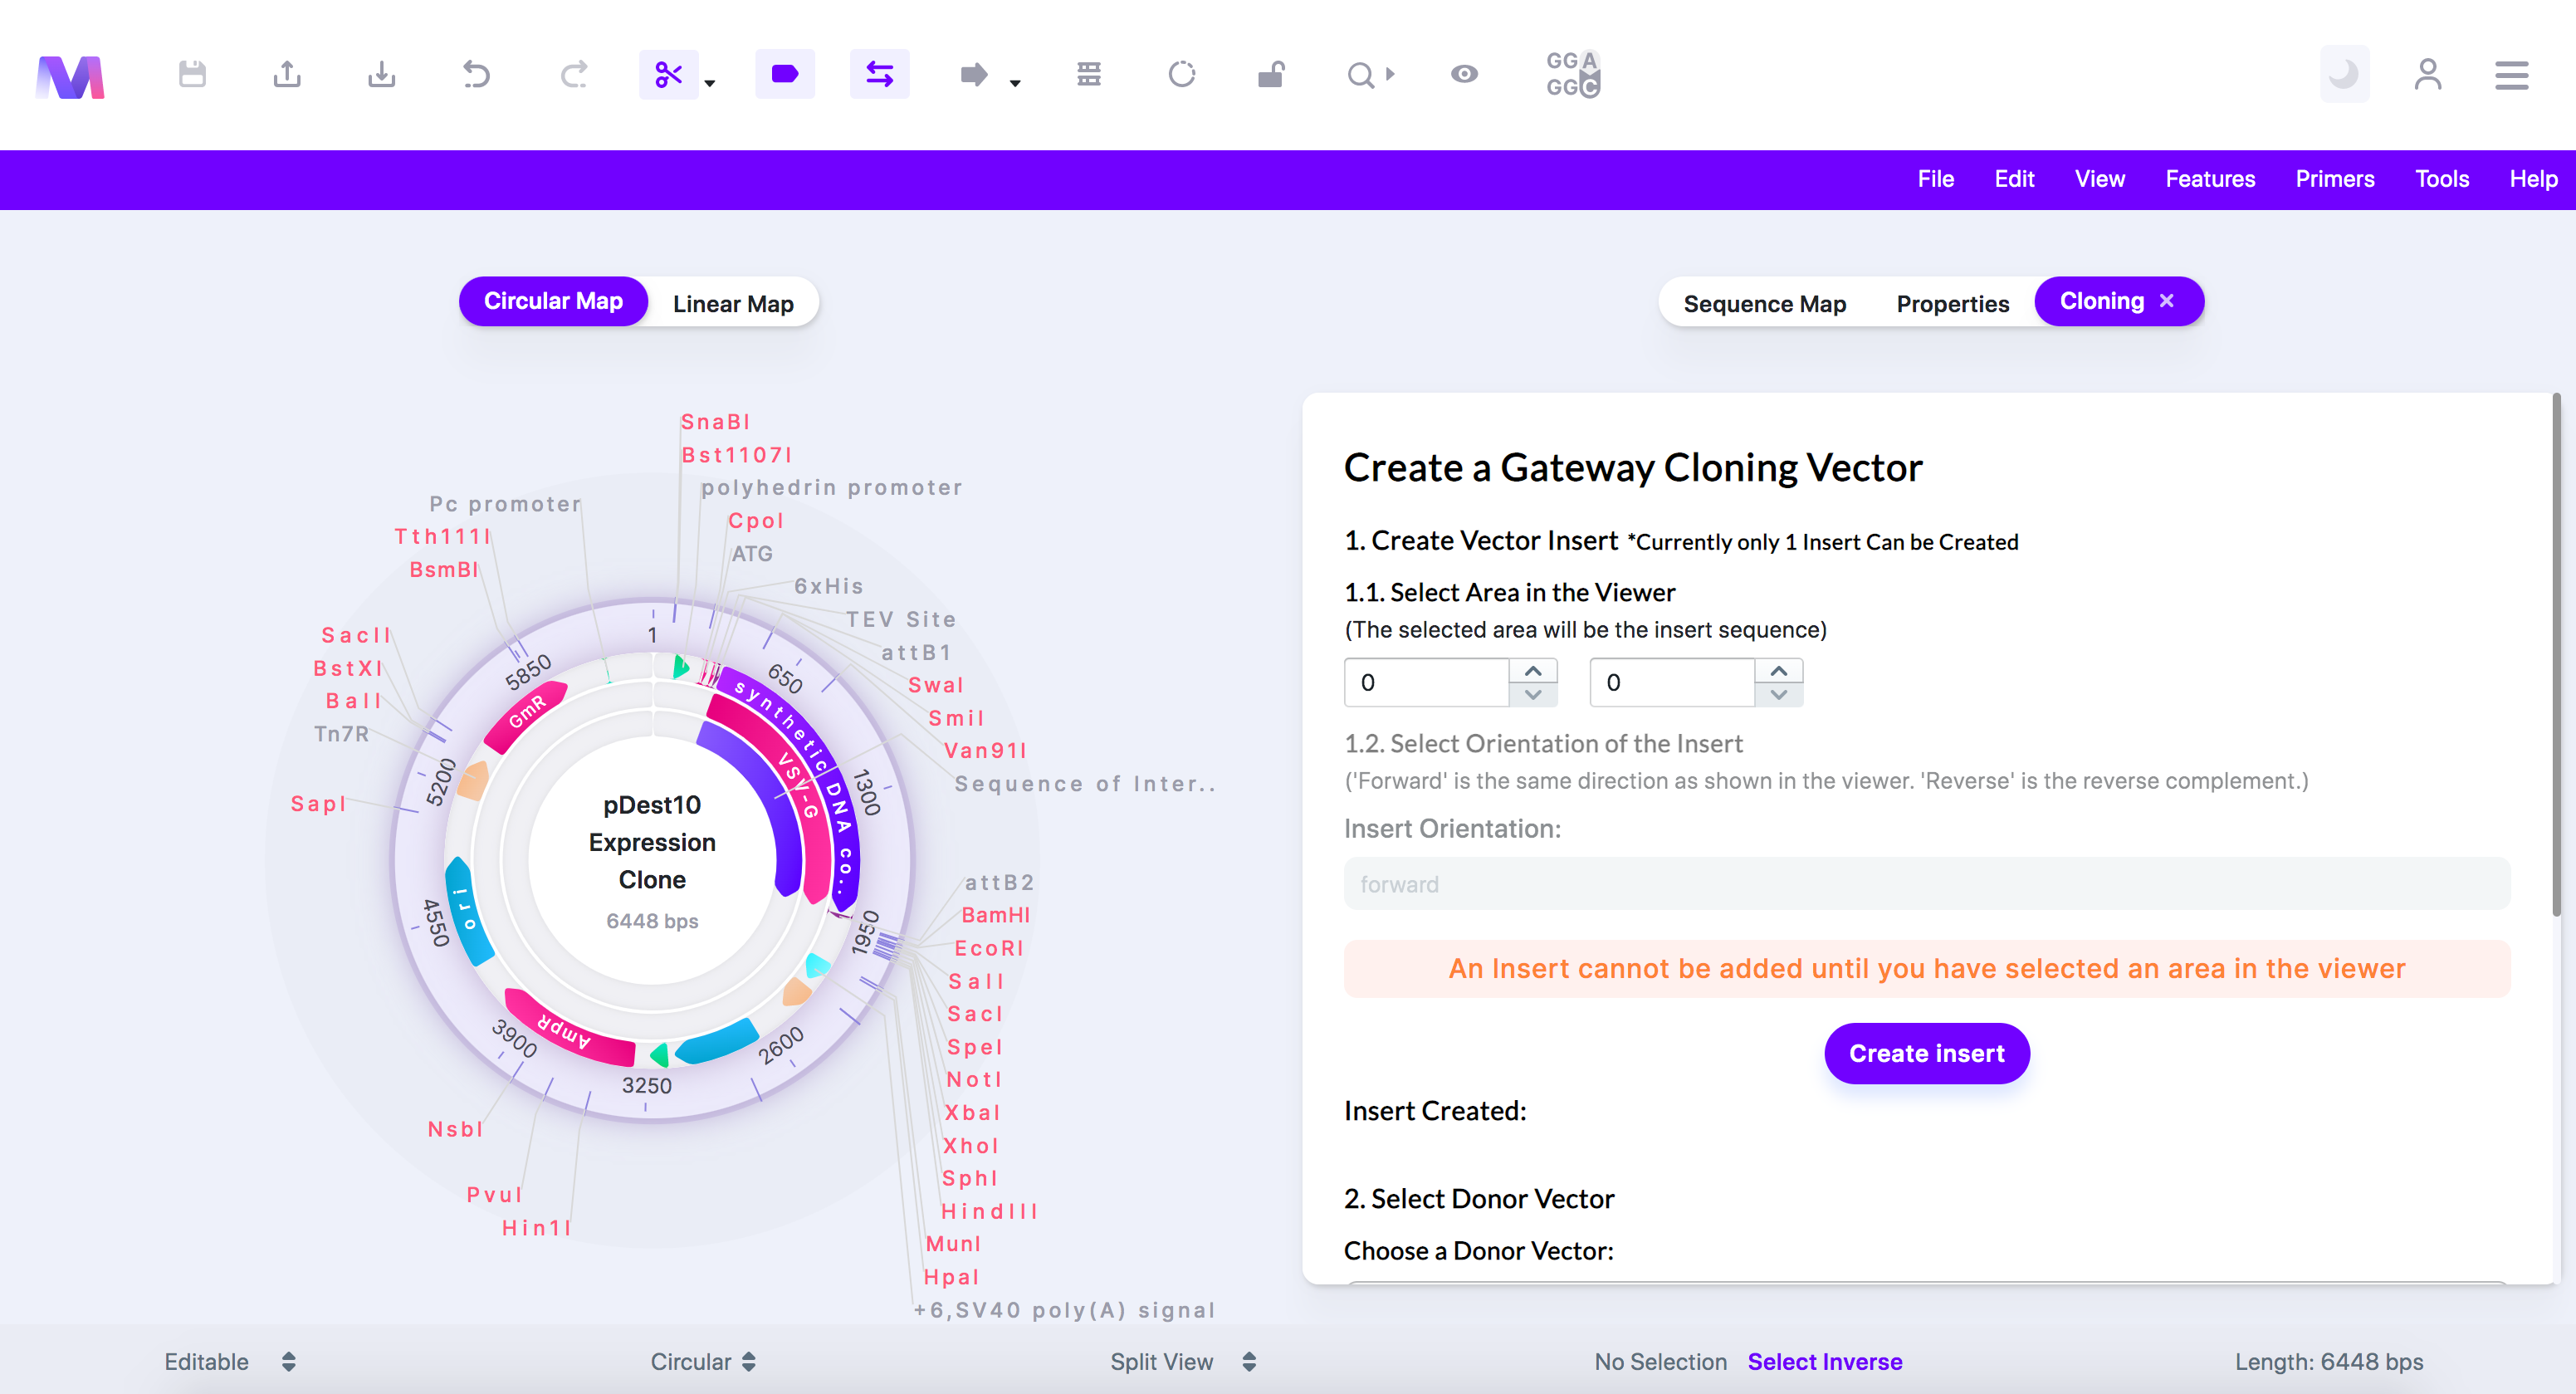
a. The Mendelgen dashboard is shown: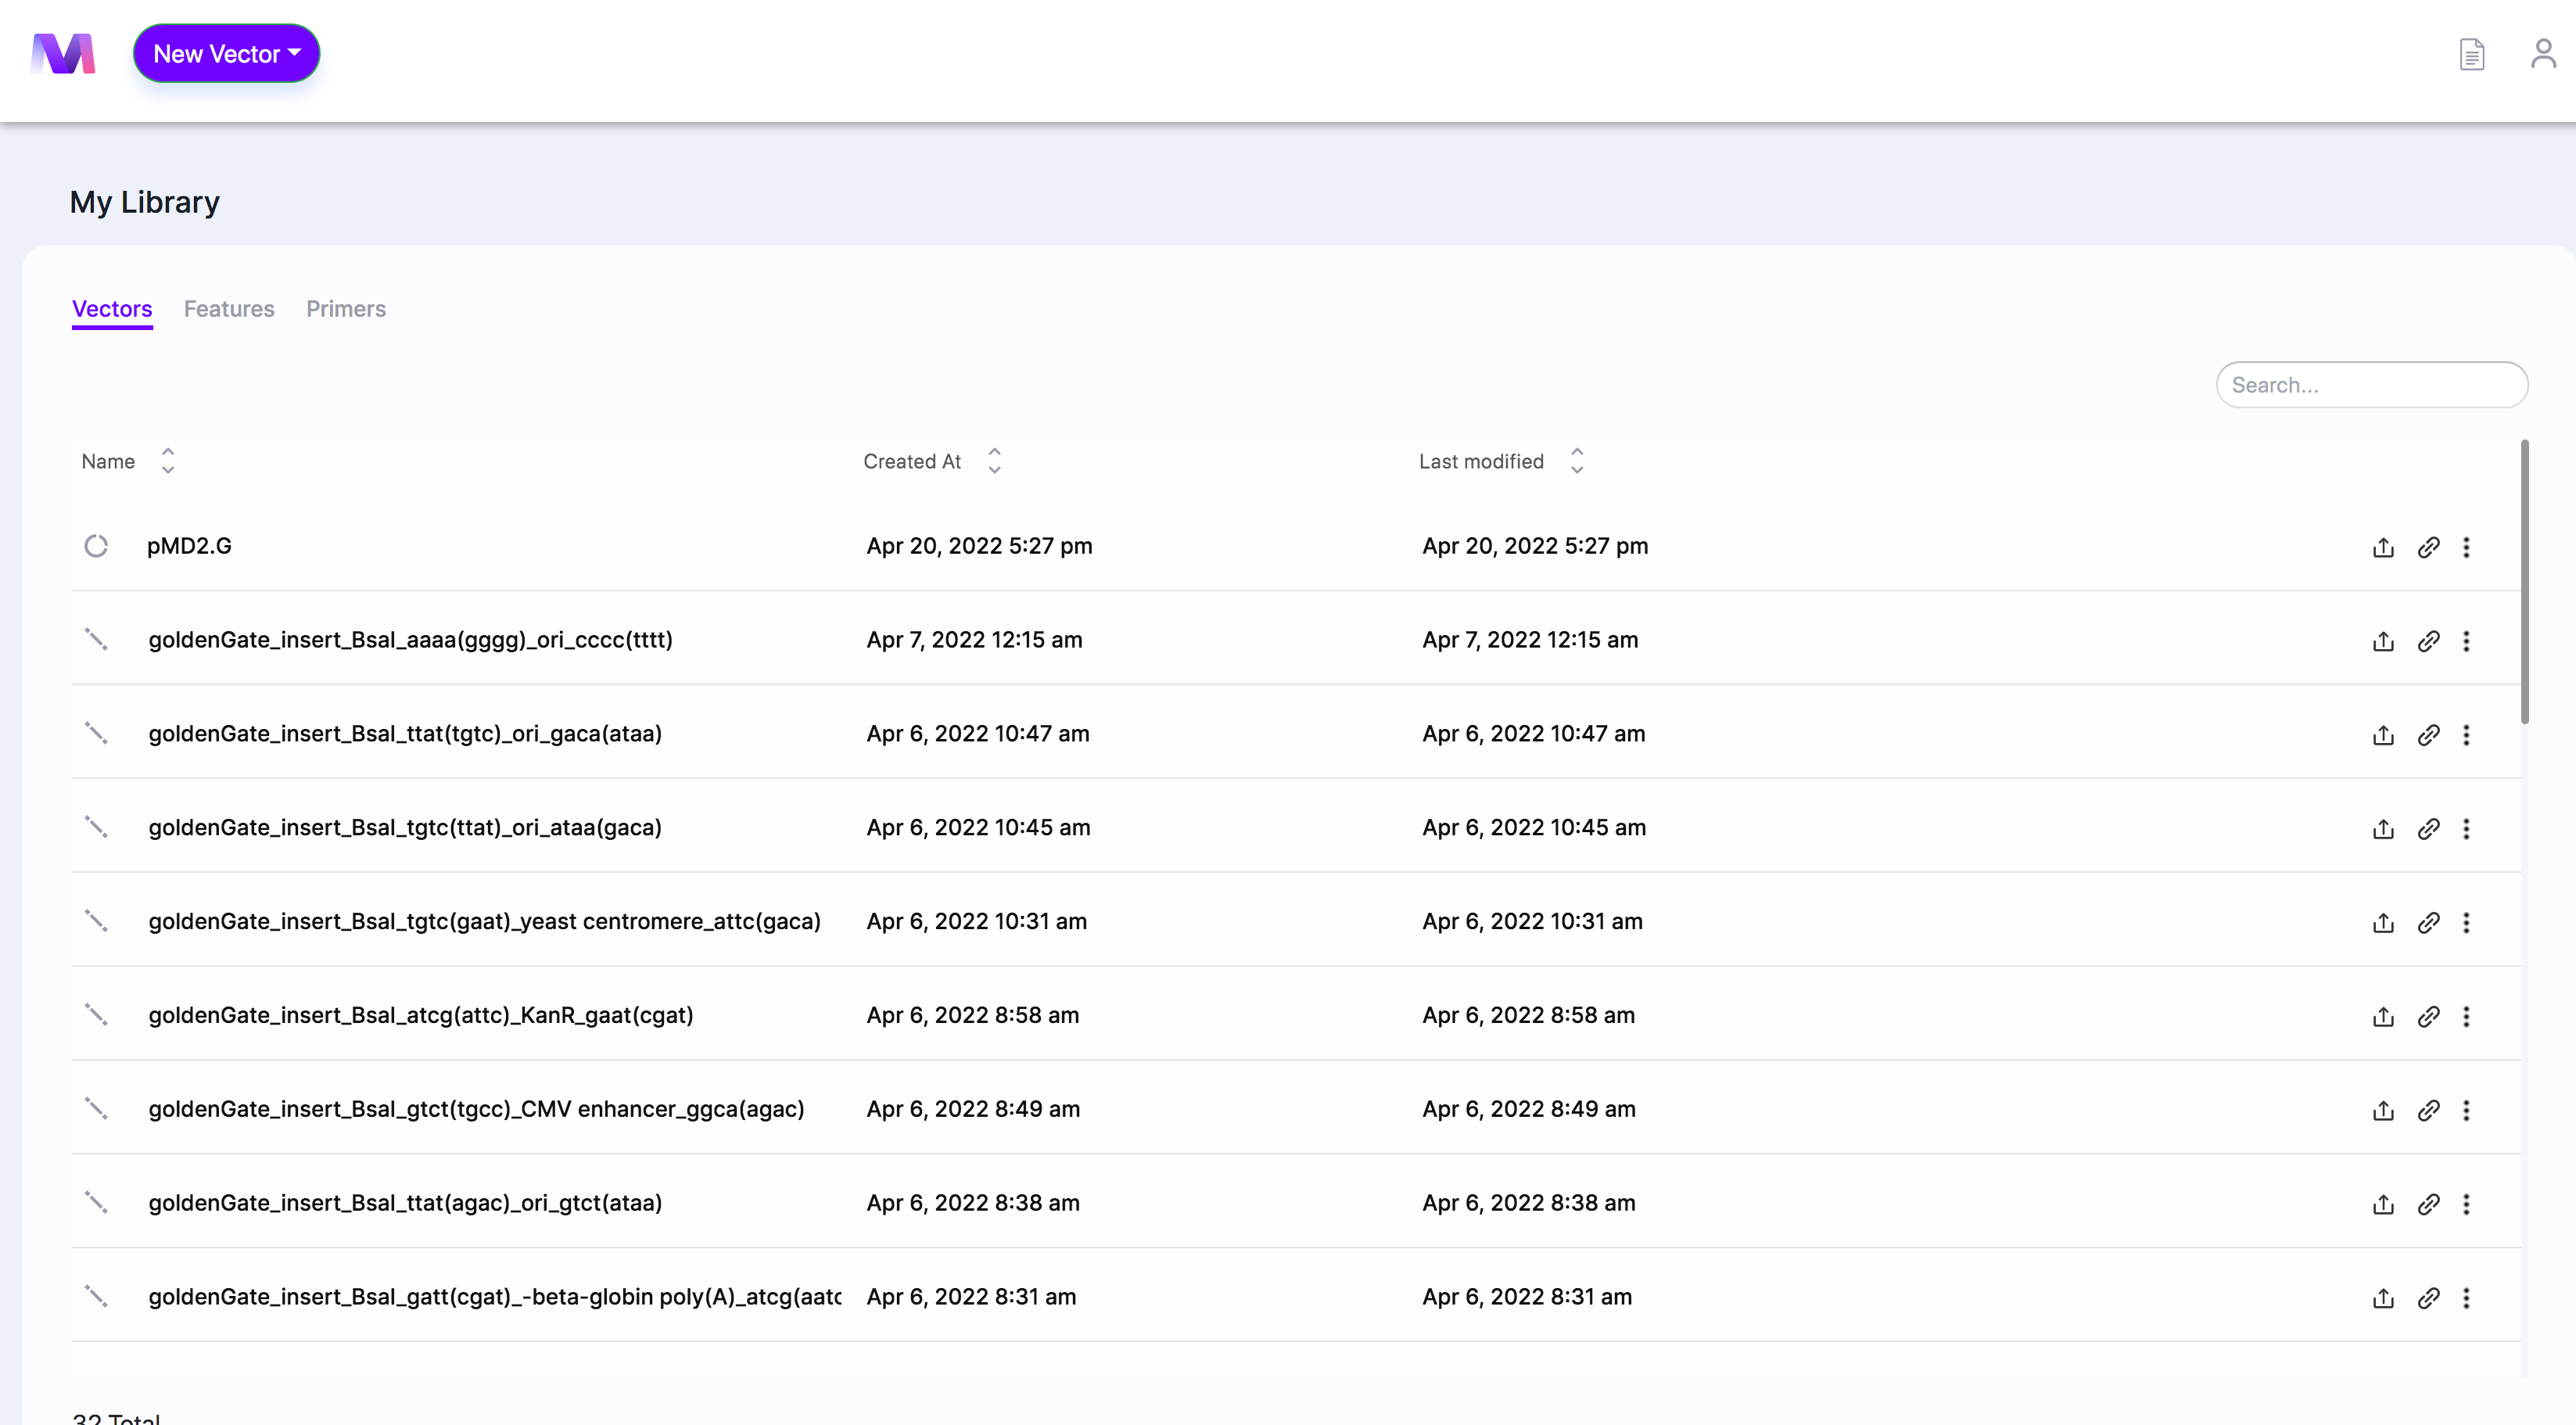
b. When the page opens, the selected sequence containing the gene/region of interest will be shown in the viewer.
3. In the first step, select the gene/region of interest from the sequence you want to use in the cloning.
a. Click a feature, or drag over a region in the viewer, to choose the insert to use in cloning. You can also manually type in the start and end locations.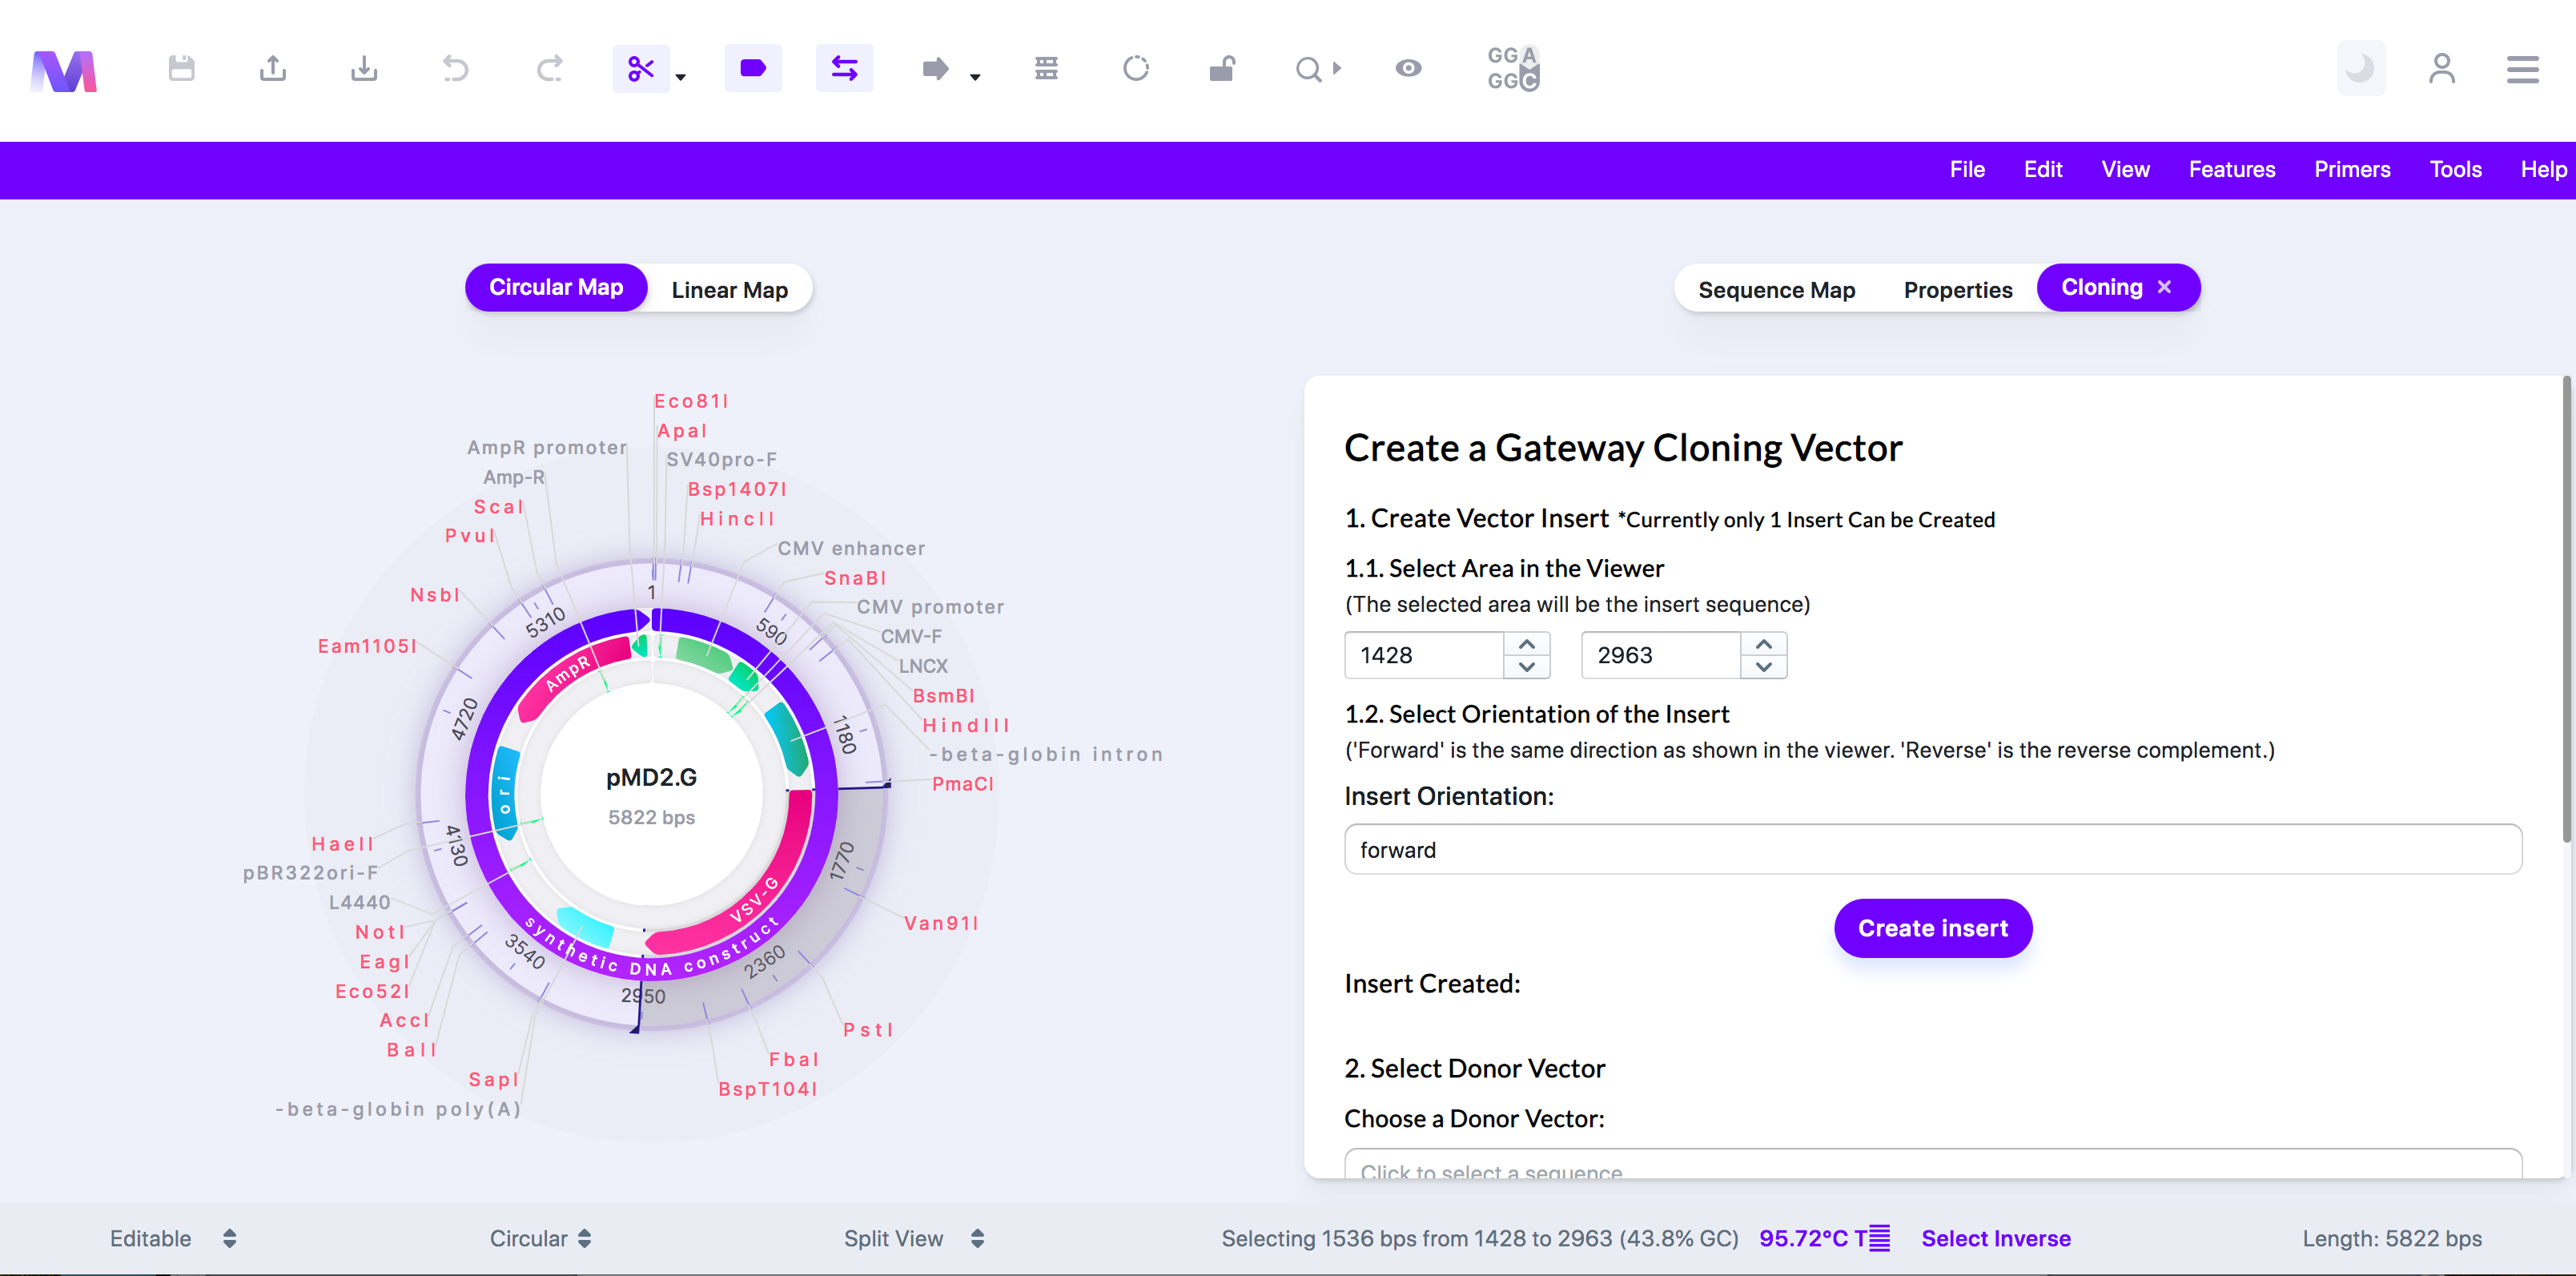
b. Or switch to the 'Sequence Map' tab, click on a feature or location, and then switch back to the 'Cloning' tab.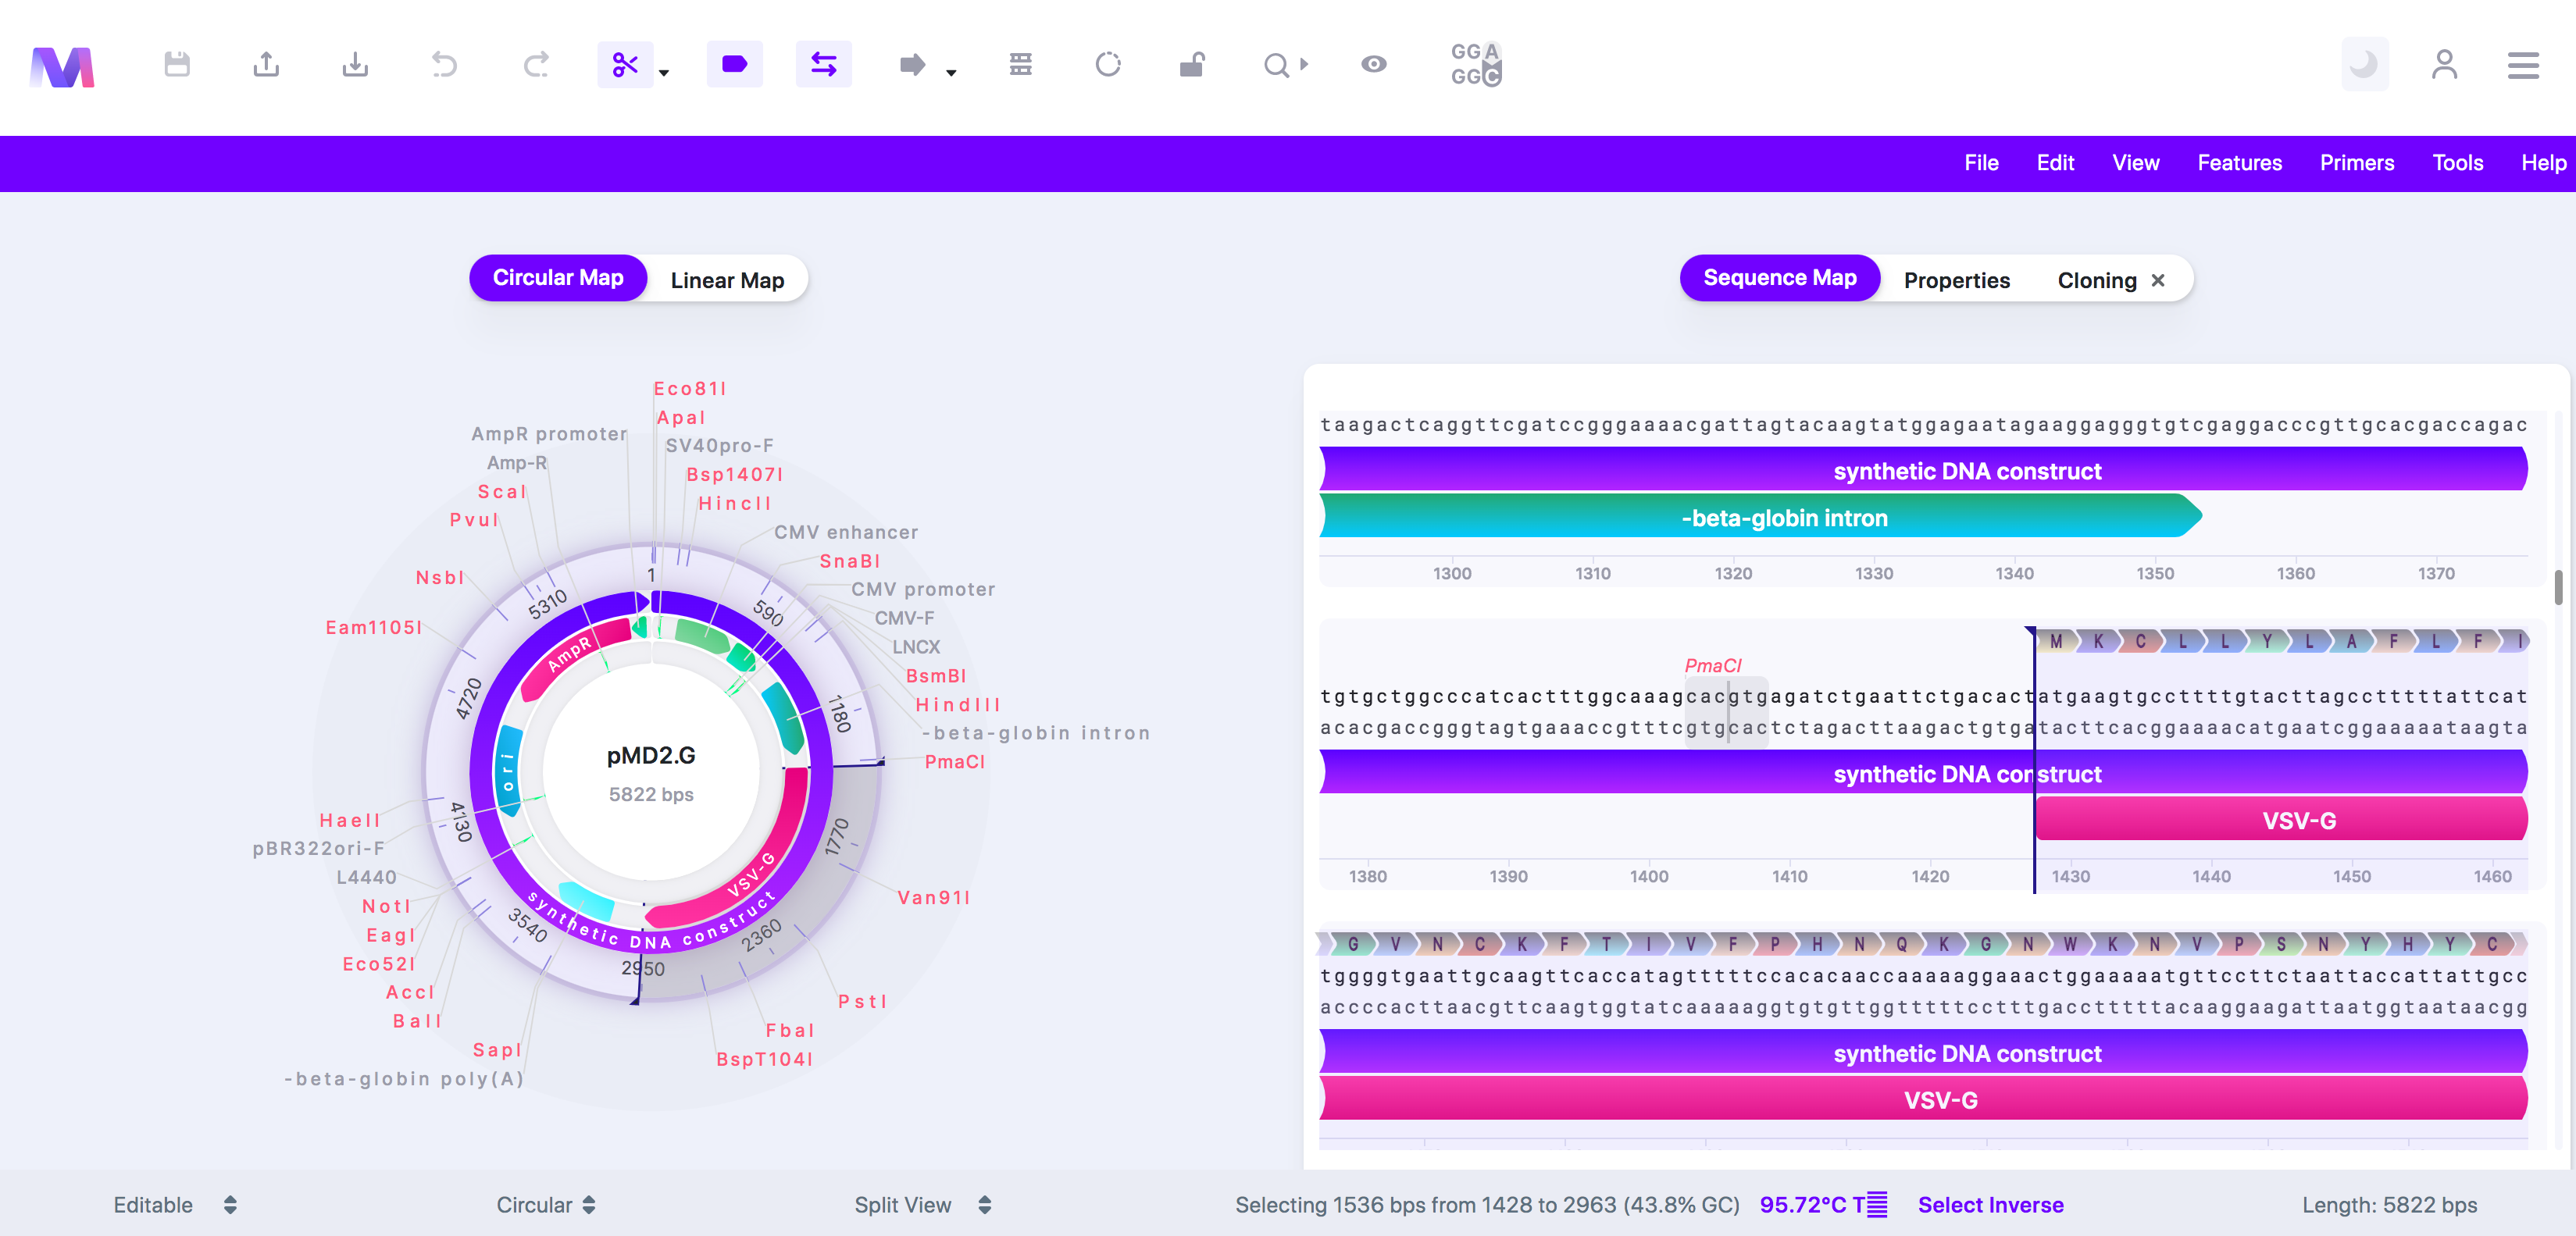
c. Select the orientation for your selected region in the final vector.
i. Forward is shown in the viewer, regardless if the gene chosen goes in the forward or reverse direction.
ii. Reverse is the reverse complement of what is shown in the viewer.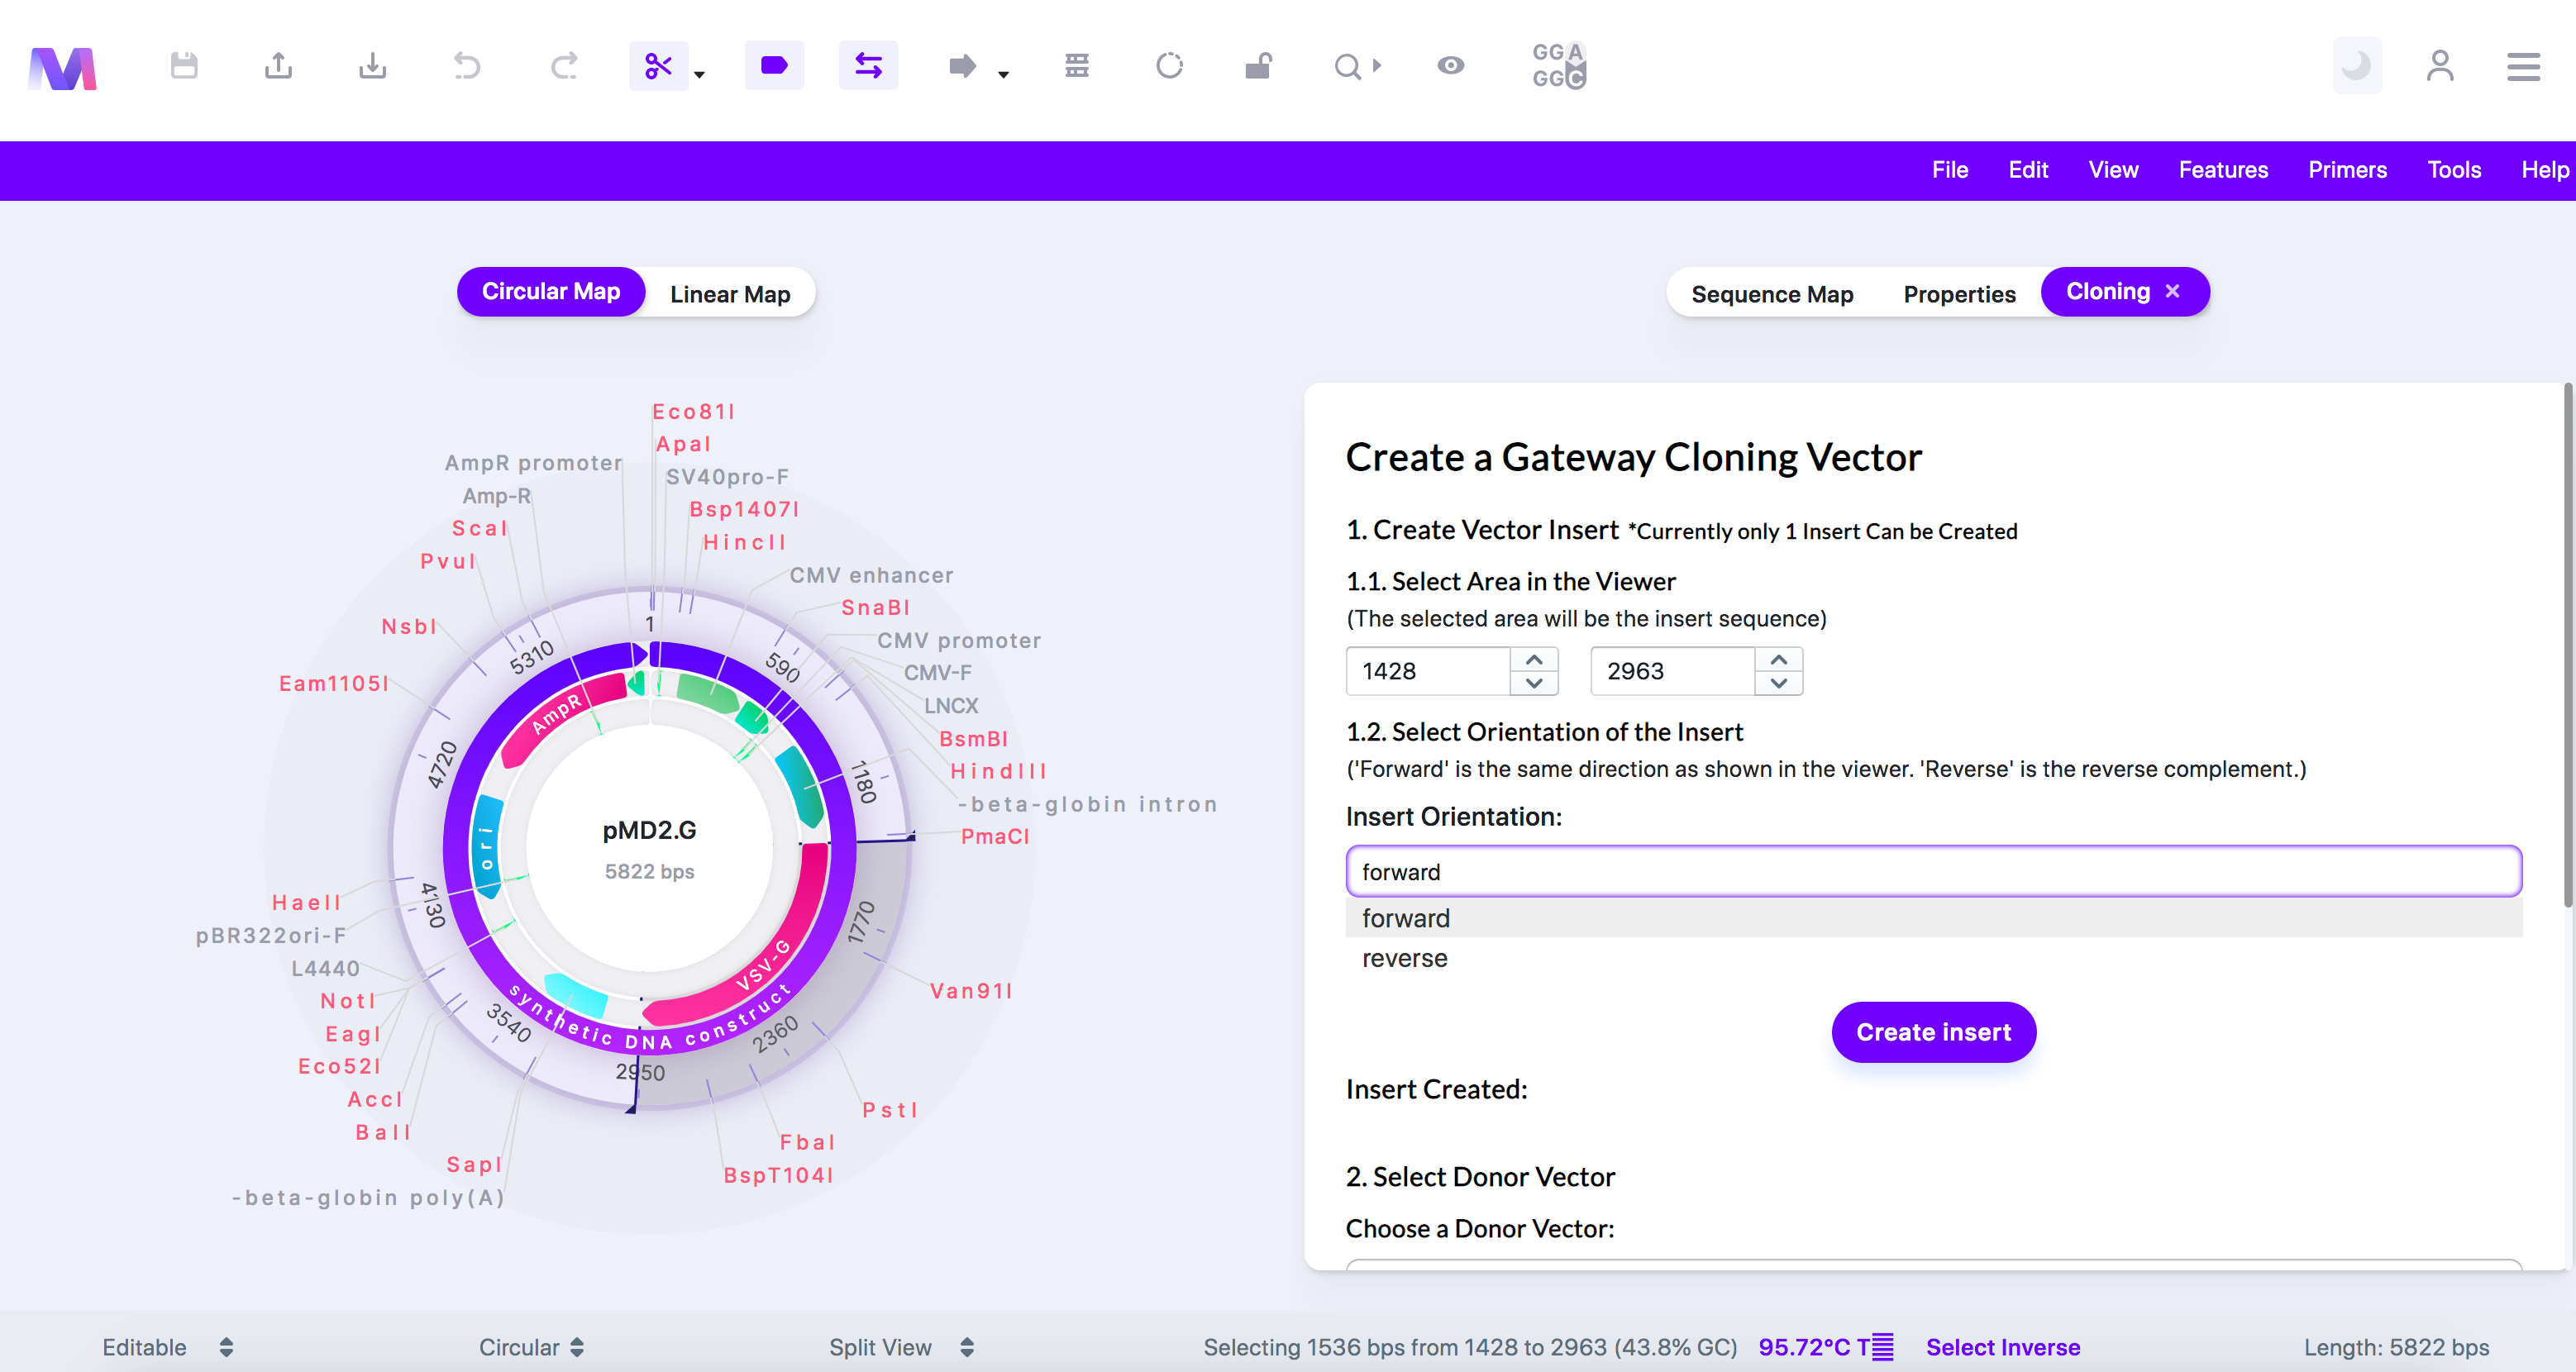
e. Click 'Create Insert', and the insert will get added under 'Insert Created.'
f. Currently, creating only one insert is supported.
4. Check the correct insert has been added under 'Insert Created.'
a. Click the 'X' by the sequence under 'Insert Created' to remove the insert from the list so you can add a different insert.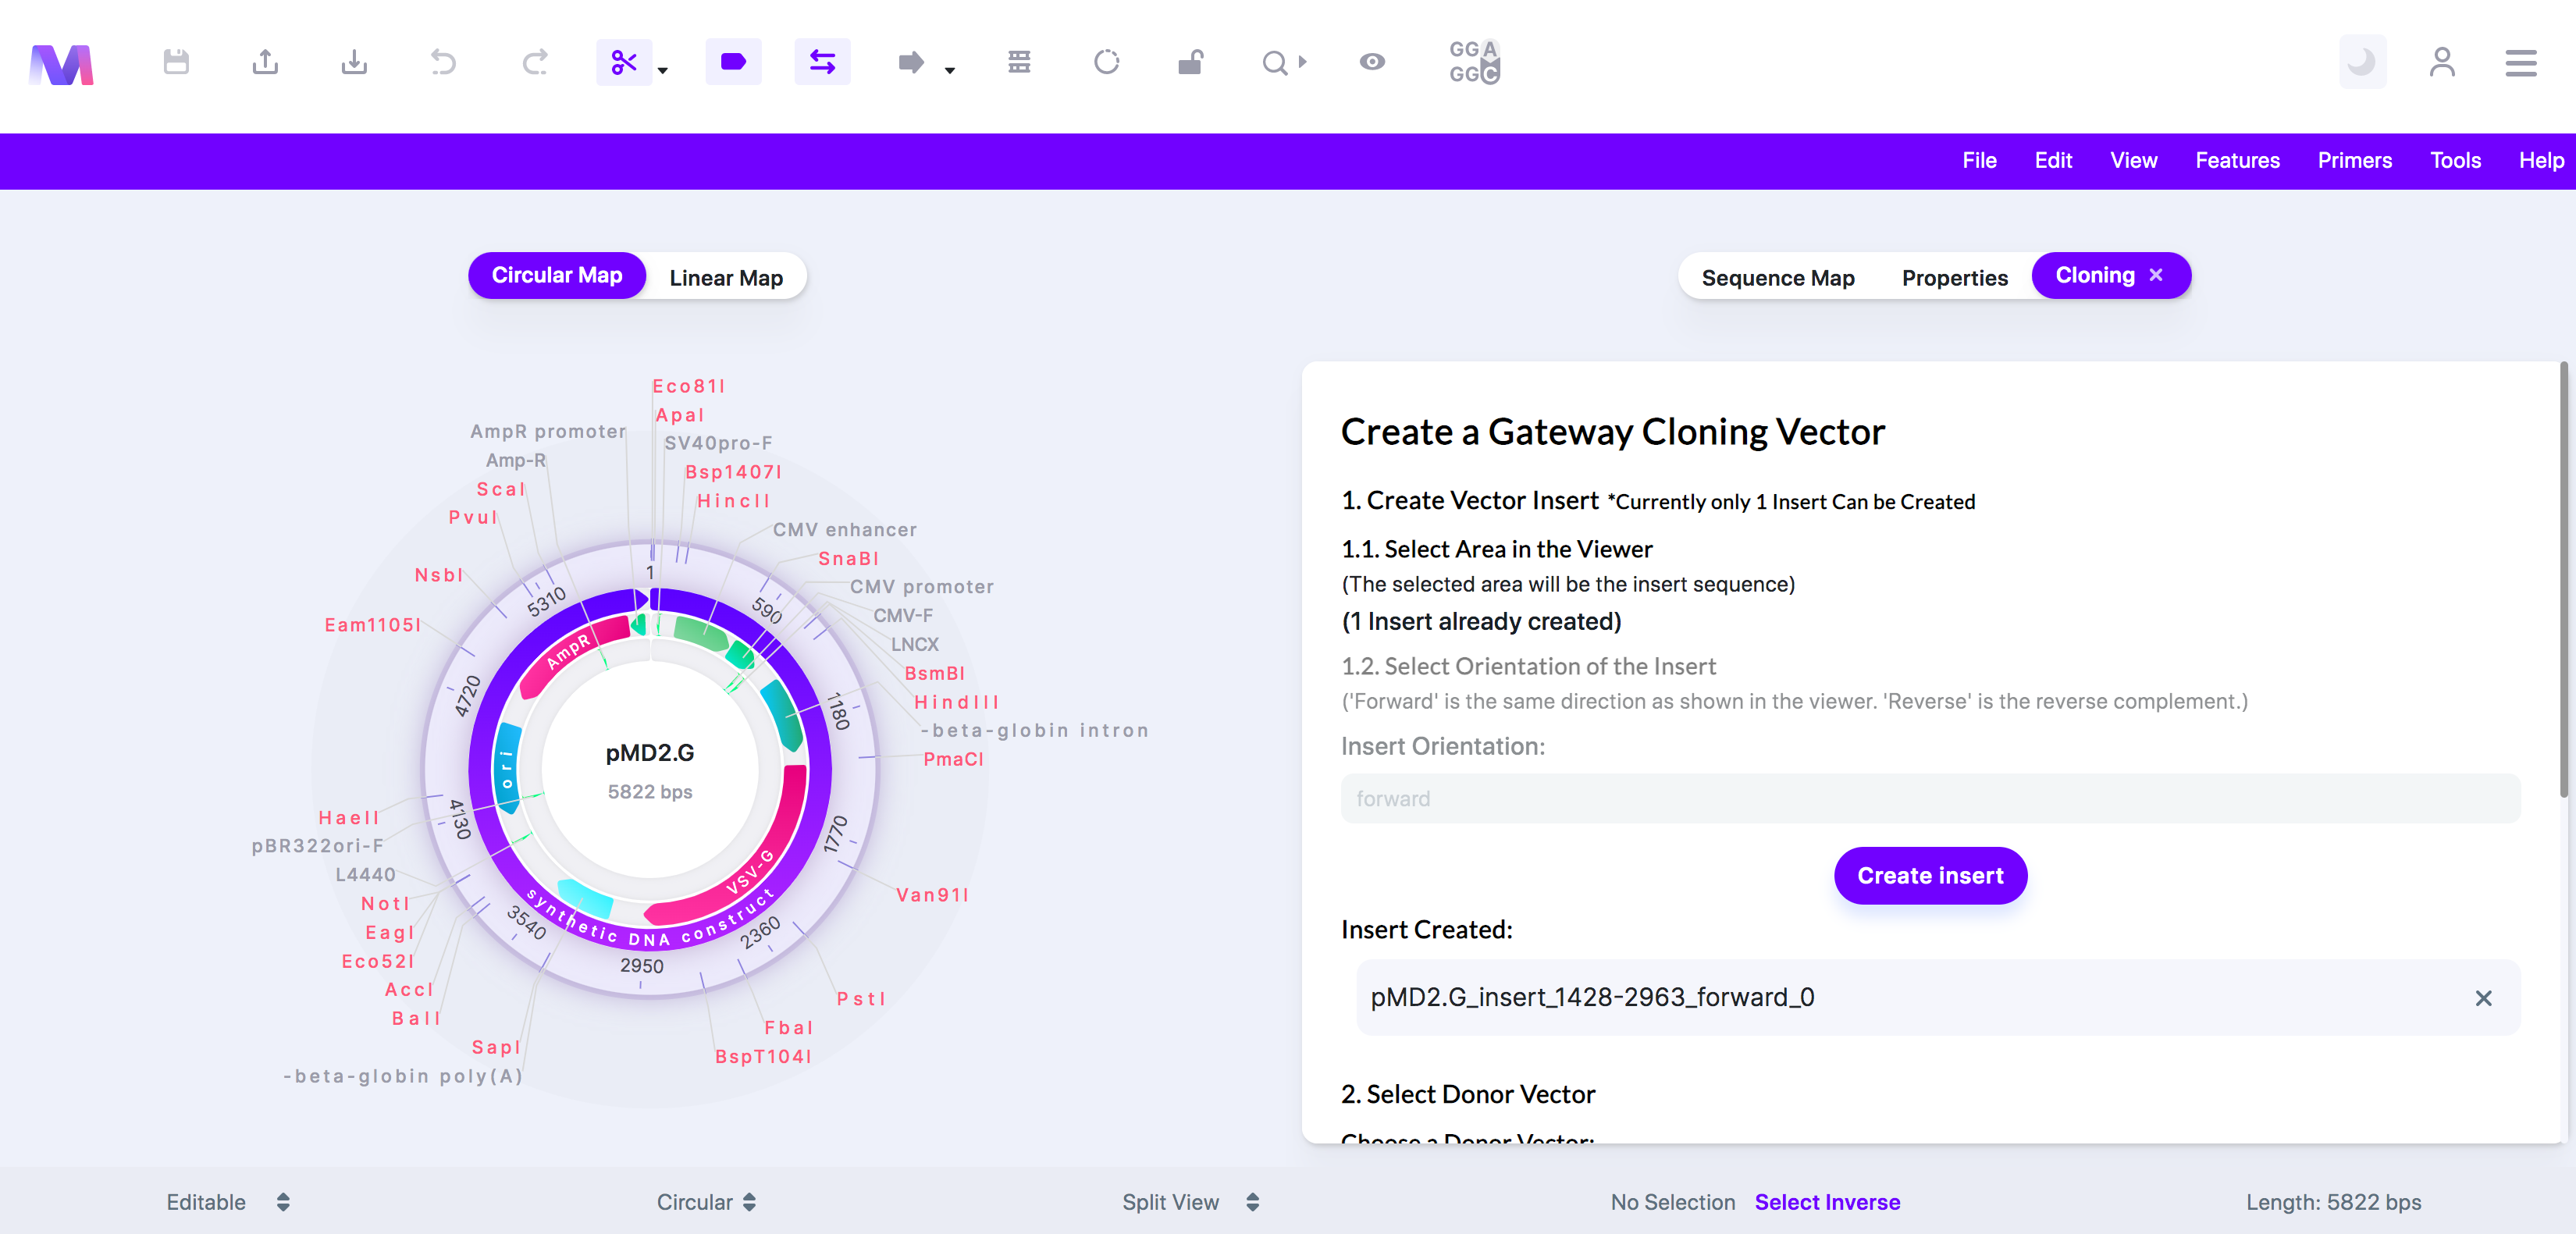
b. Insert shown under 'Insert Created.'
5. Select a Donor Vector.
a. Choose a sequence from the dropdown, and it will automatically get added under 'Donor Vector.'
b. You can view this sequence in a new tab by clicking the sequence name once it has been added to 'Donor Vector.
c. The dropdown under 'Choose a Donor Vector' opens to select a sequence to be used as the donor vector.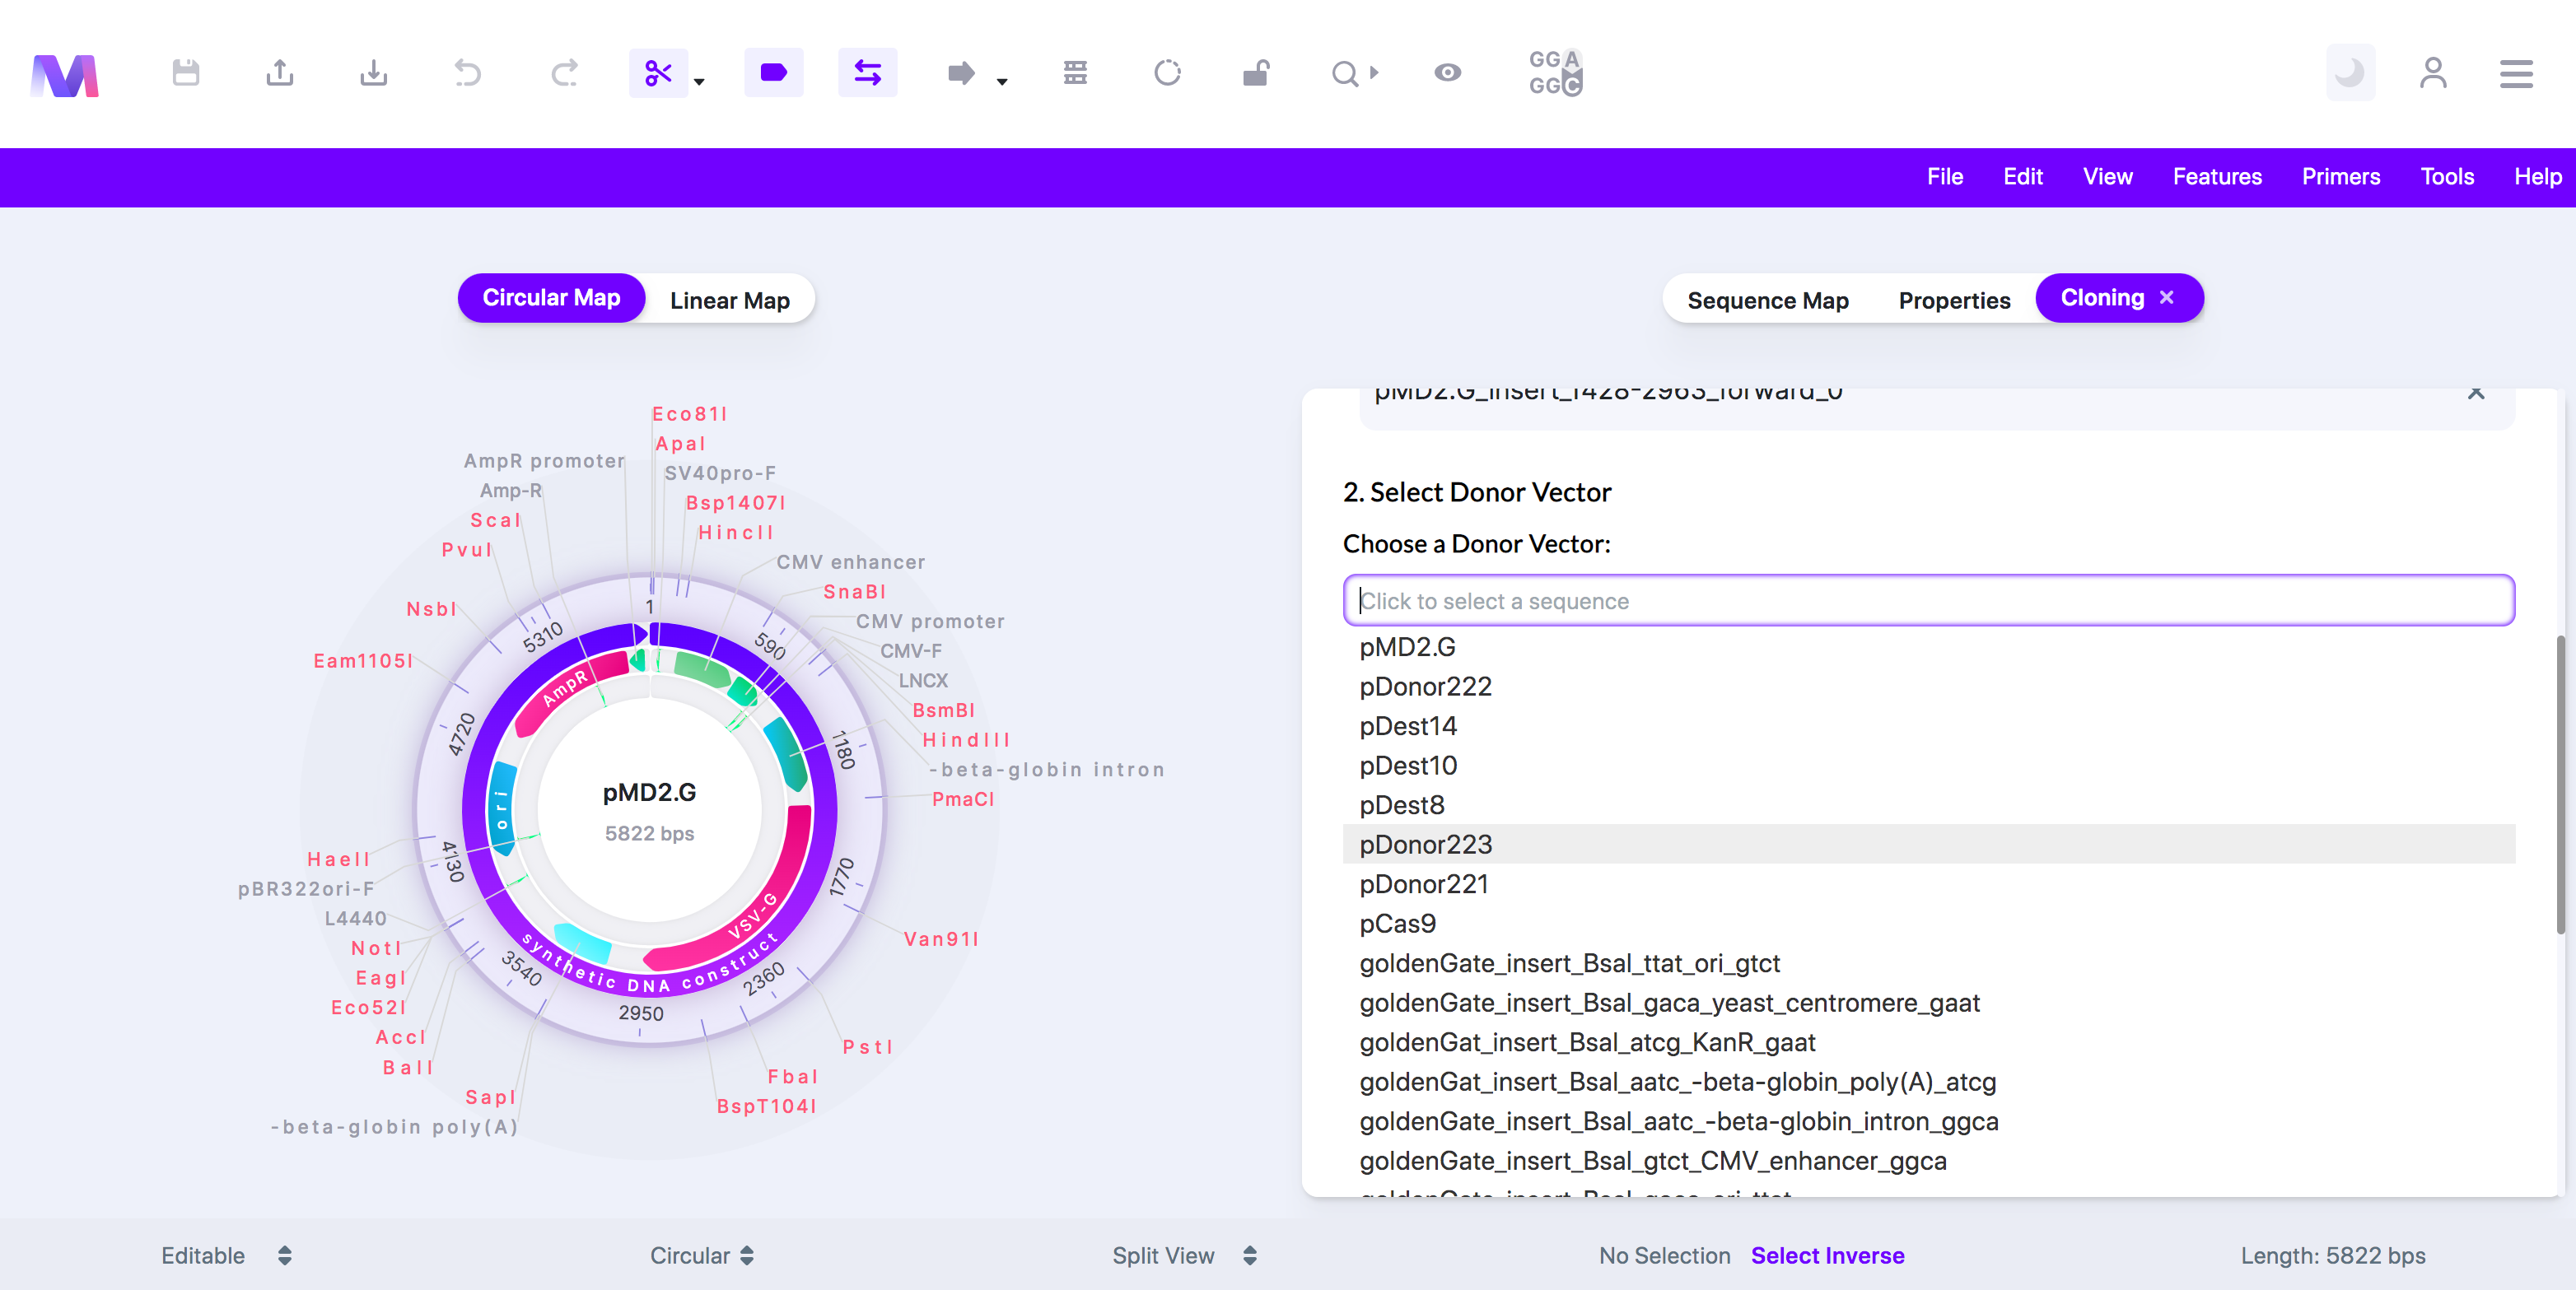
d. The donor vector must already contain the 'attP' sites.
e. Currently, only one donor vector is supported.
6. Check the correct donor vector has been added under 'Donor Vector.'
a. Click the 'X' by the sequence under 'Donor Vector' to remove the donor vector from the list so you can add a different donor vector.
b. Donor vector listed under ‘Donor Vector.’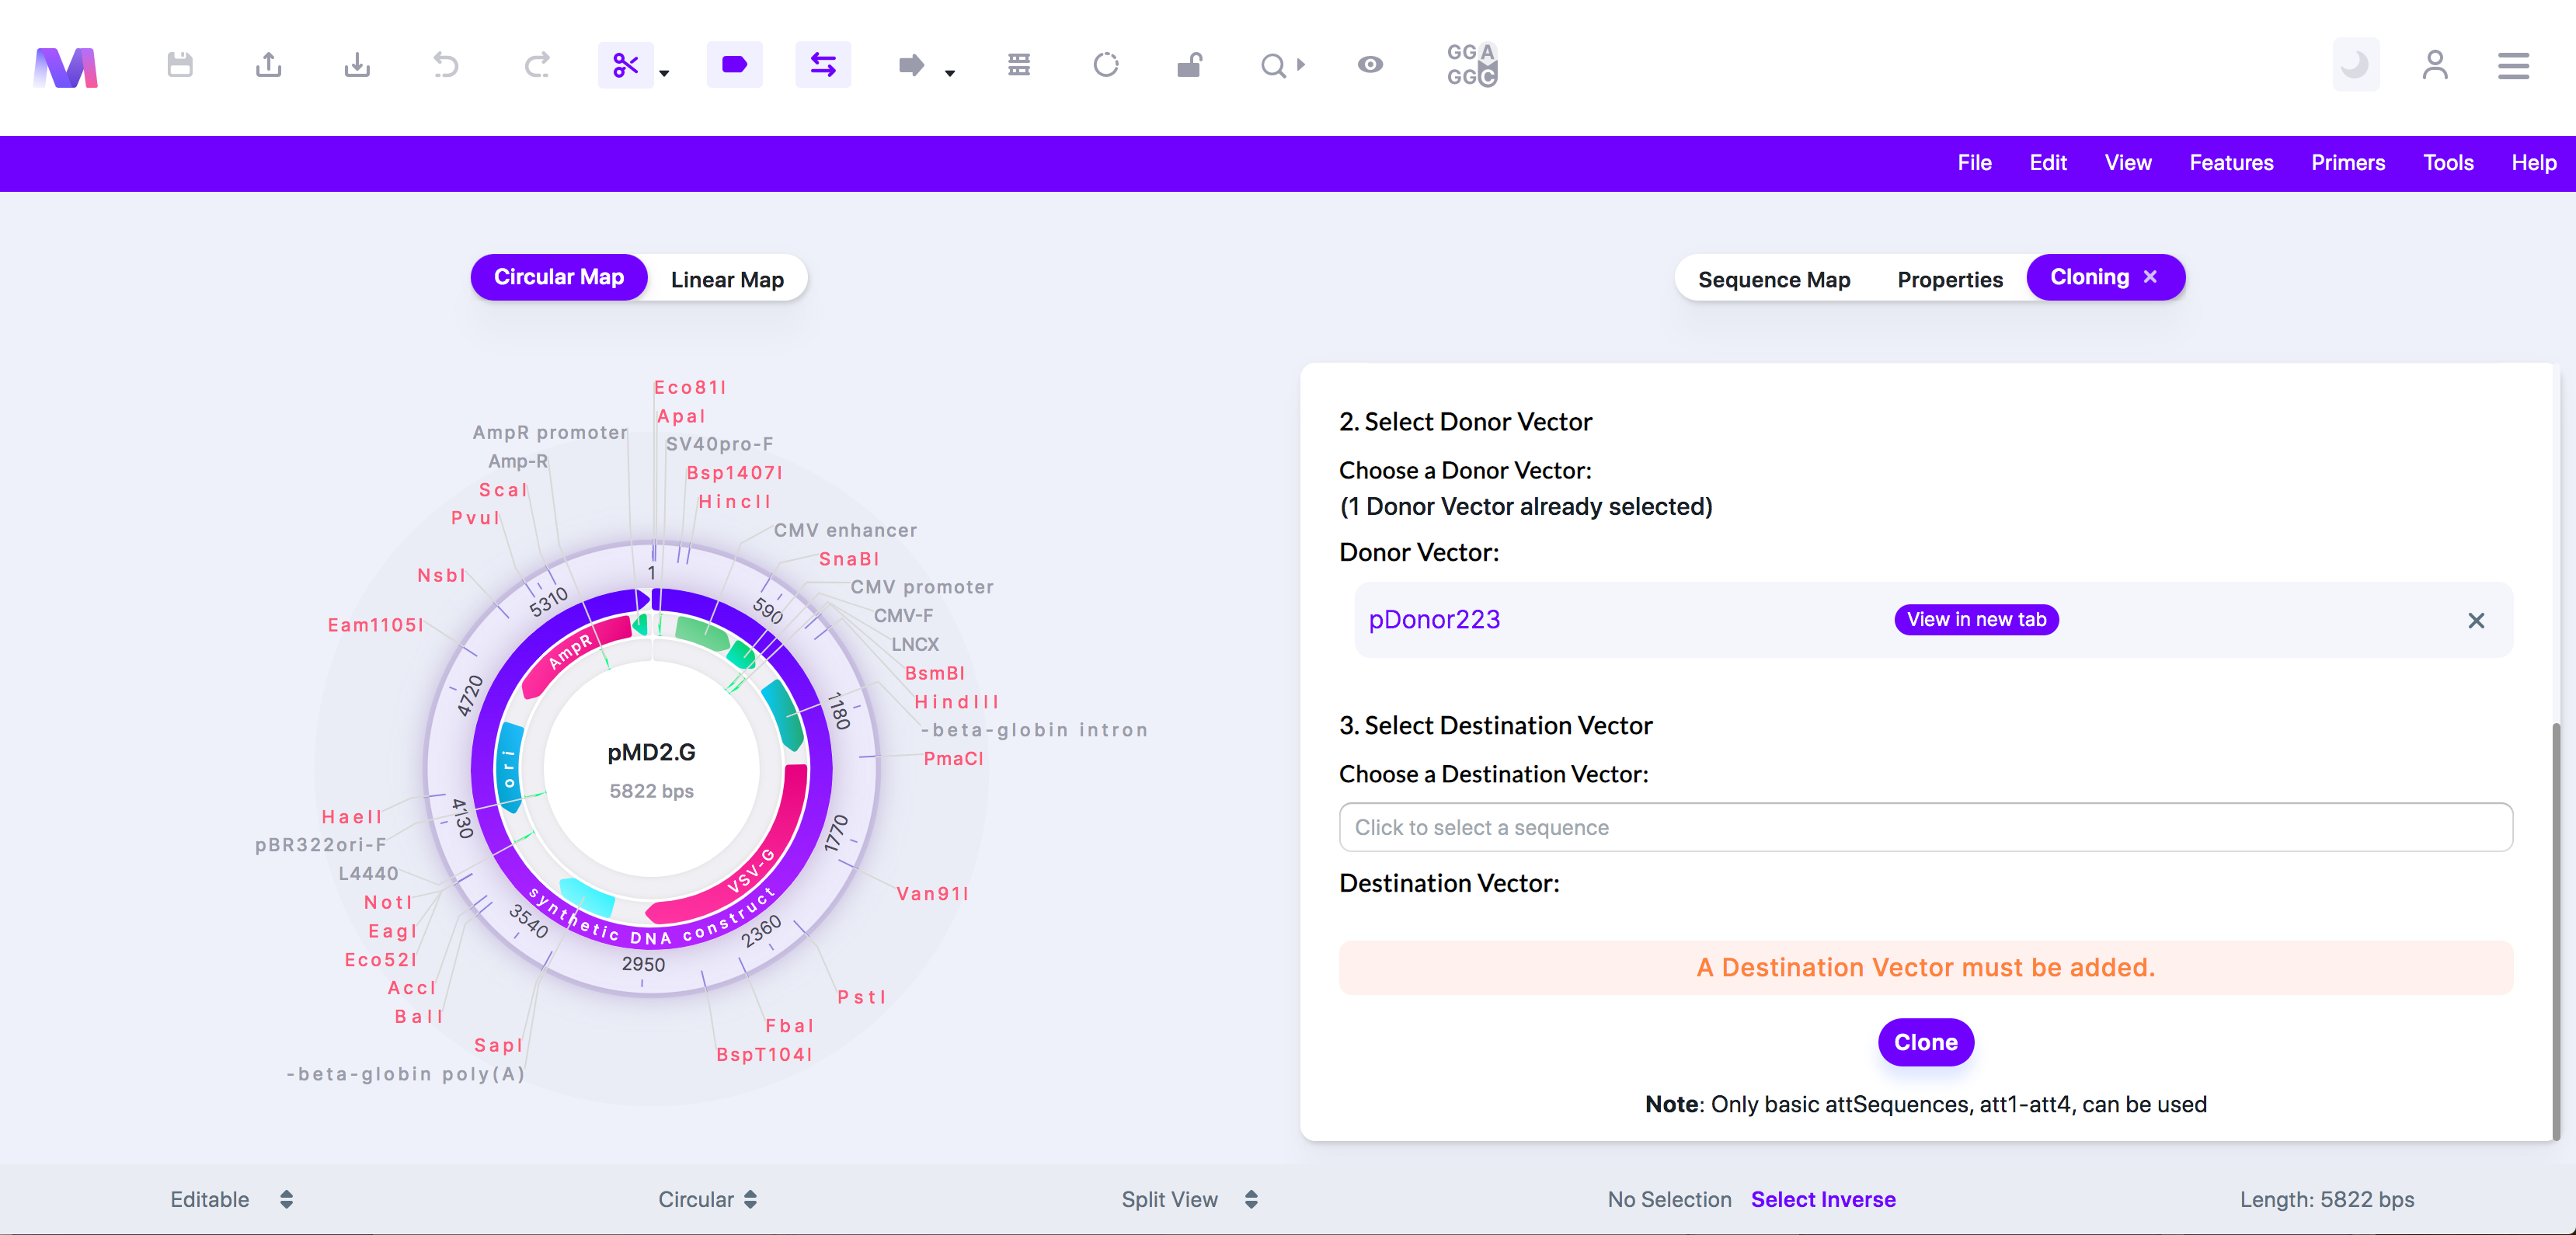
7. Select a Destination Vector.
a. Choose a sequence from the dropdown, and it will automatically be added under 'Destination Vector.'
b. You can view this sequence in a new tab by clicking the sequence name once it has been added to 'Destination Vector.'
c. The dropdown under 'Choose a Destination Vector' opens to select a sequence to be used as the destination vector.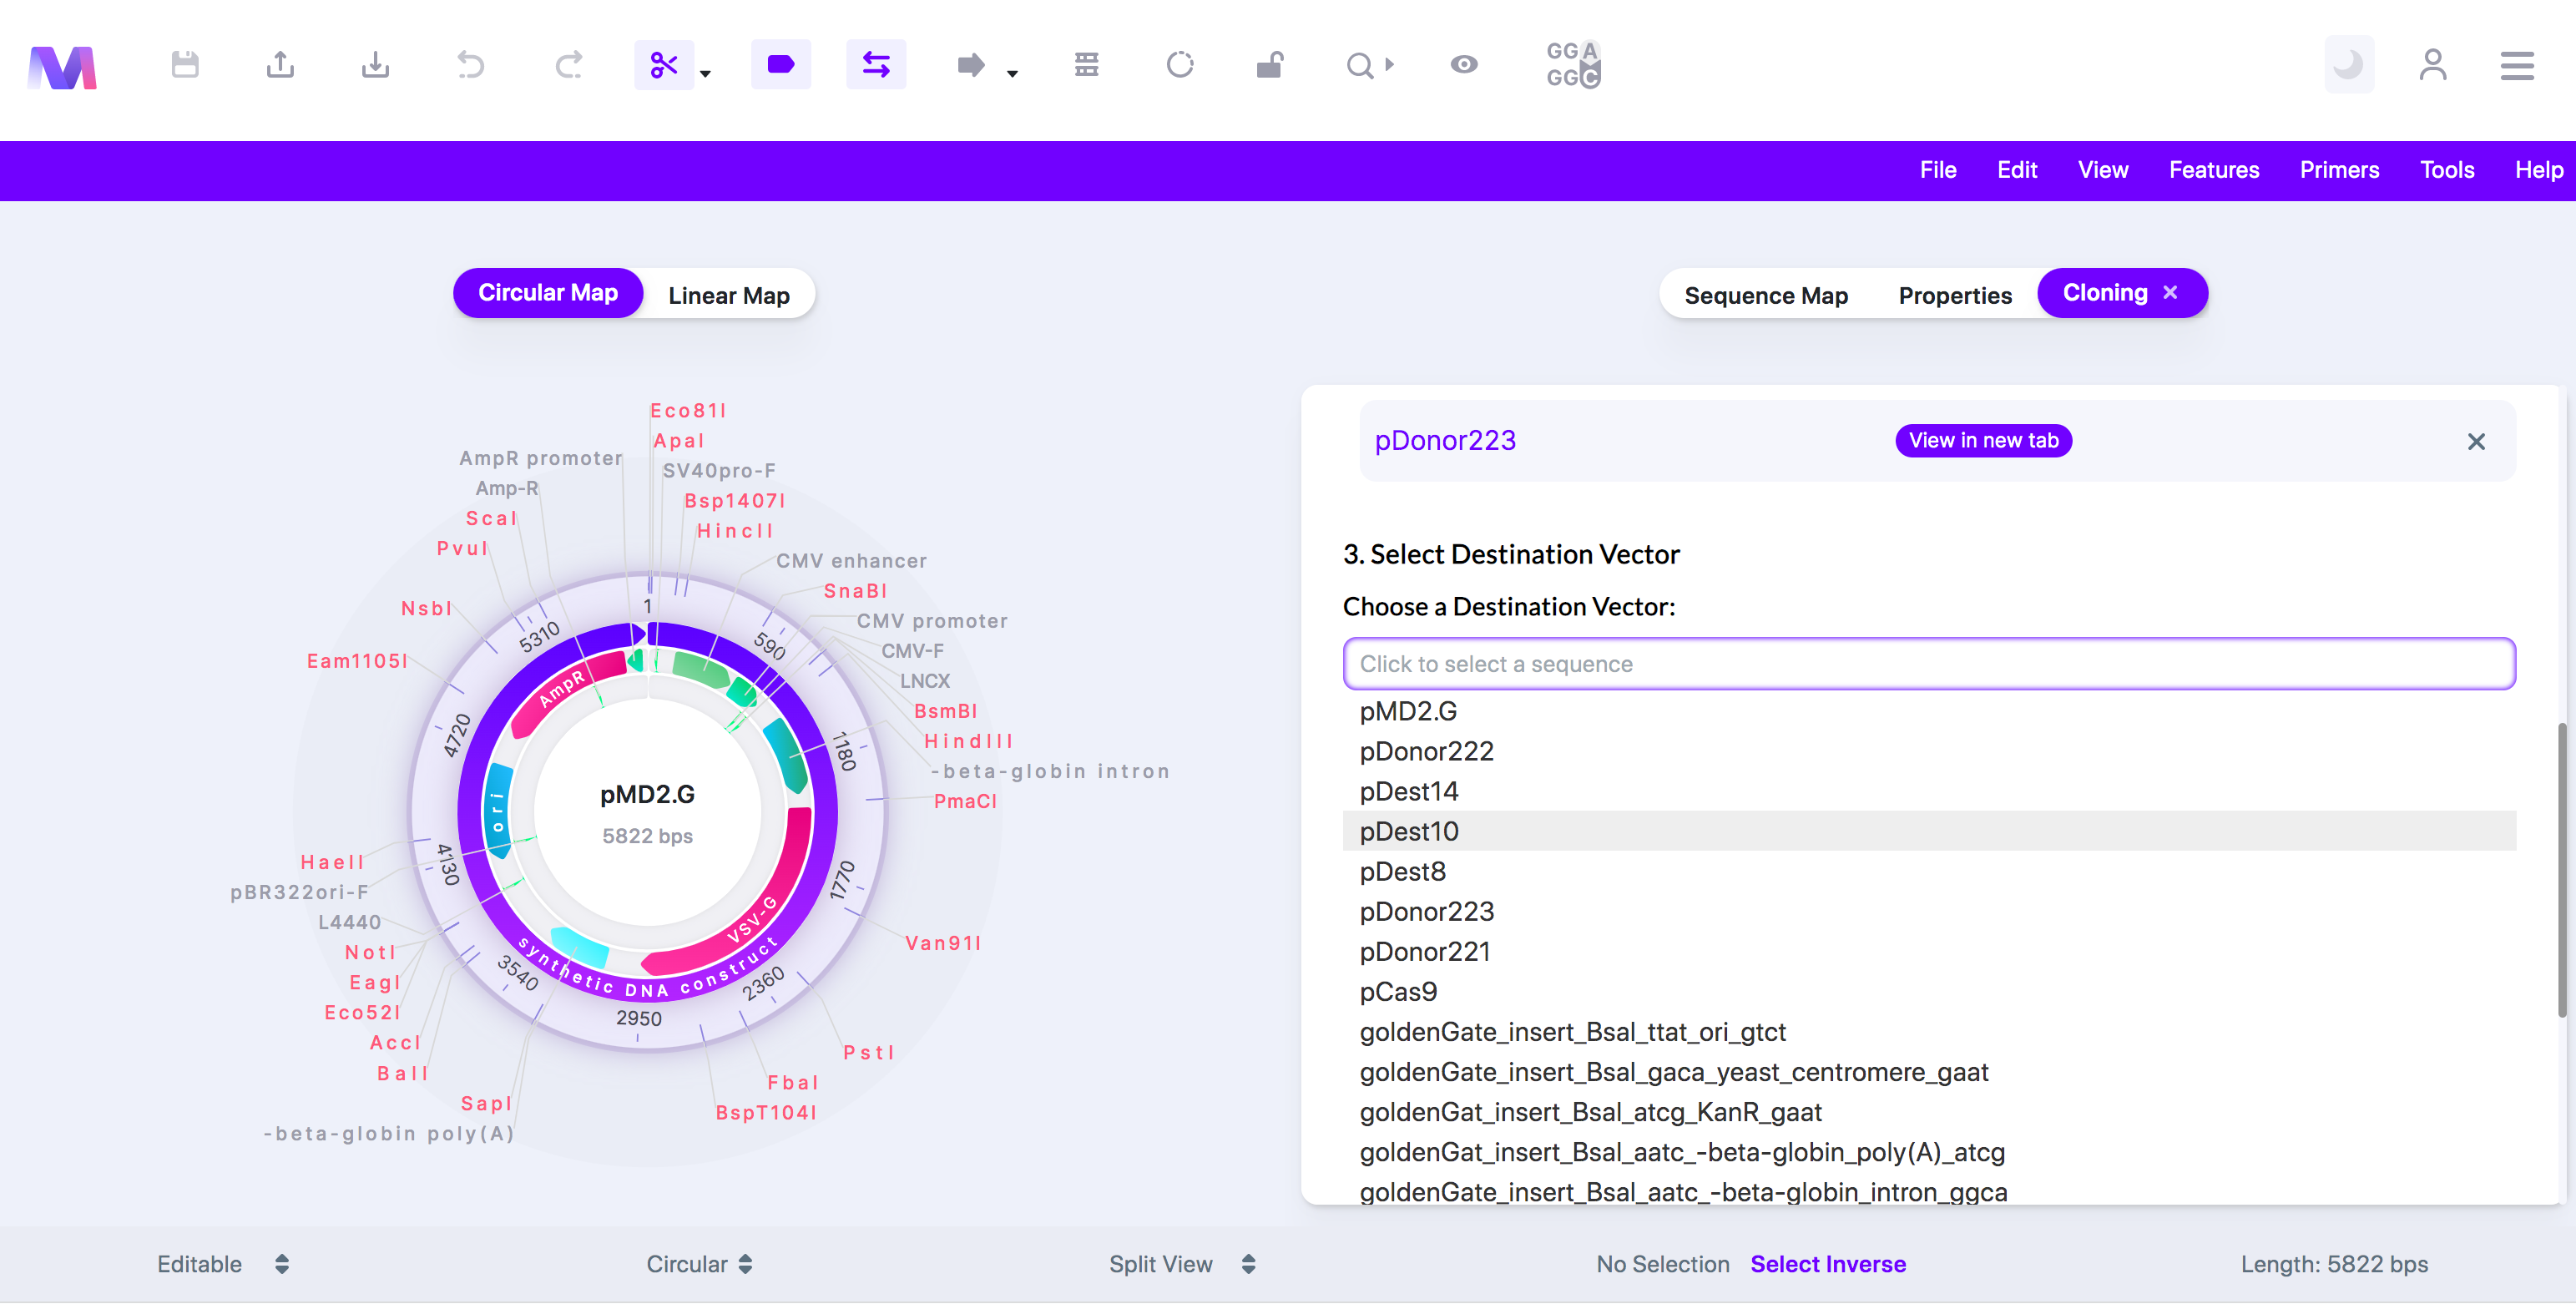
d. The destination vector must already contain the 'attR' sites.
e. Only one destination vector can be chosen.
8. Check the correct destination vector has been added under 'Destination Vector.'
a. Click the 'X' by the sequence under 'Destination Vector' to remove the destination vector from the list so you can add a different destination vector.
b. Destination vector listed under Destination Vector'.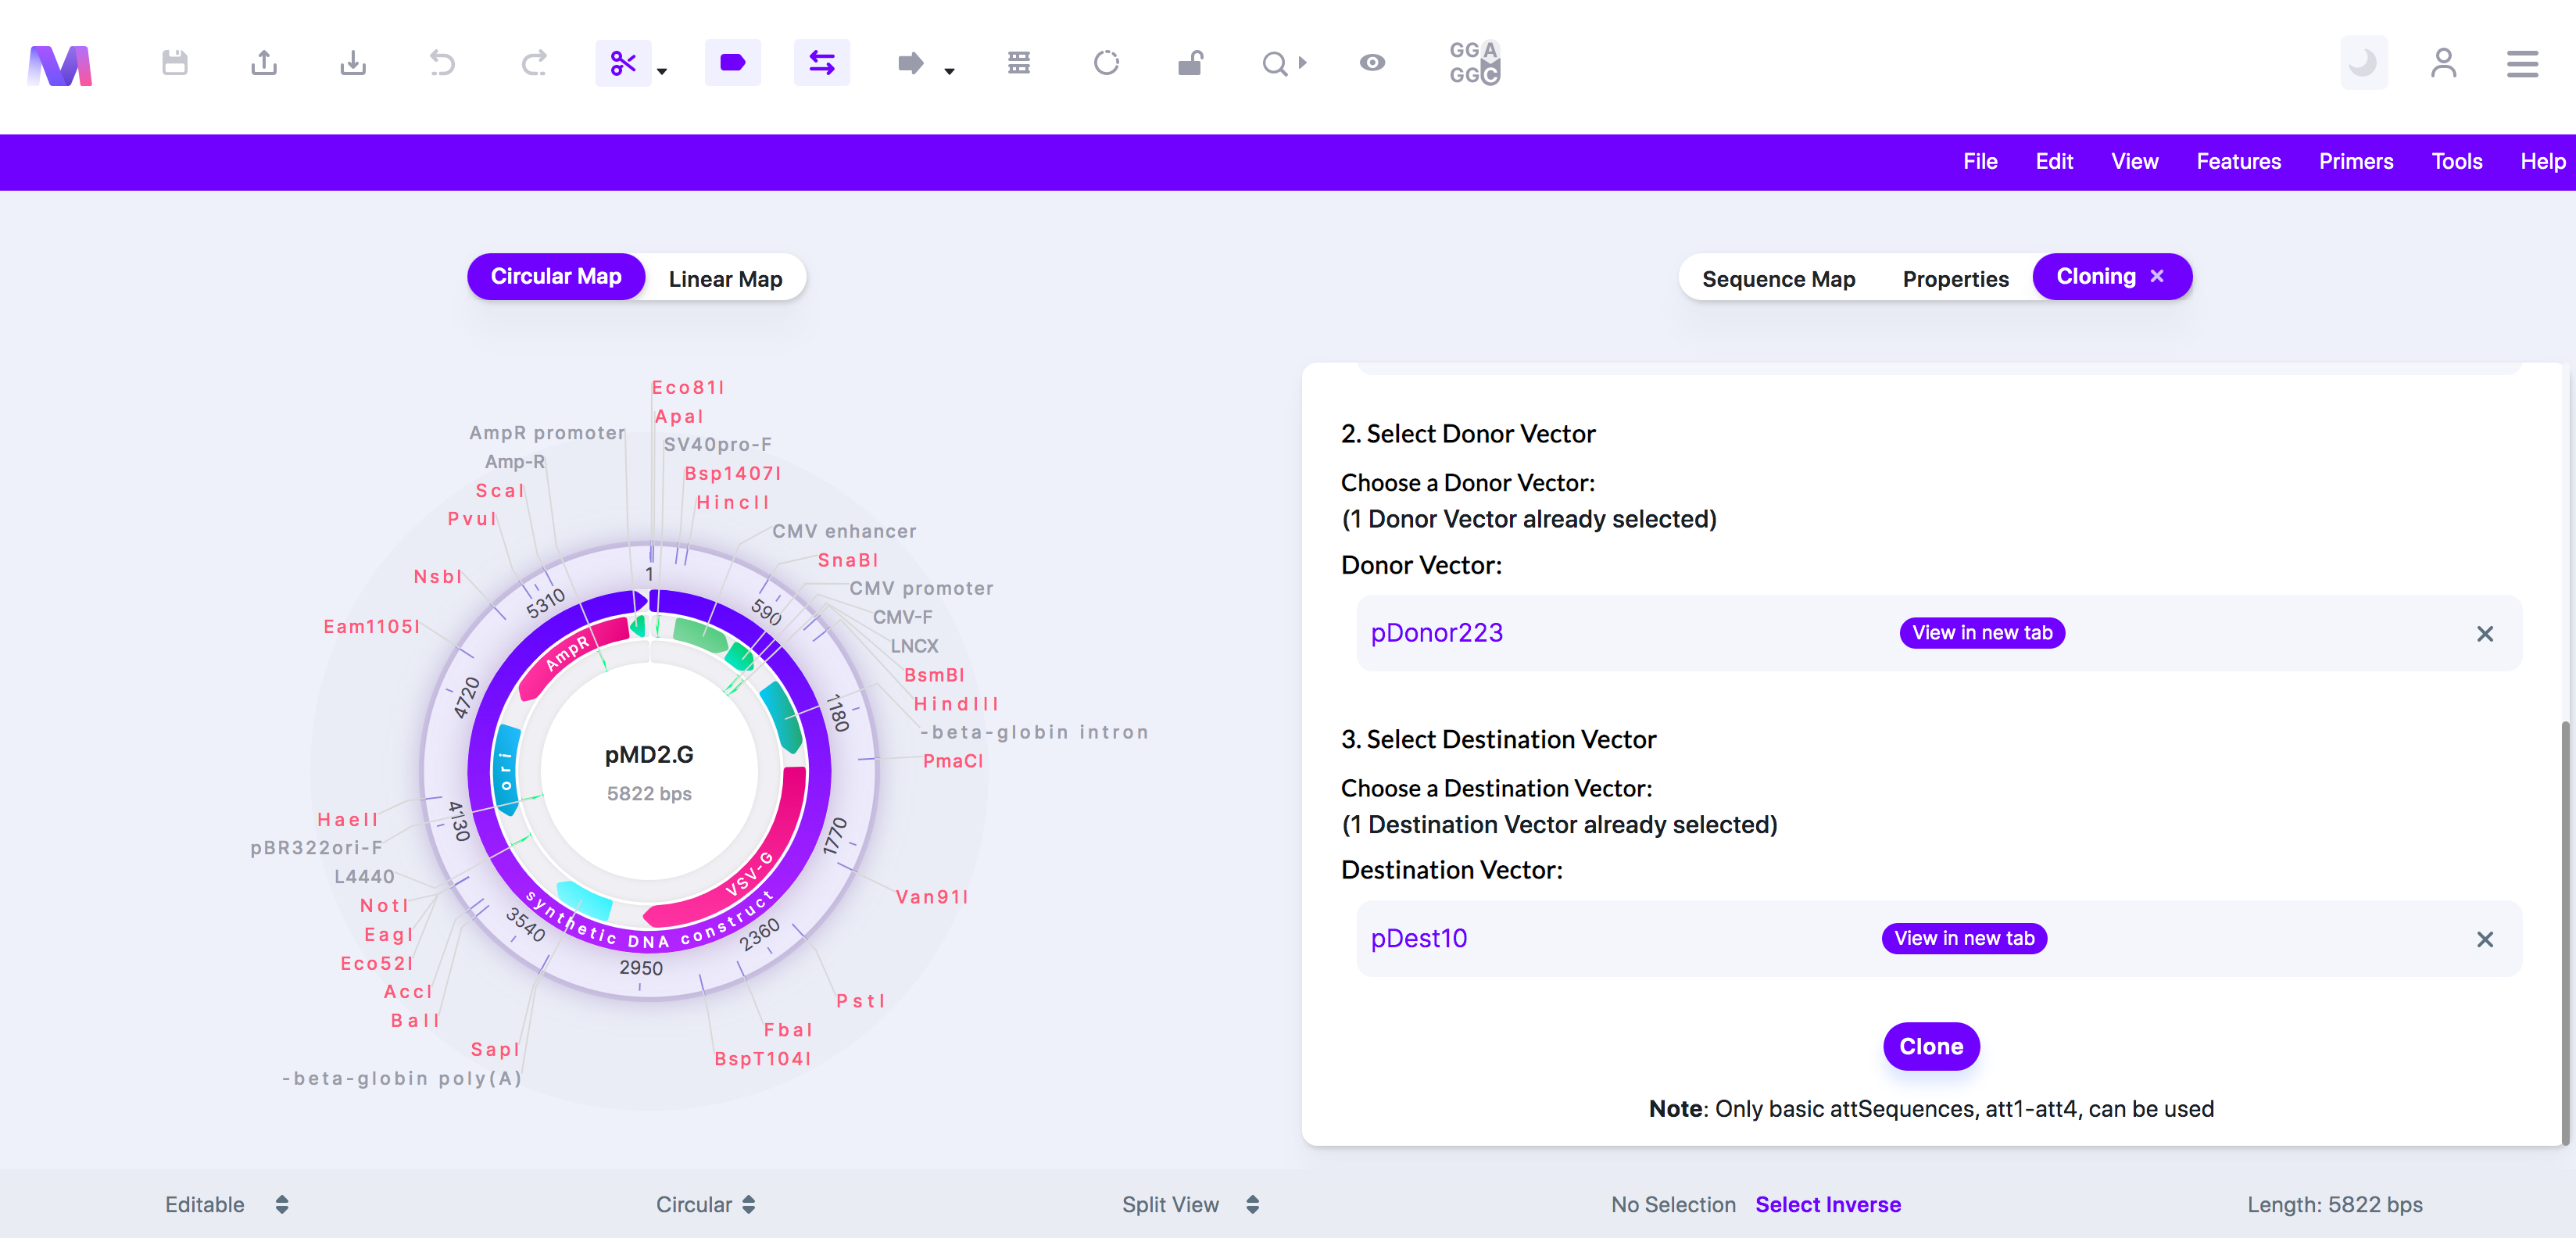
9. Click the 'Clone' button to perform a Gateway Cloning simulation.
a. You will not be able to click 'Clone' if any errors exist.
b. An error highlighted above the cloning button preventing cloning.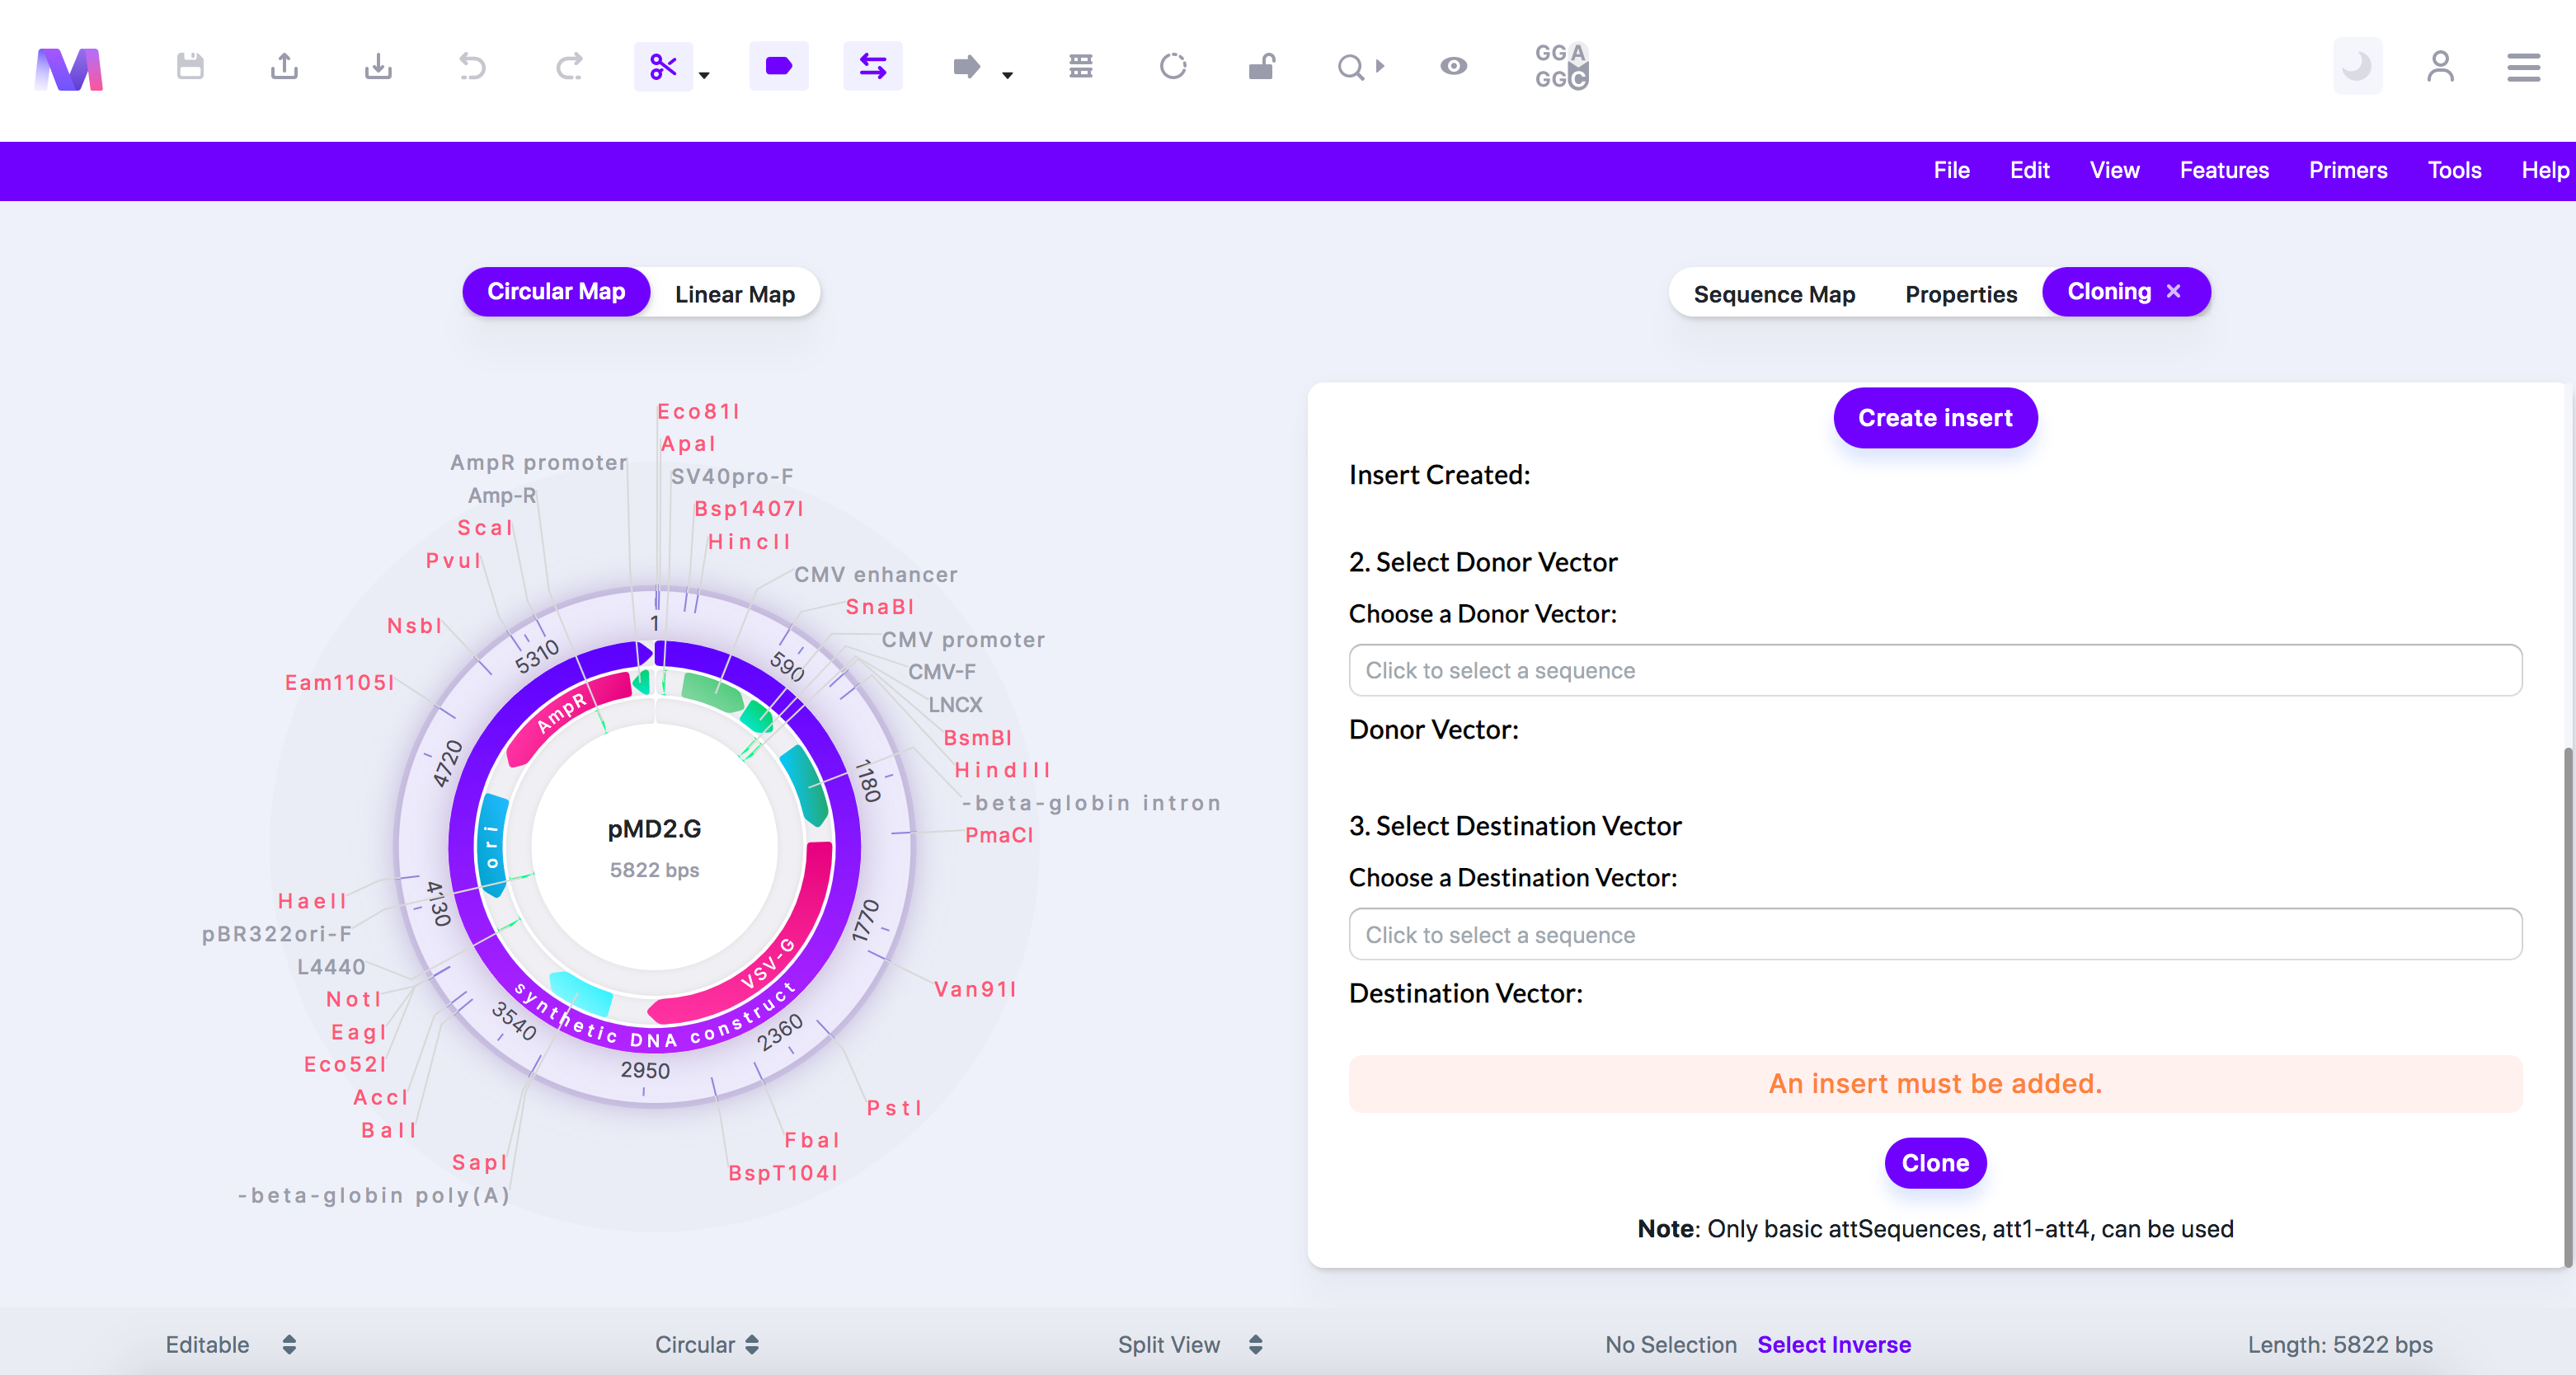
c. Errors and their description.
i. An insert must be added.
ii. Too many inserts have been added. Only one insert is allowed.
iii. A Donor Vector must be added.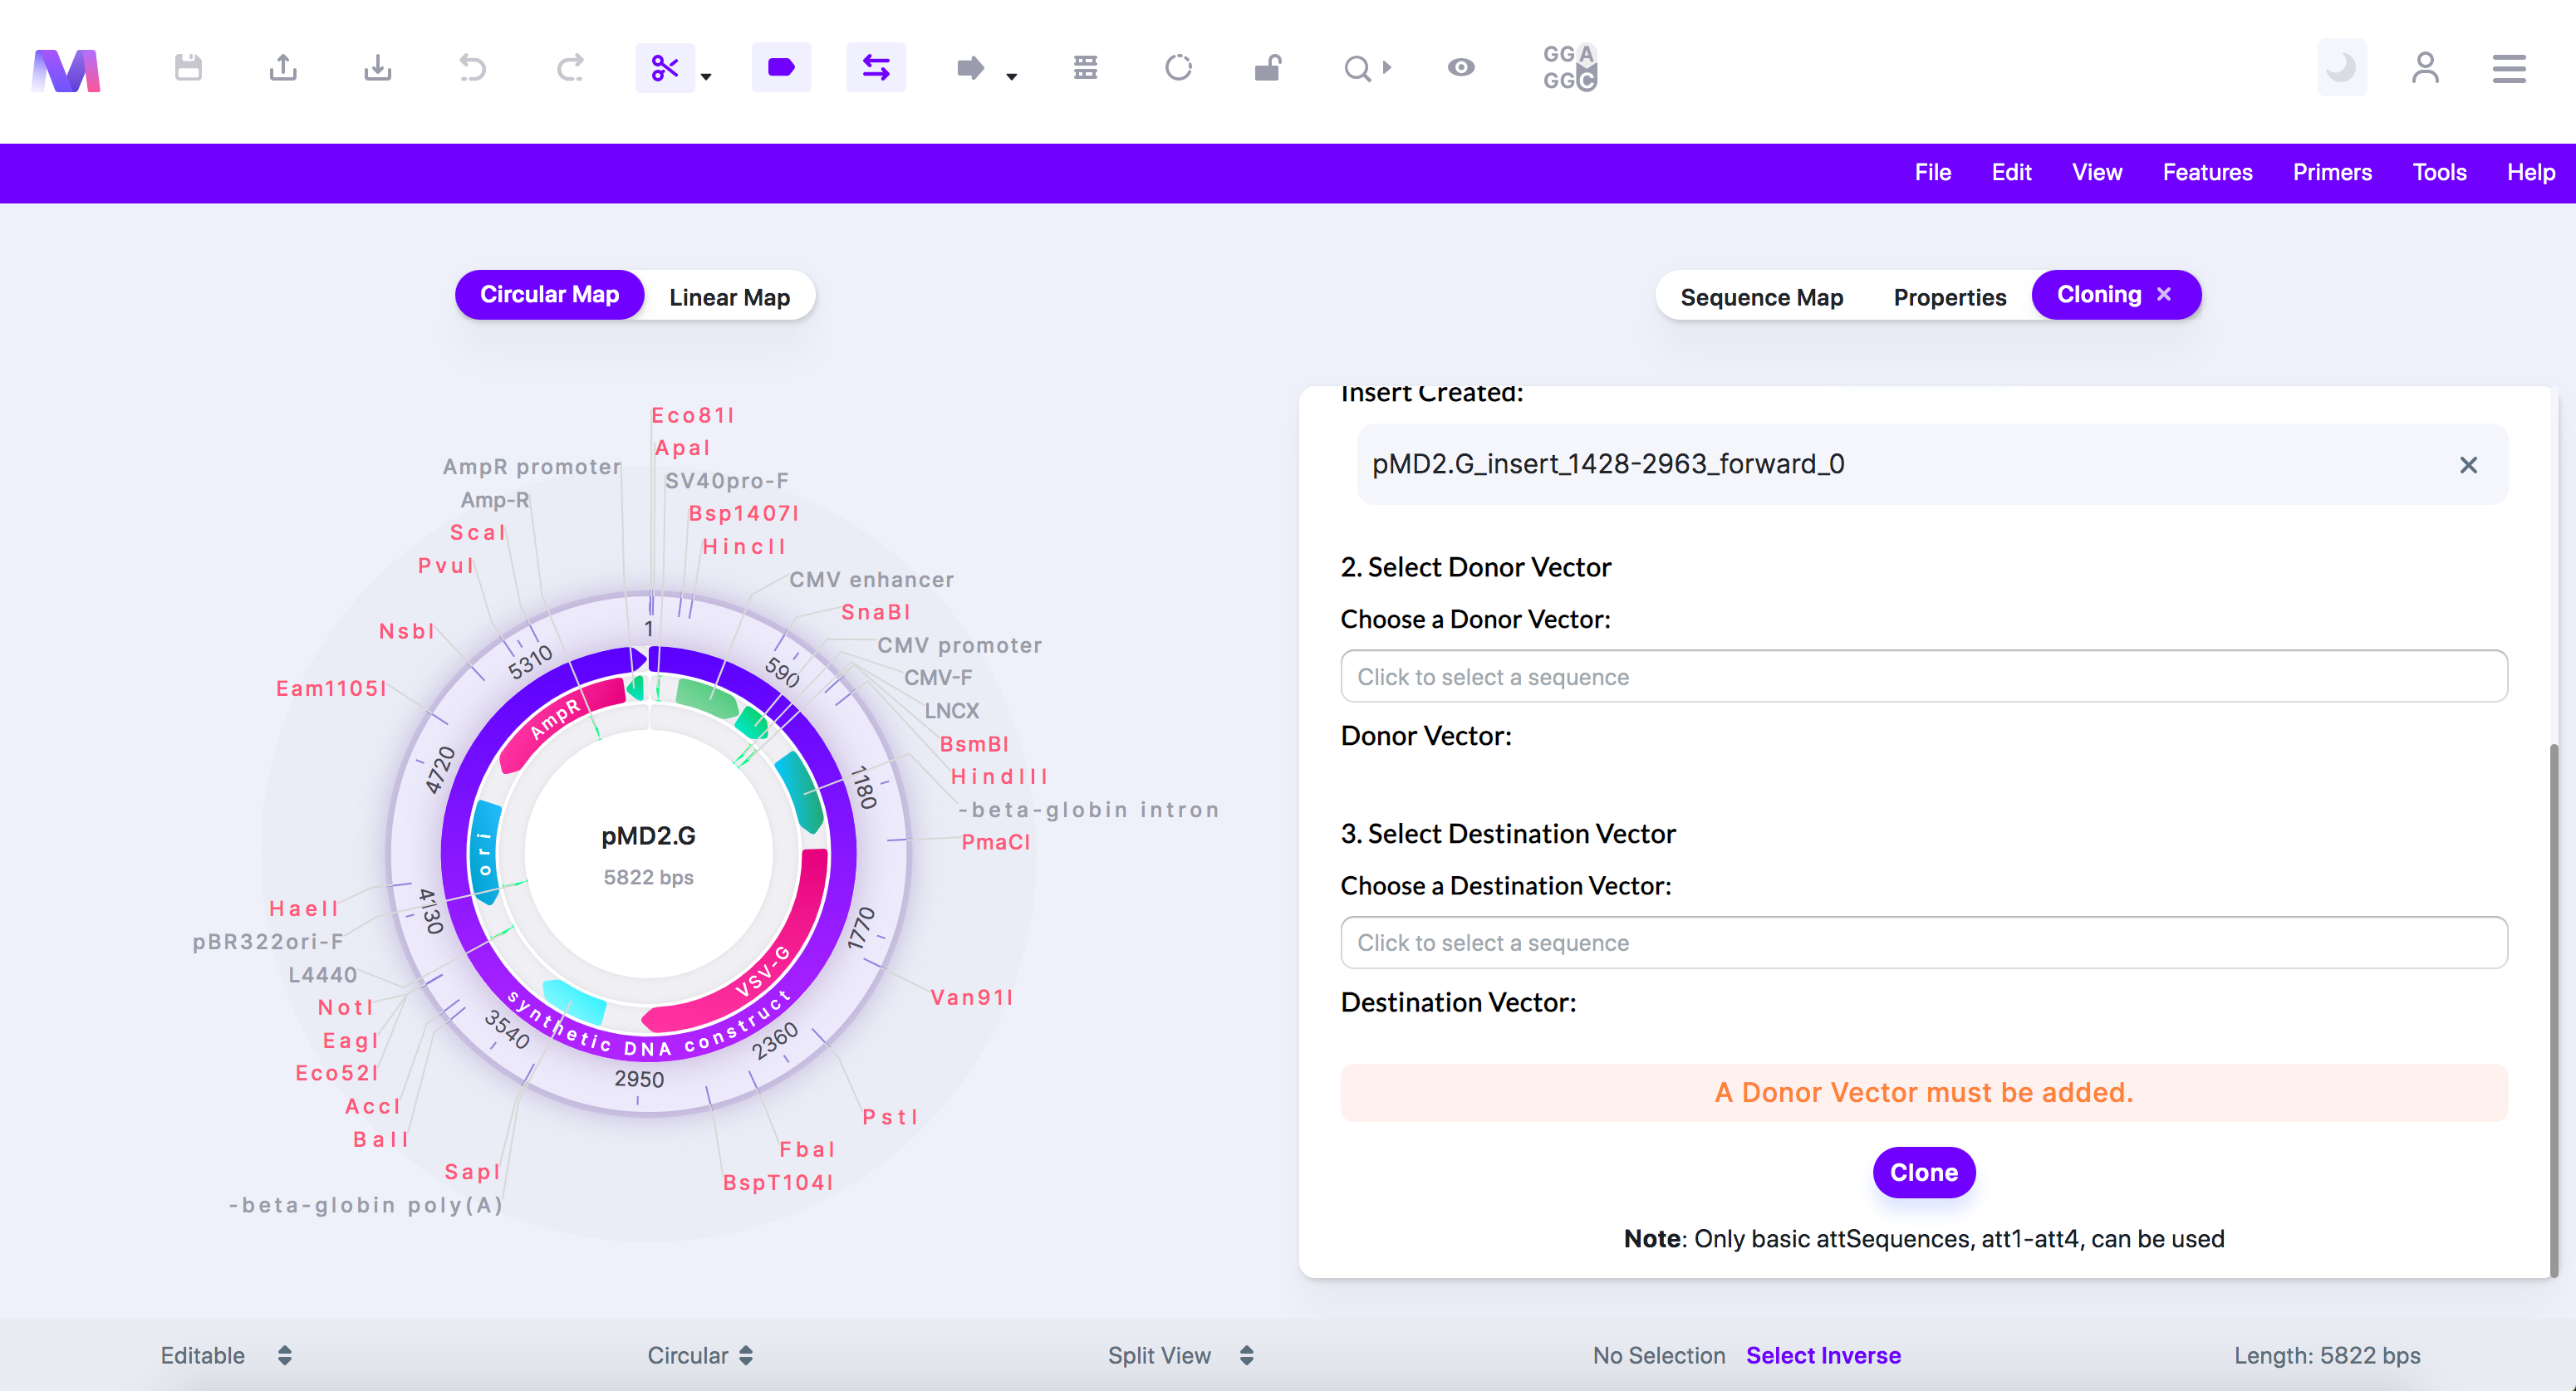
iv. Too many Donor Vectors have been added. Only one is allowed.
v. A Destination Vector must be added.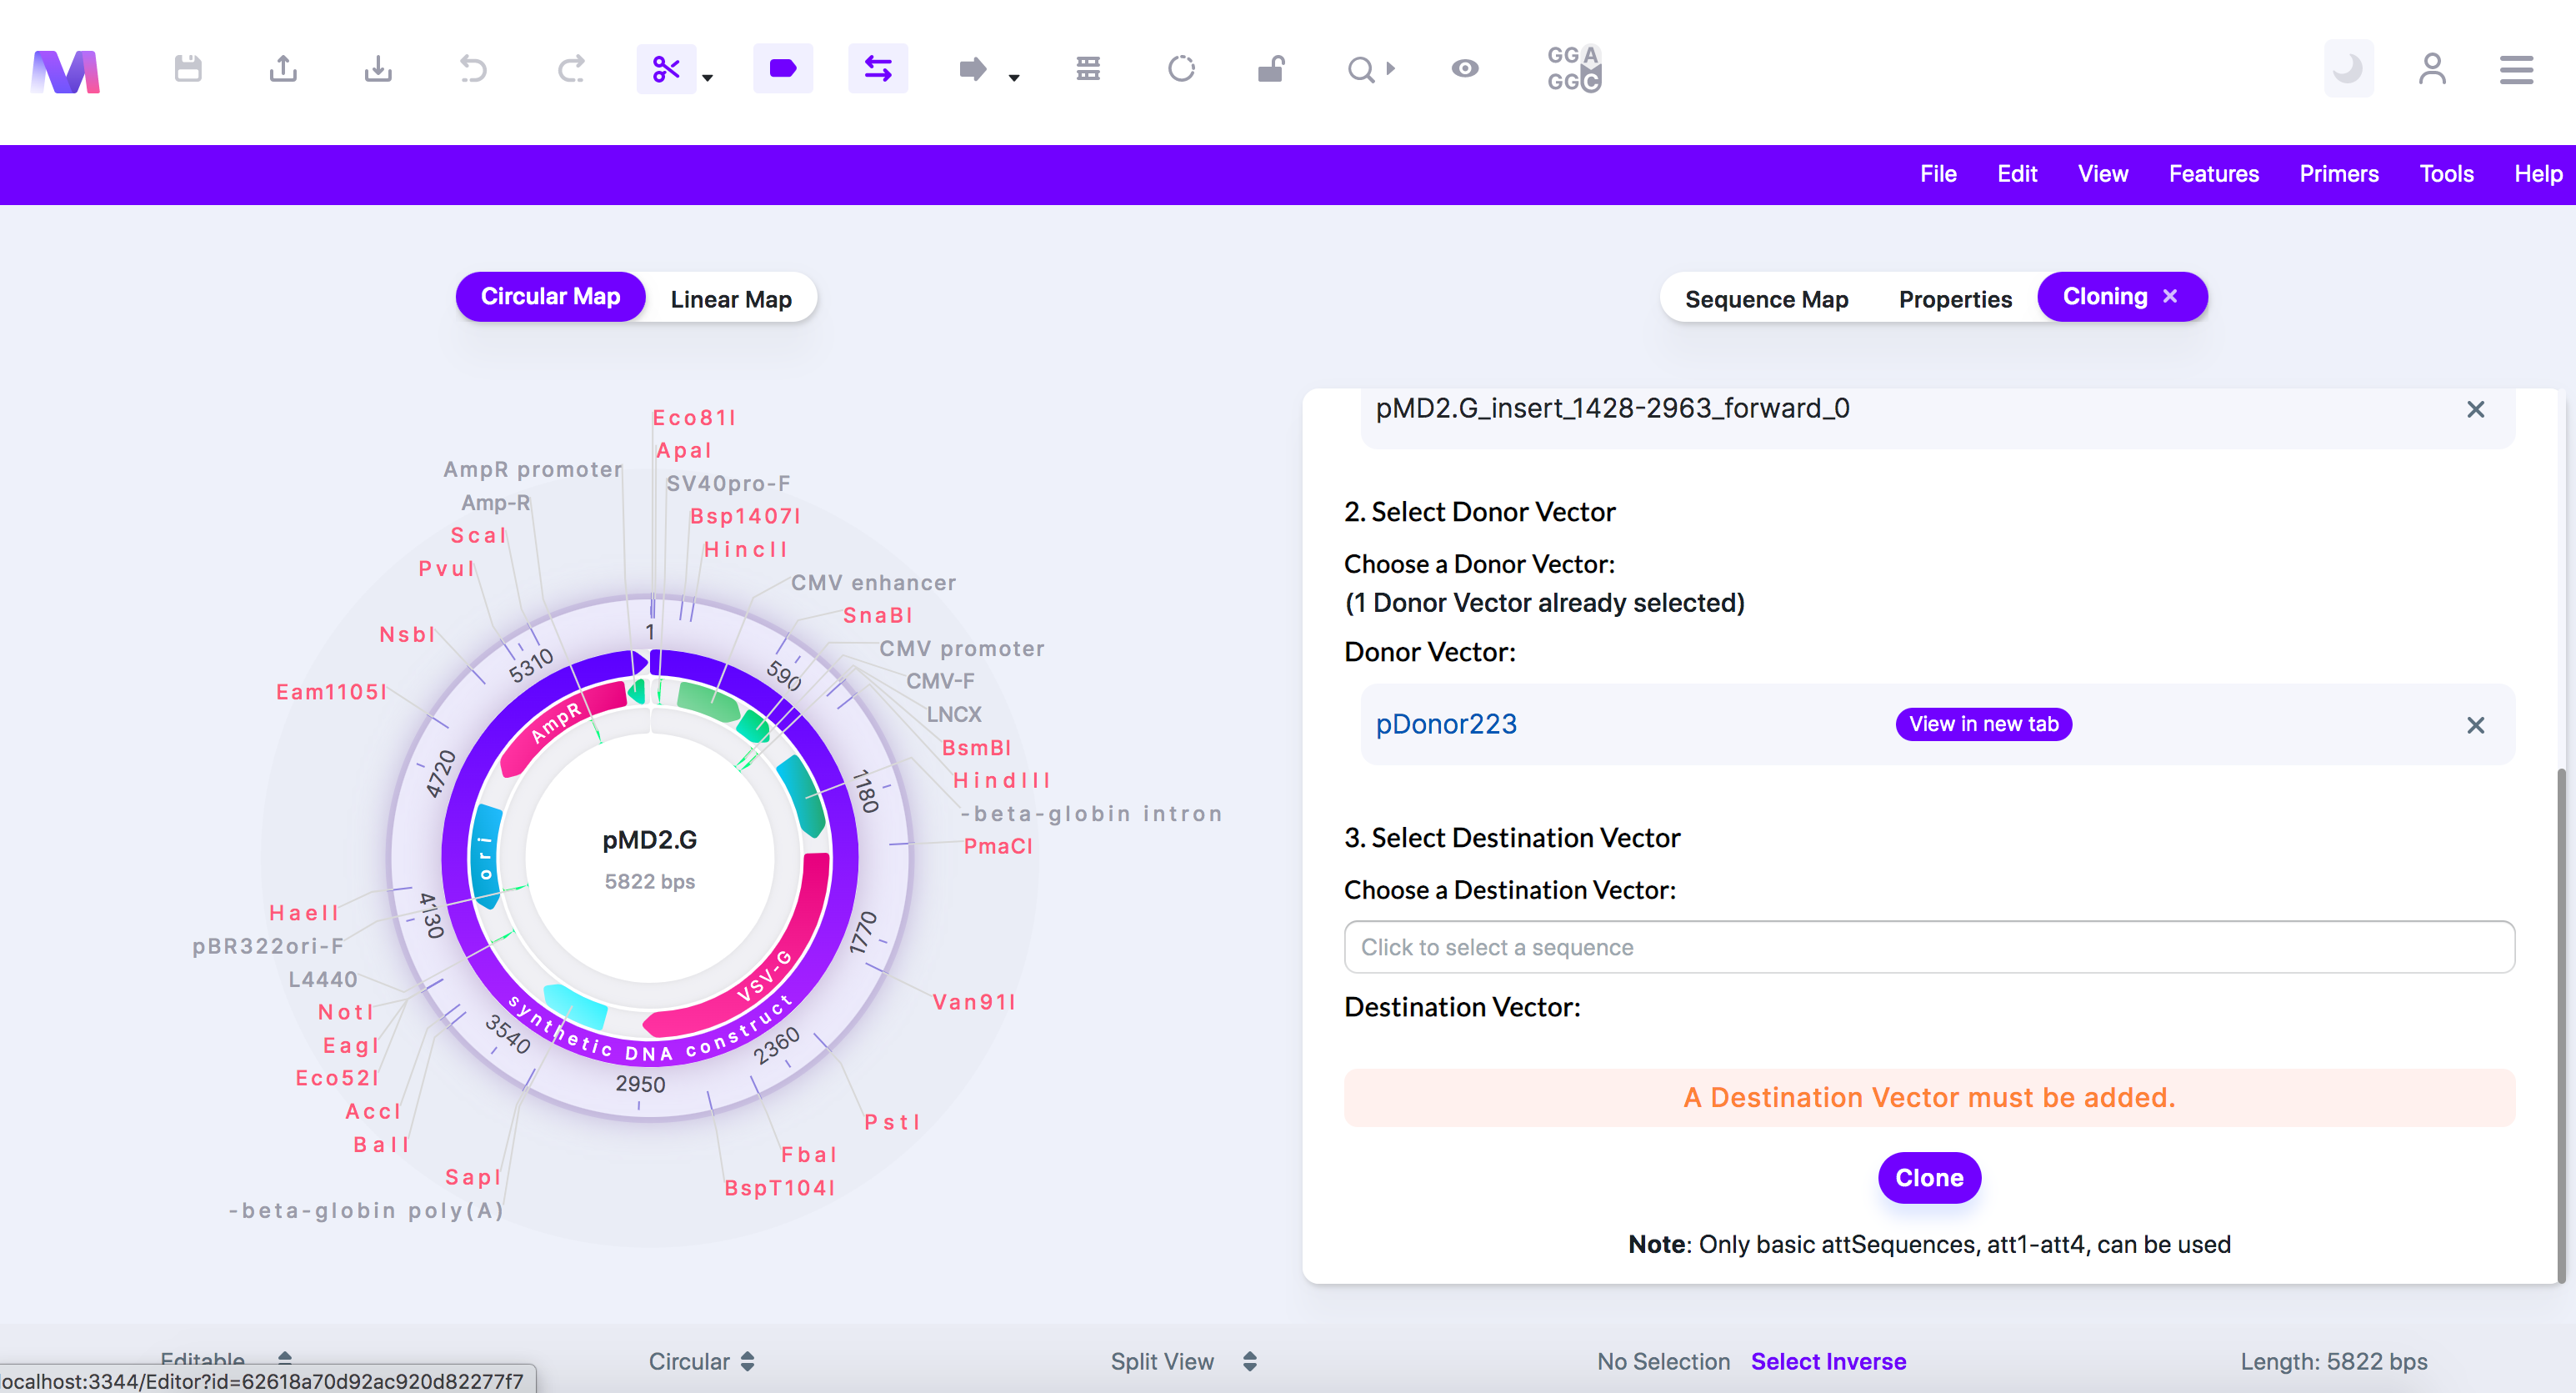
vi. Too many Destination Vectors have been added. Only one is allowed.
vii. The number of Inserts and Donor Vectors are not equal.
1. In Gateway cloning, the number of inserts and donor vectors must be equal. Currently, Mendelgen only supports having one insert and one donor vector, but in the future will support adding four inserts and four donor vectors. Each insert is associated with a specified donor vector to produce an Entry Clone, so the number of inserts and donor vectors must be equal. One donor vector cannot be associated with more than one insert and vice versa.
viii. The Donor Vector '(Donor Vector name provided)' does not contain two 'attP' sites and cannot be used as a Donor Vector.
1. All Donor Vectors must contain two attP sites.
ix. The Destination Vector '(Destination Vector name provided)' does not contain two 'attR' sites.
1. All Destination Vectors must contain two attR sites.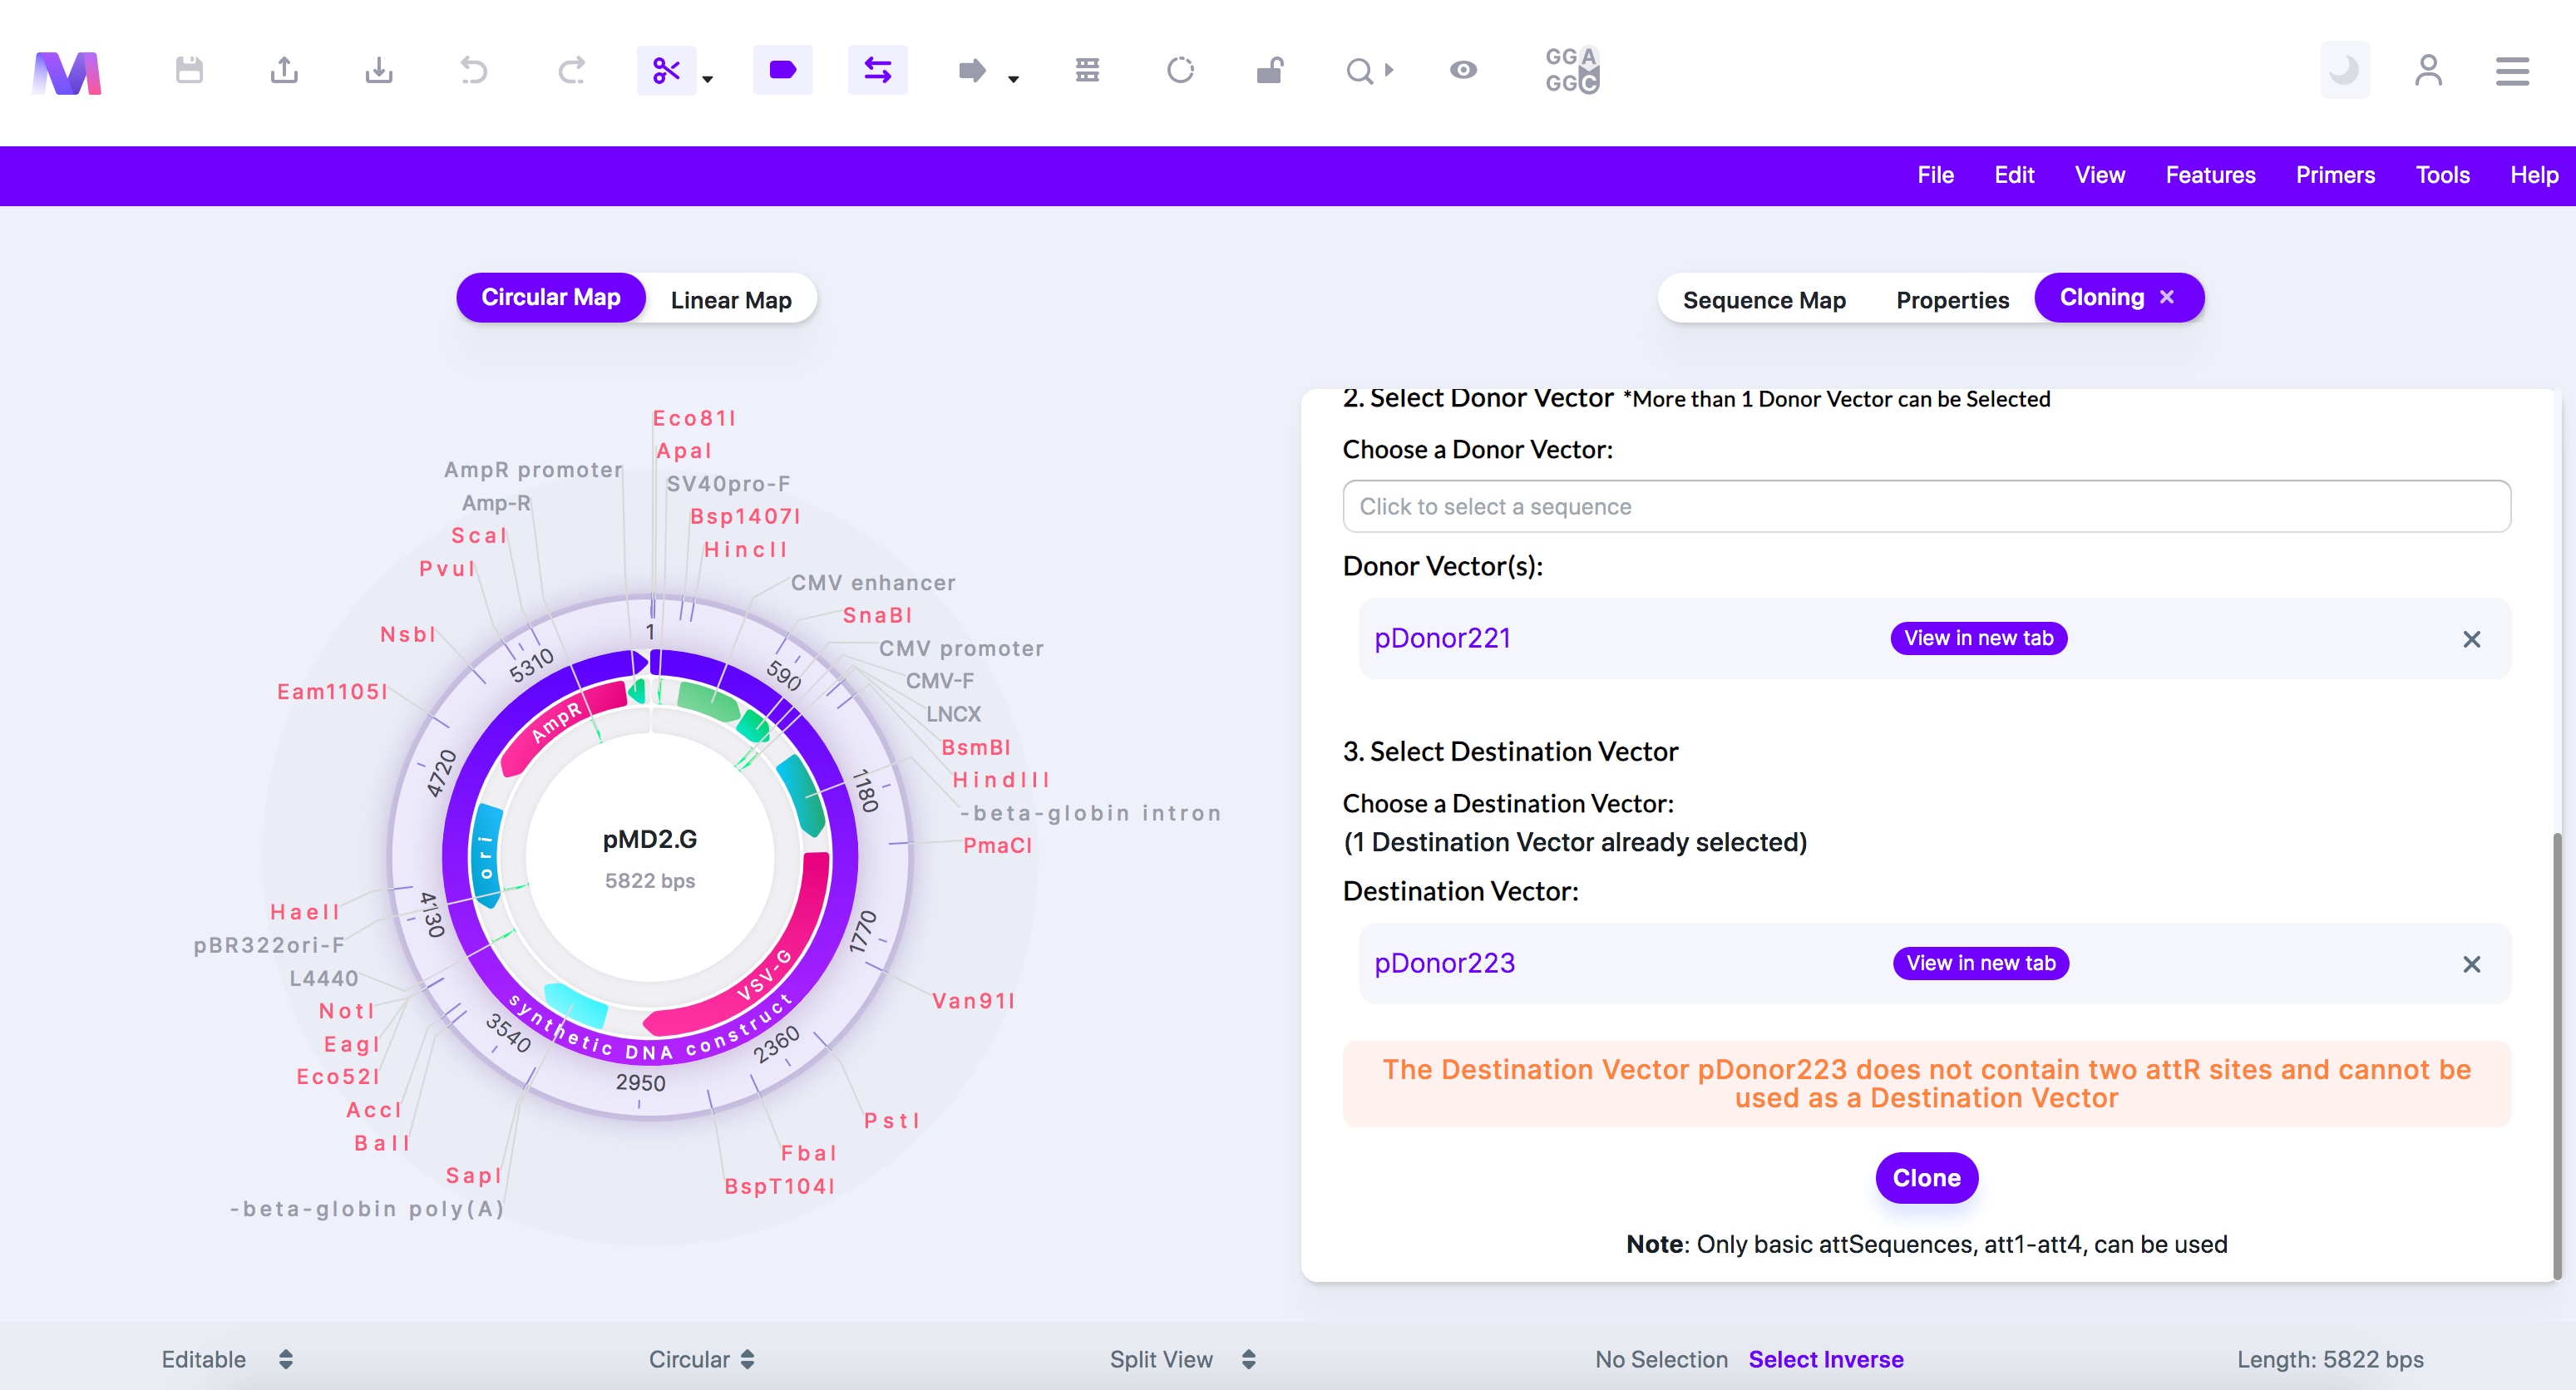
x. The '(att feature name provided)' feature in the Donor Vector '(Donor vector name provided)' does not contain the shared DNA sequence all '(att feature name provided)' sequences must contain.
1. There are many types of att features, including attB, attP, attL, and attR. Within each of these types, there are other types, such as attB1 and attB2, or attP1 and attP2. When comparing attB1, attP1, attL1, and attR1, they all share the same sequence in one region. This error tells you that the Donor Vector you chose does not contain this shared sequence.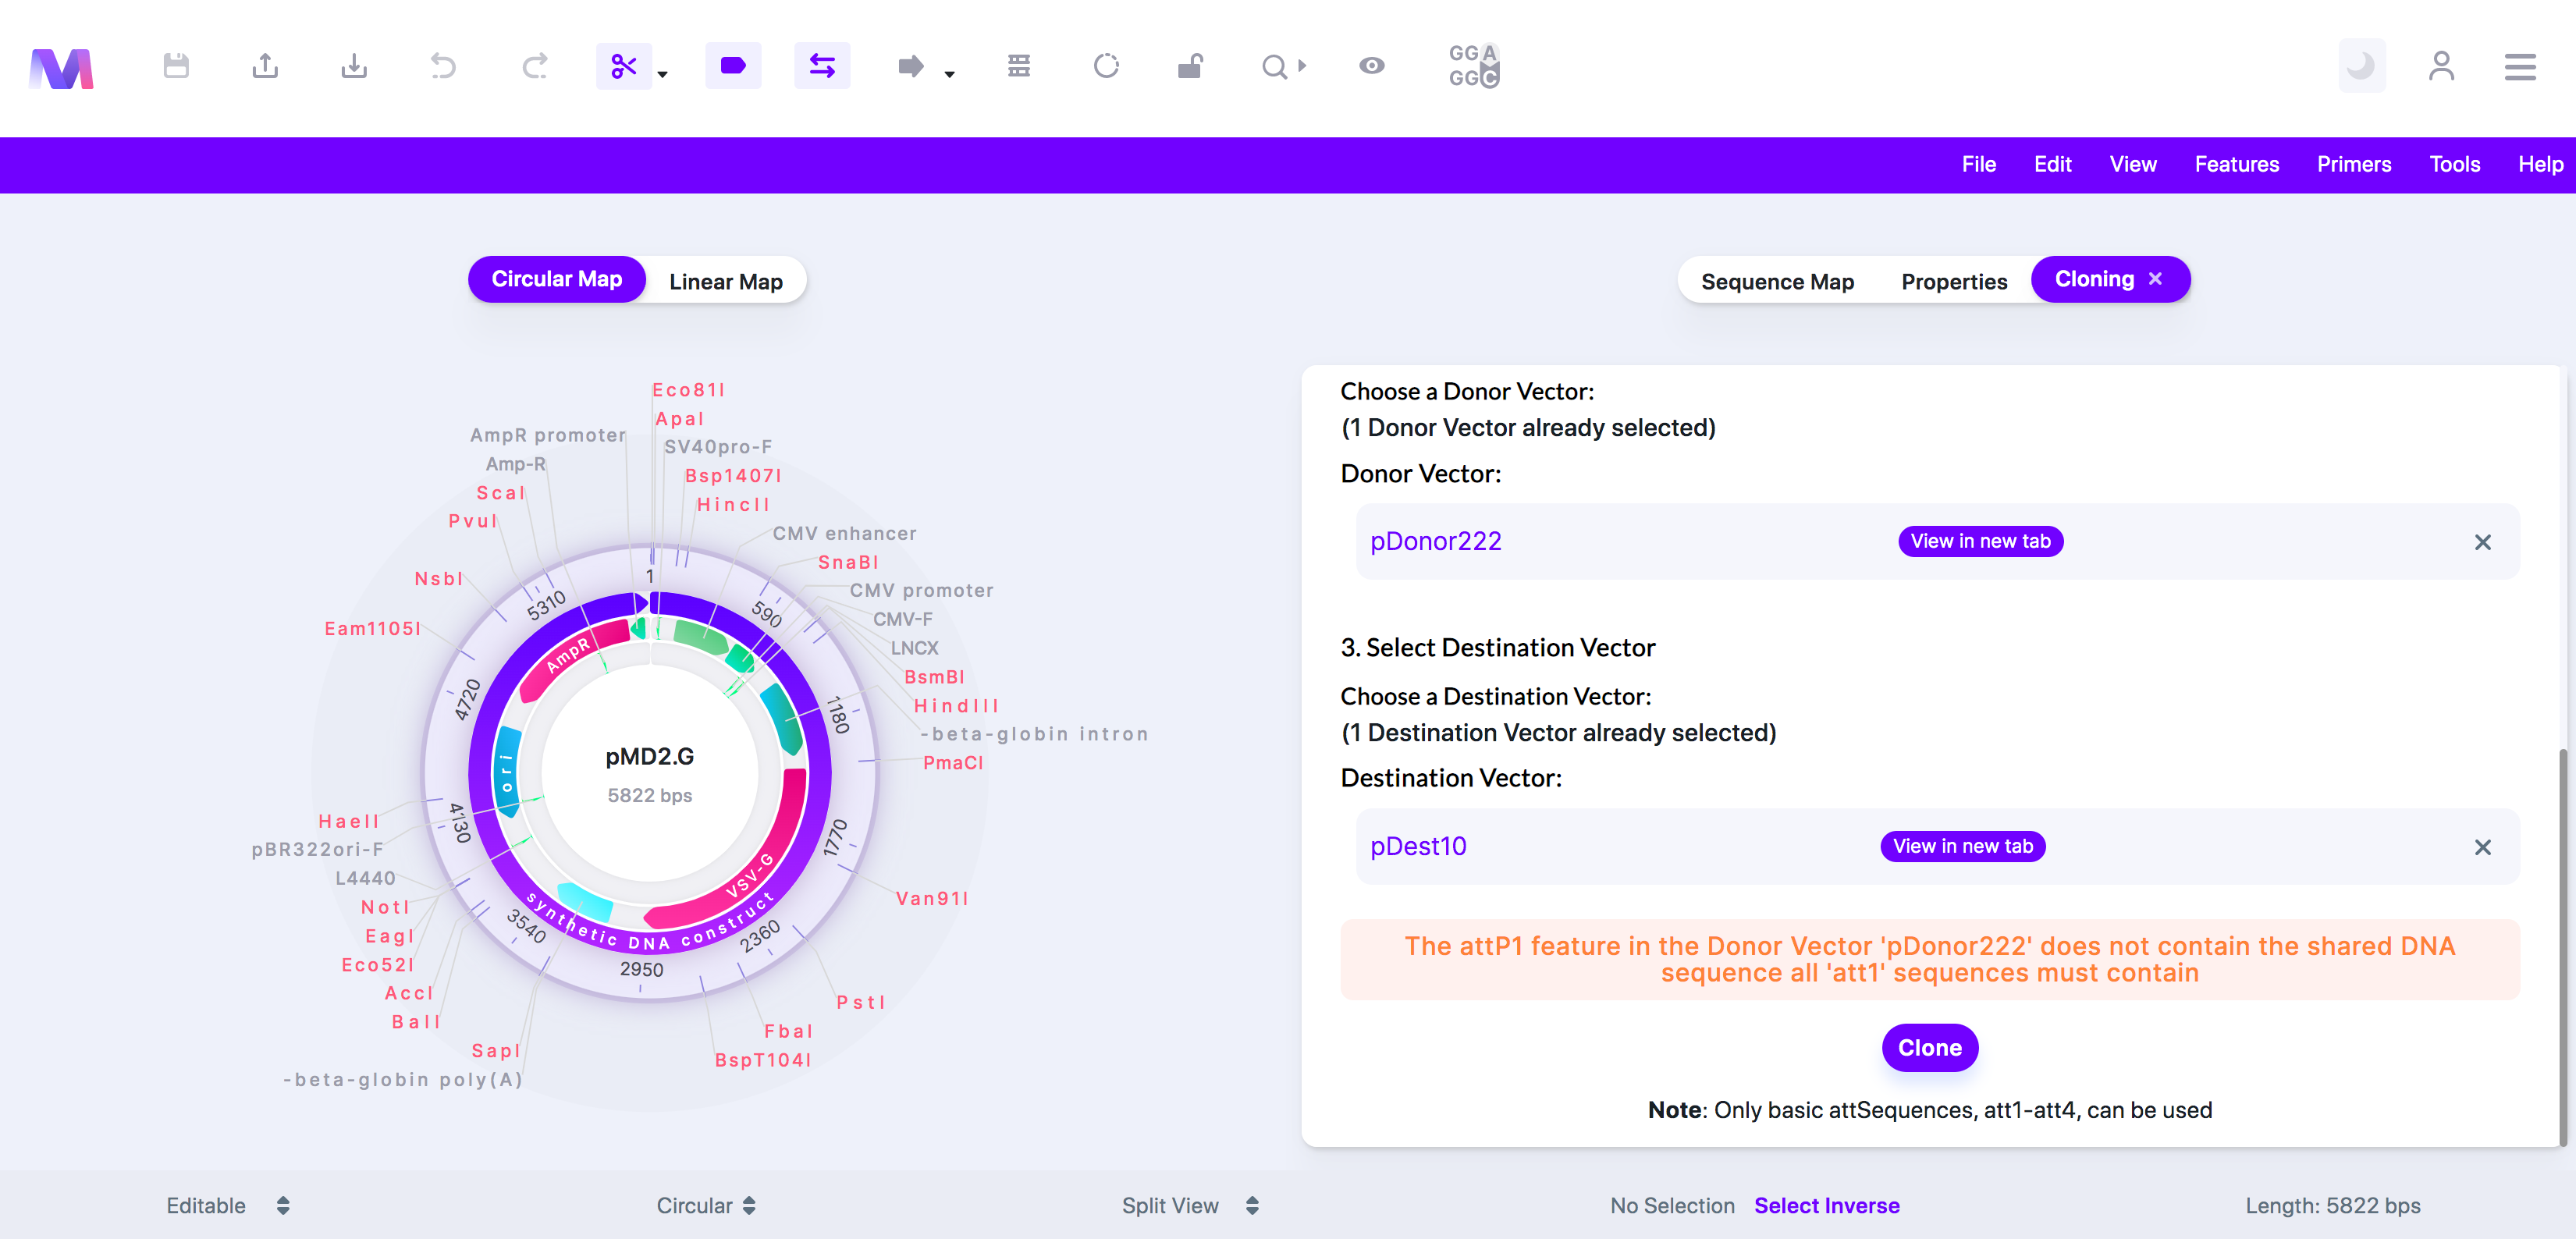
xi. The '(att feature name provided)' feature in the Destination Vector '(Destination vector name provided)' does not contain the shared DNA sequence all '(att feature name provided)' sequences must have.
1. There are many types of att features, including attB, attP, attL, and attR. Within each of these types, there are other types such as attB1 and attB2, or attP1 and attP2. When comparing attB1, attP1, attL1, and attR1, they all share the same sequence in one region. This error tells you that the Destination Vector you chose does not contain this shared sequence.
xii. The Donor Vector '(Donor vector name provided)' '(Donor vector att feature name provided)' will not be able to form an attL sequence to match the Destination Vector '(Destination vector att feature name provided)' sequence.
1. In the Gateway LR reaction, an attL site goes through recombination with an attR site. For recombination to occur, the attL and attR sites must correspond correctly. For example, an attL1 corresponds to an attR1 but not an attR2. In the BP reaction, which occurs before the LR reaction, the Donor vector's attP site is converted to an attL site. For example, an attP1 becomes an attL1, not an attL2. Therefore if you have a Donor Vector with an attP2, the BP reaction will make an Entry clone with an attL2 site, which cannot correspond and go through recombination with a Destination Vector with an attR1 site. The problem presented in this scenario is an example of why you have received the error above.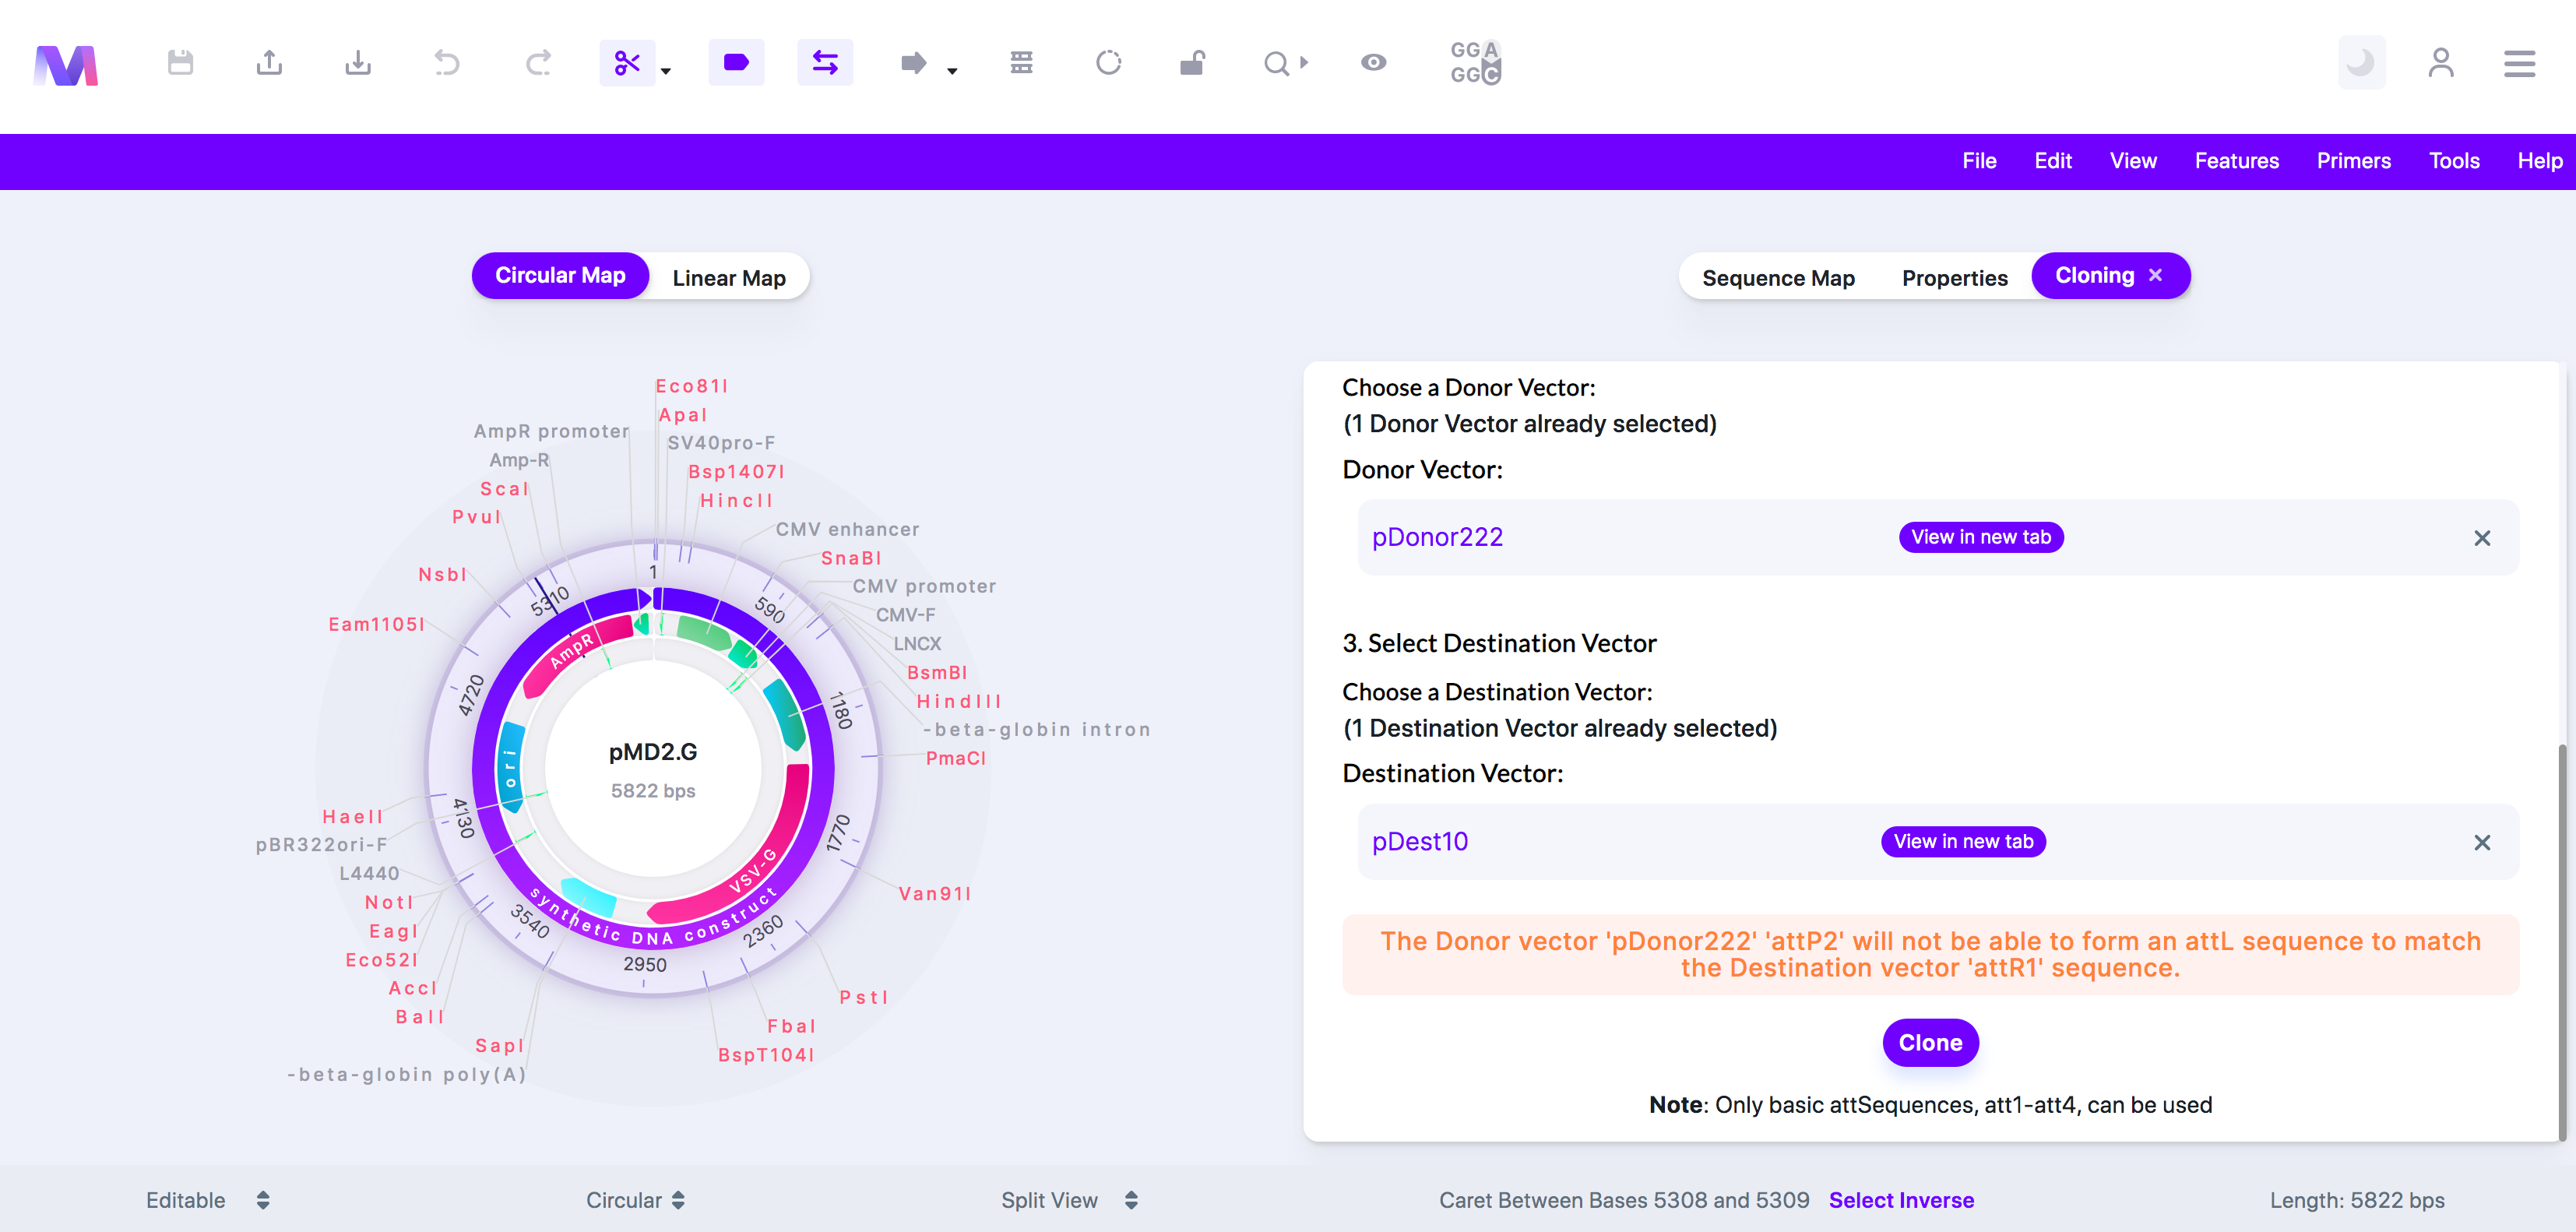
10. The final resulting Expression Clone will be displayed in the viewer.
a. Mendelgen has simulated the following
i. A PCR reaction to add the correct 'attB' sites surrounding the gene/region of interest.
ii. The BP reaction - Recombination between the 'attB' sites on the PCR fragment and the 'attP' sites on the Donor Vector to create the entry clone with 'attL' sites.
iii. The LR reaction - Recombination between the 'attL' sites on the entry clone and the 'attR' sites on the destination vector to create the expression clone's final vector.
b. Finished cloning simulation.